# Admin Portal
# Overview
The ABB Ability™ Platform Admin Portal is a web application that enables three different administrator personas to perform various operations on security configuration for selected Ability Platform Multitenant environments. The user interface is dynamically adjusted to any logged user permissions and presents a user-friendly visual form for all Principal Manager API functionality. The following user manual contains information about the application basics, user interface overview, and all required knowledge regarding available workflows. For more information on architectural concepts and related terminology, please reference the other articles in the Multitenancy section.
# Authentication
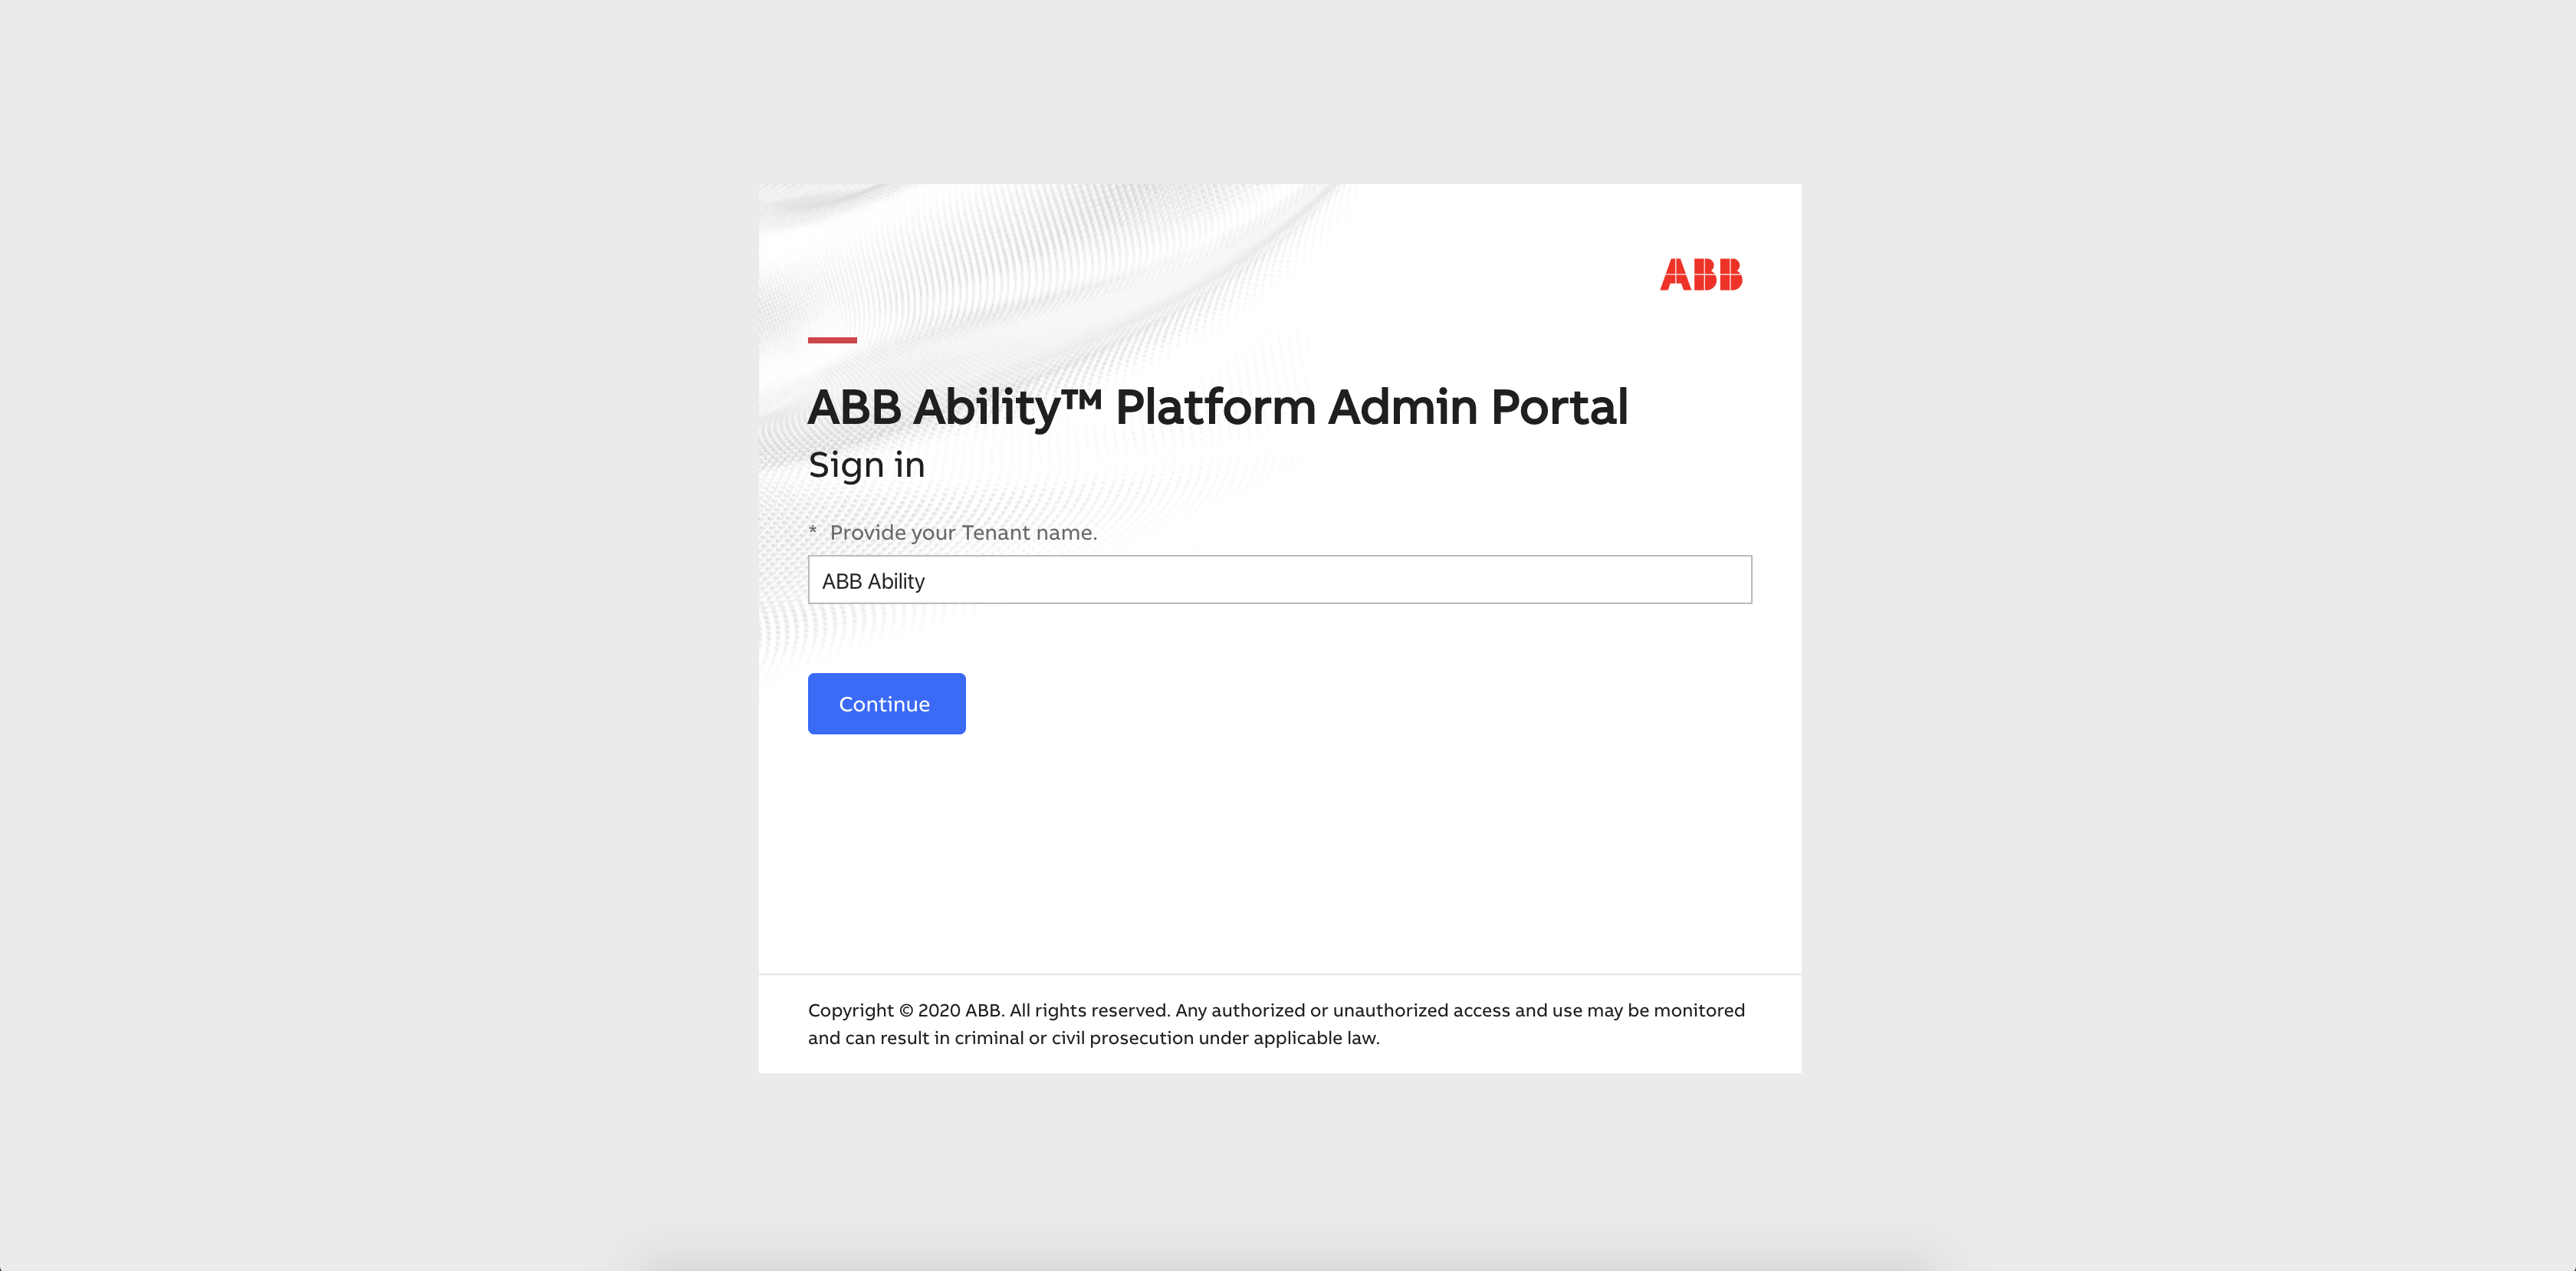
When you open the Admin Portal, the first thing you need to do is to authenticate with the supported identity provider using a Microsoft B2C component. The user is obligated to specify an organization name (or the tenant's name) to get this process started.
The tenant name used during the last login is remembered.
The renewal process of a user's token is automated. By default it is set to be refreshed every five minutes.
# GDPR Privacy Notice
Because of the General Data Protection Regulation made by the European Parliament and Council of the European Union (in effect as of 25 May 2018), every user of the application needs to accept a privacy notice that includes all necessary information about the personal data processing on the portal. User acceptance is required to proceed and start using the portal.
After successfully logging in and accepting the privacy notice, the application will gather data about user authorization and available permissions to present an adjusted and operative user interface.
# User Interface general overview
The application's user interface is built on CommonUX style guide principles which are standardized at the ABB company level. For more, see the CommonUX website.
The application is divided into three main sections:
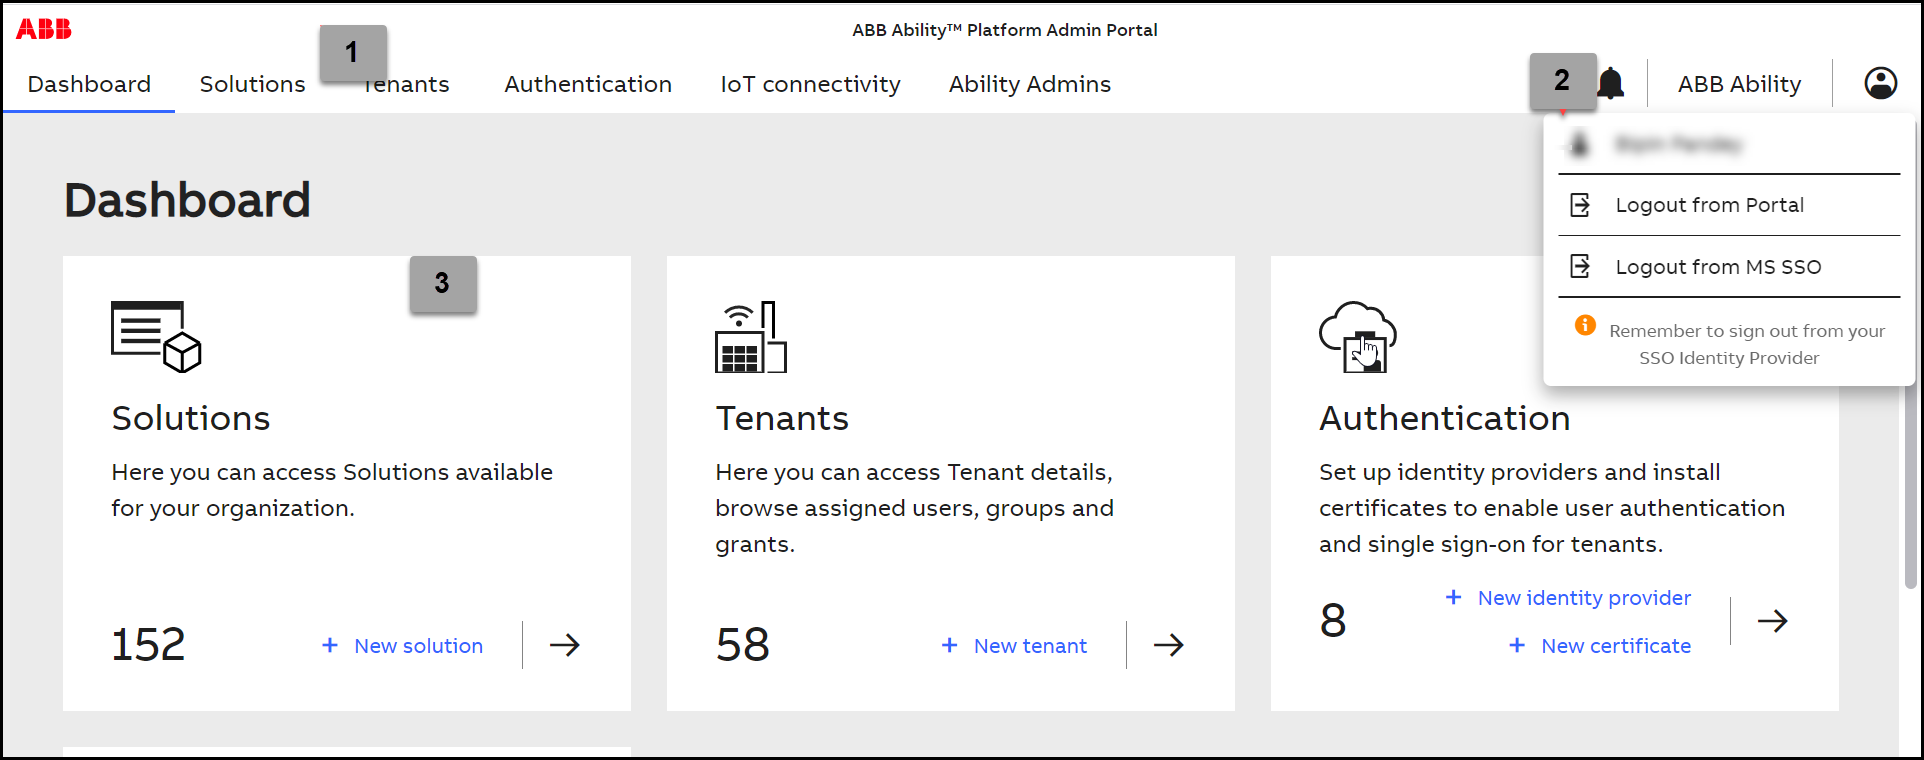
- Navigation tabs (1) allow switching between the Dashboard, Solutions, Tenants, Authentication, IoT Connectivity, Ability Admins, Administration.
- User section (2) provides access to notifications, details about the user profile, option to logout from the app or Microsoft account.
- Content area (3) presents the data related to the active tab.
TIP
A session expiration counter is displayed when time is less than 10 minutes. Click on refresh icon to extend the session and continue navigating the portal.
# Themes
The Admin Portal UI is available in two styles referenced by the CommonUX:
Dark mode
Light mode
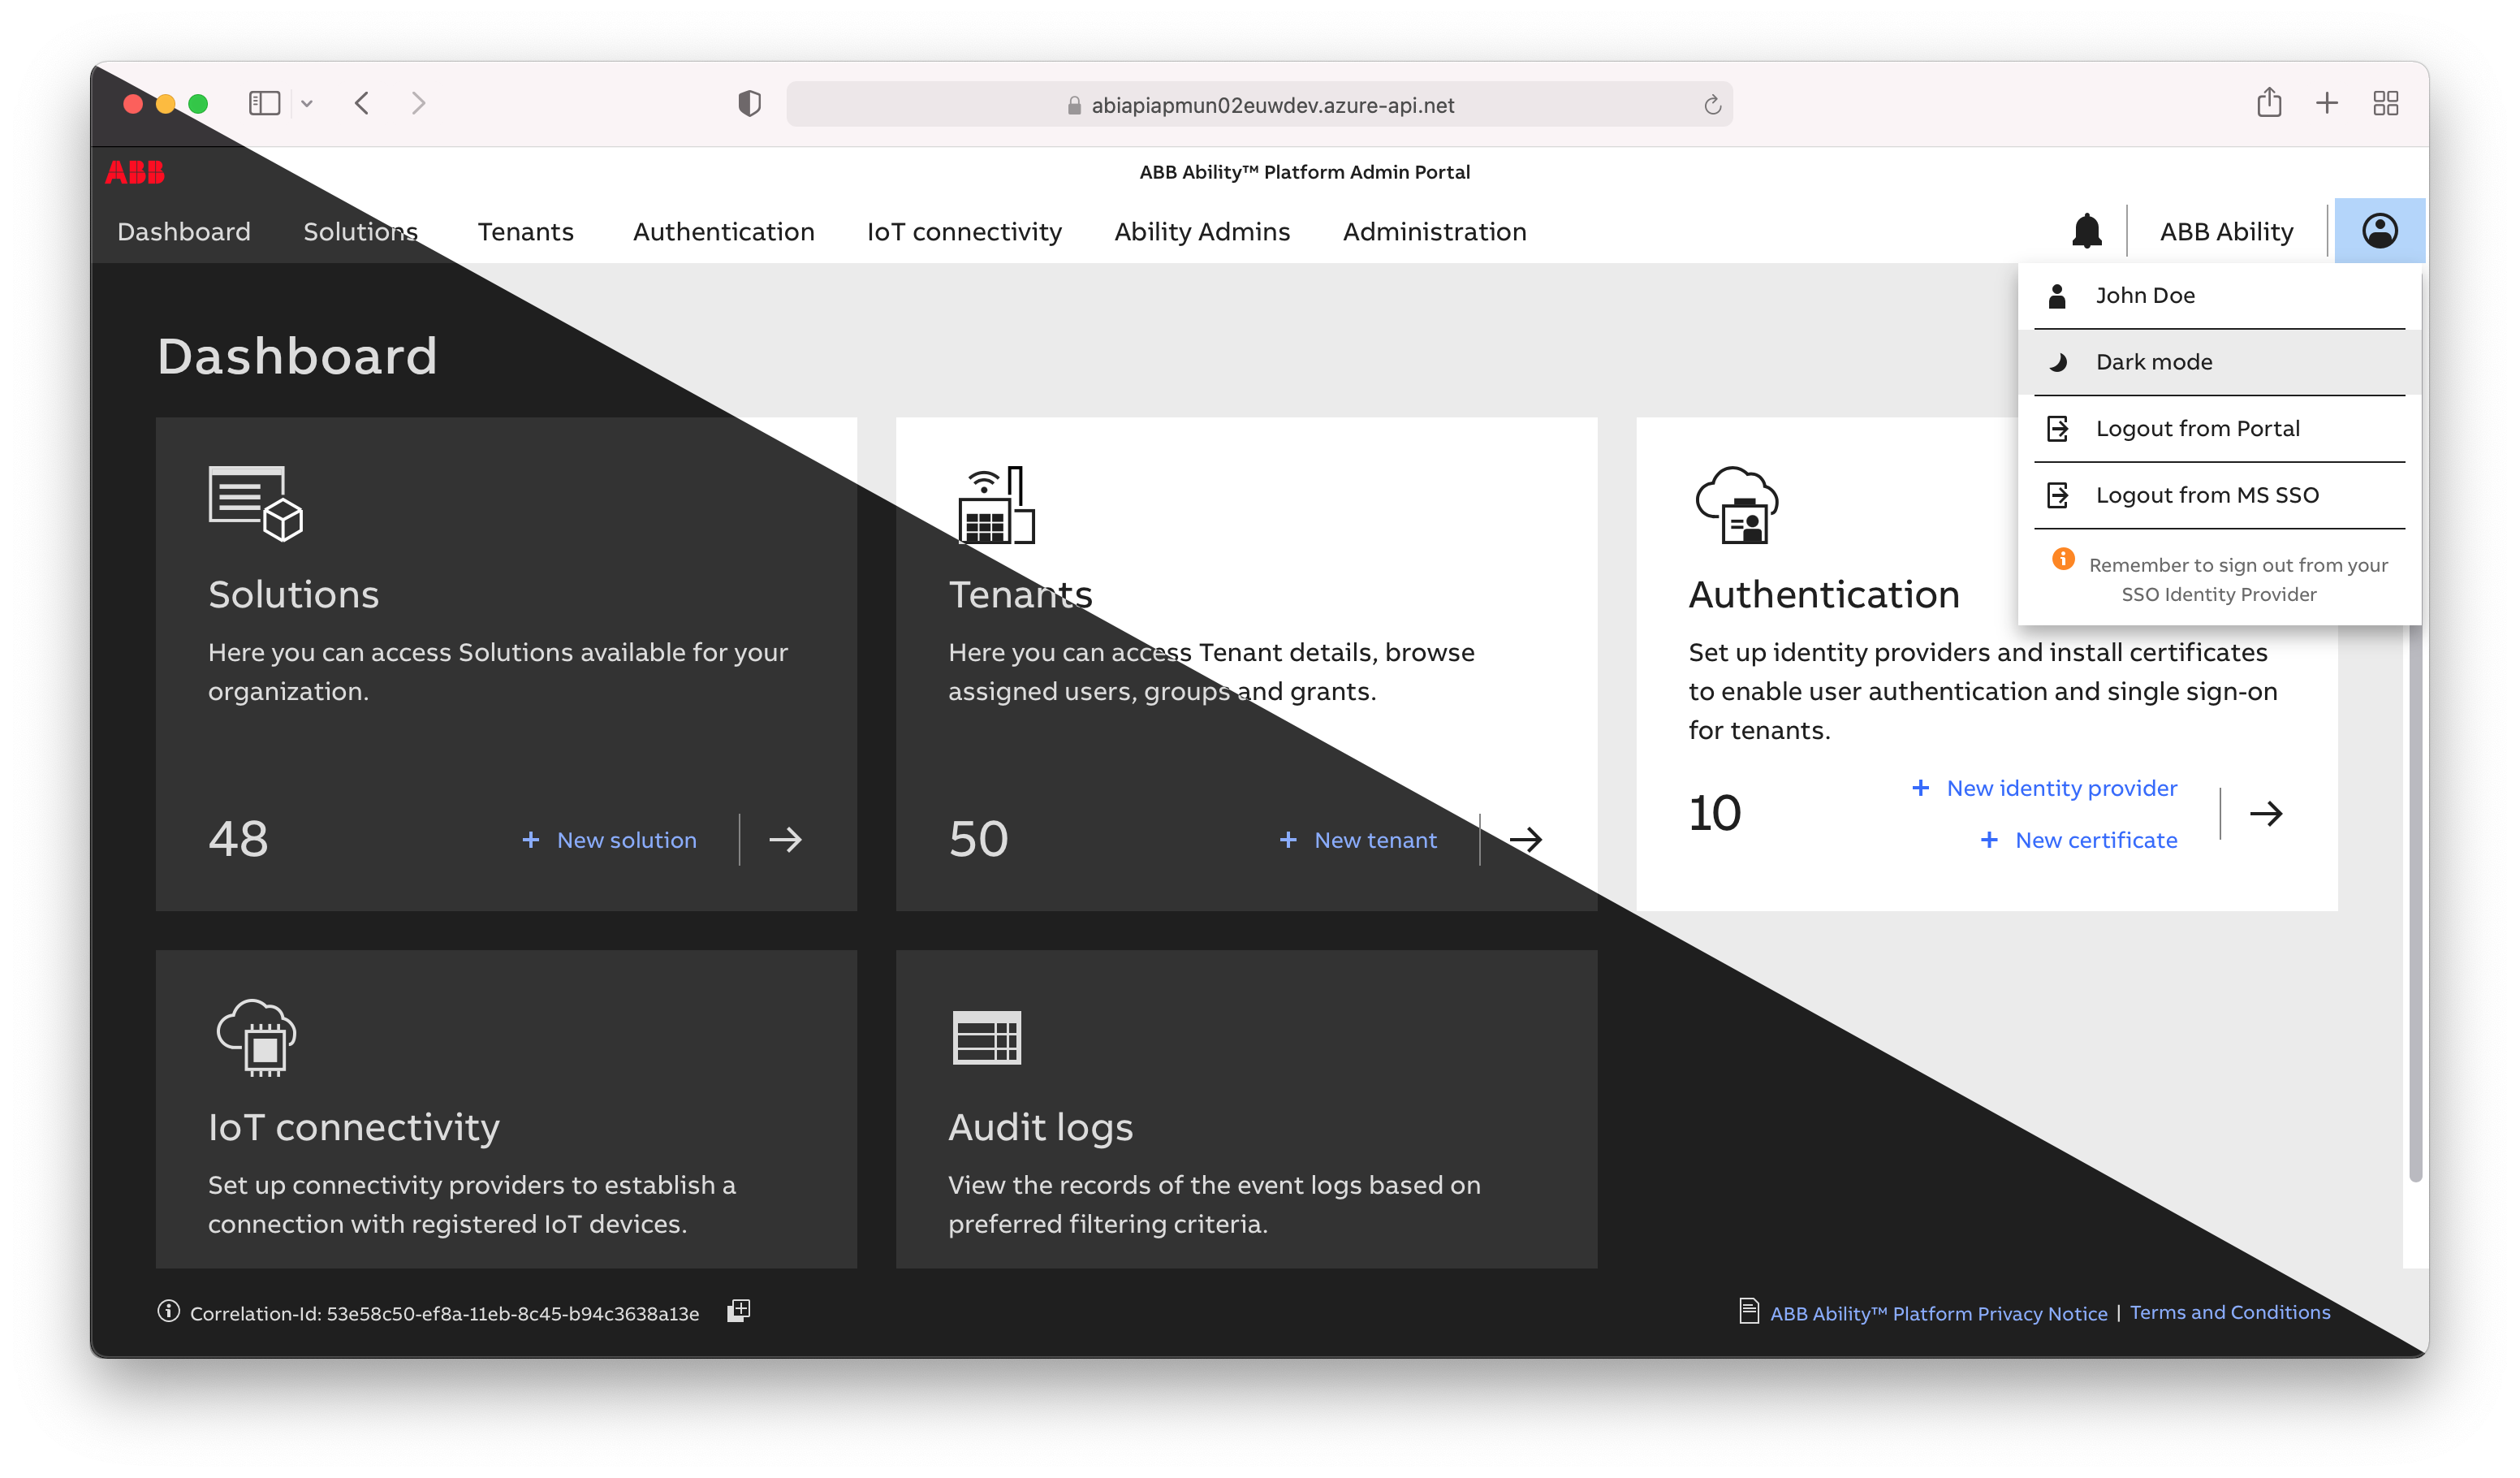
To switch the theme, head to the User section and select the Dark/Light mode. The setting is saved in the local storage of your web browser.
# Tab view
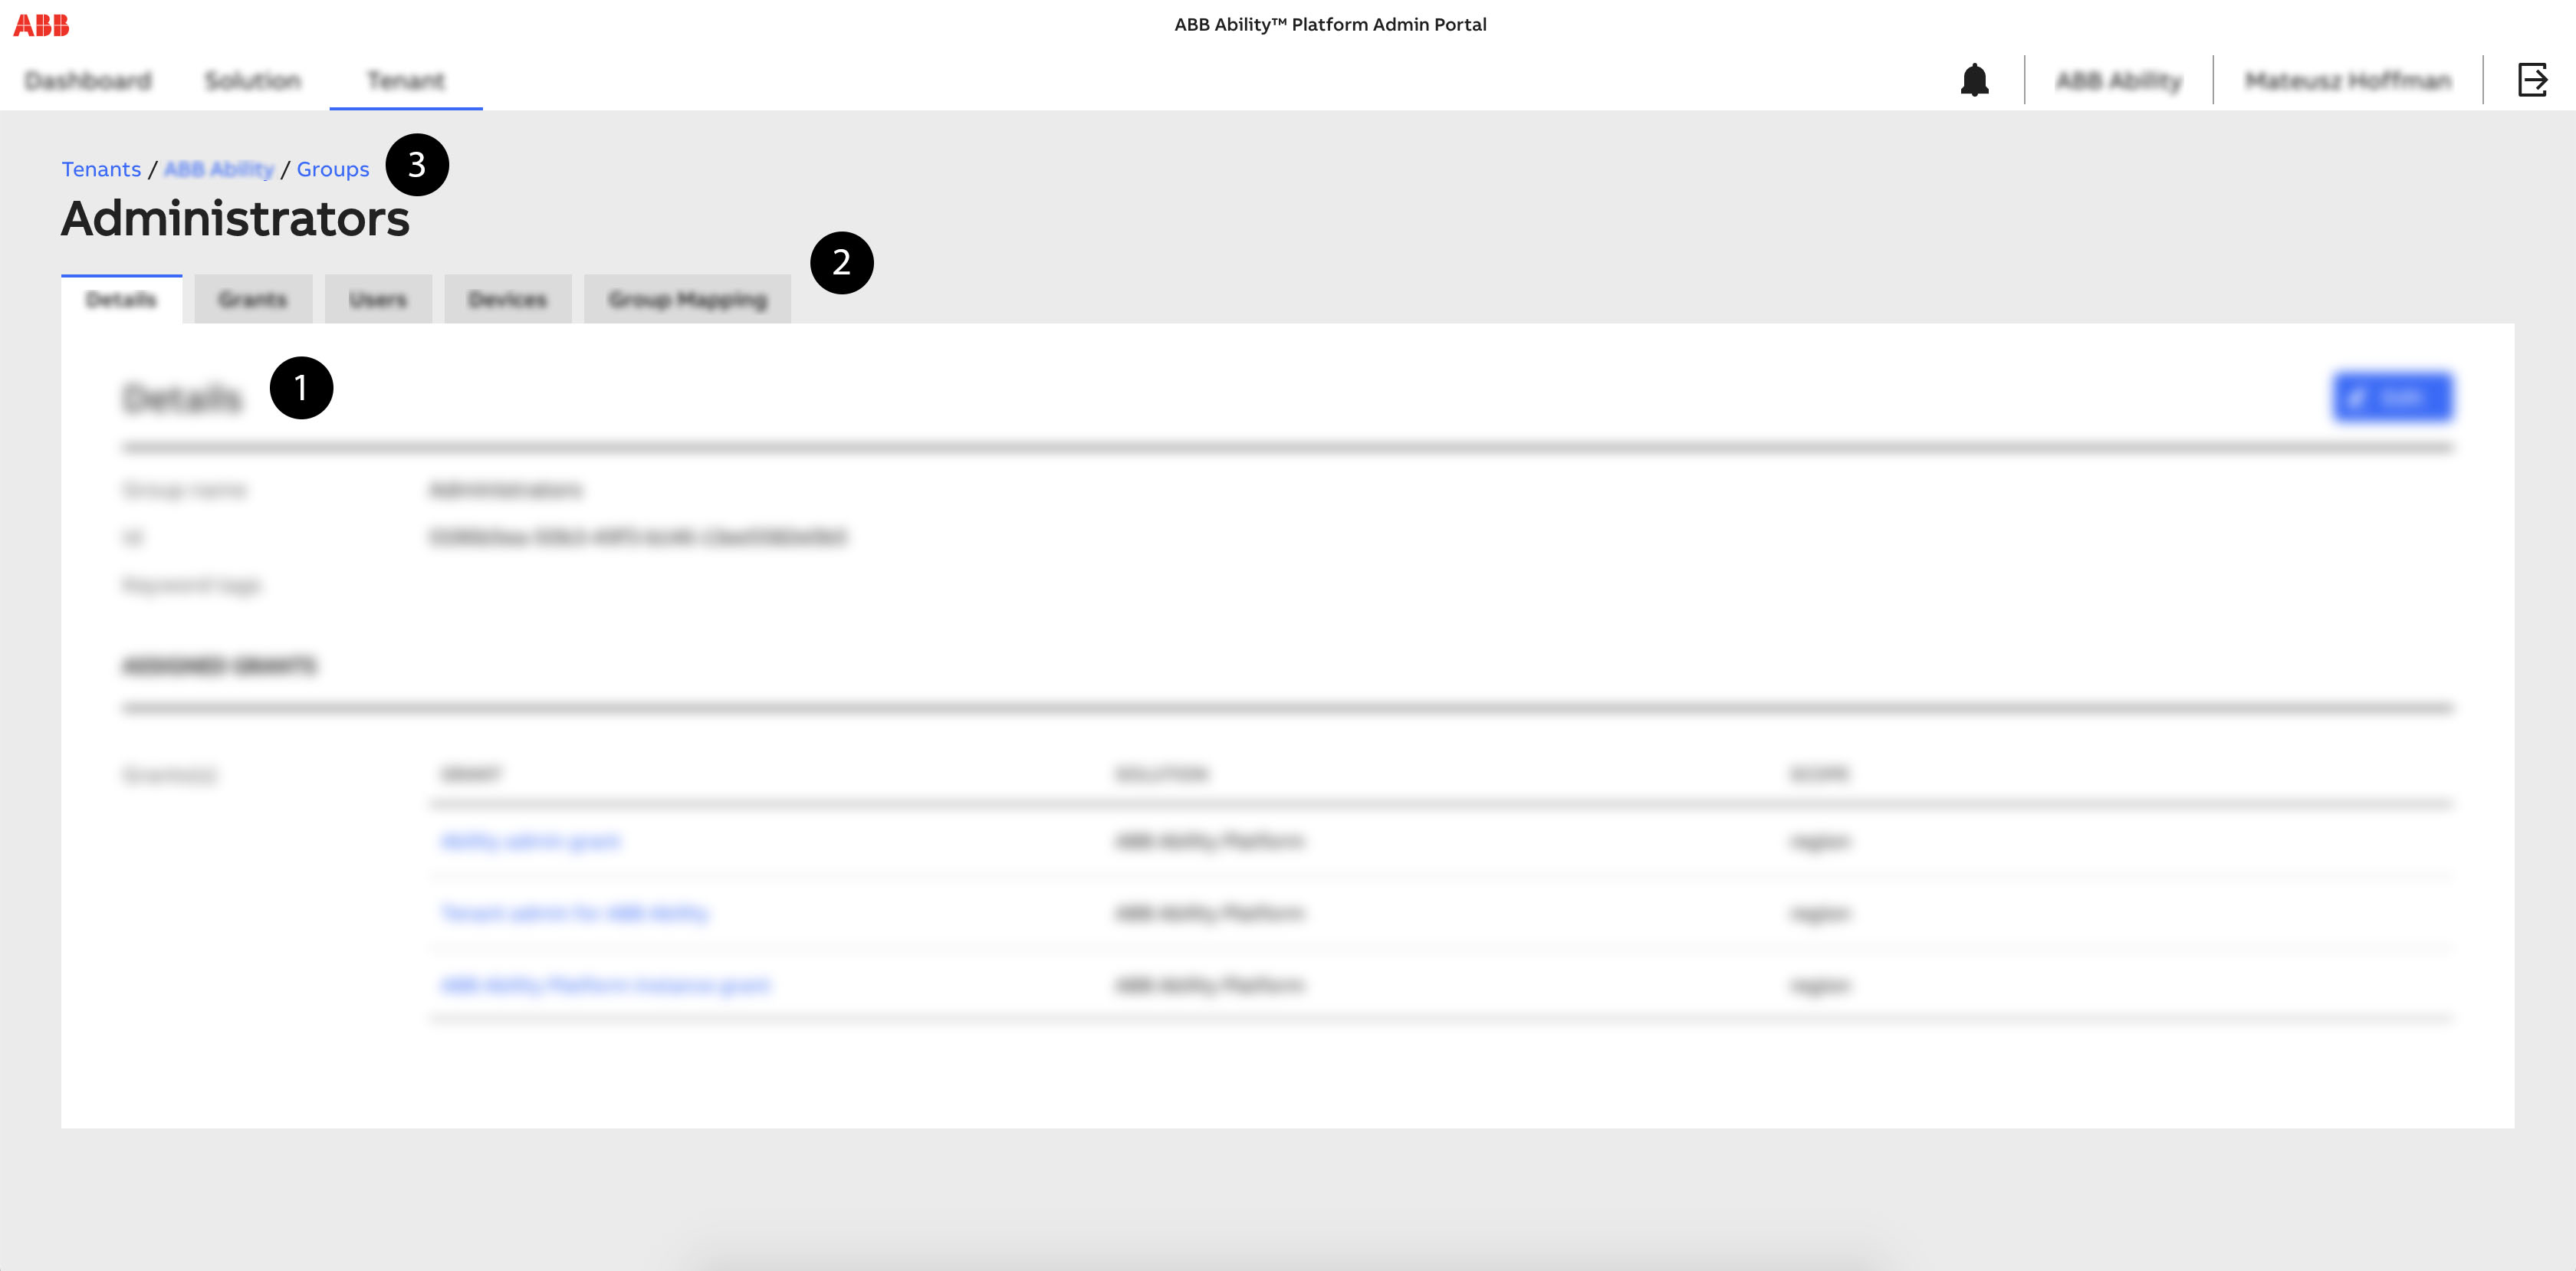
After navigating through the application and choosing a specific entity context, the view separates into compact data panels (1) with tabs that split the operational view into sections (2).
The whole user journey is easily accessible using the available breadcrumb component (3) that shows a nested context of navigation up to the current view (e.g. that we are currently viewing the Administrators group from the selected Ability tenant).
Searching for items within Solutions, Tenants, IoT Connectivity, Groups, Applications, Devices, Roles, Grants, Contracts, Resources, Permissions, and Operations:
- Modified search mechanism; from filtering on the browser's side (based on already retrieved results) to using server-side capabilities of Principal Manager API QEL filters
- At least three characters are required to trigger the server's filtering request; otherwise, a validation message is displayed.
- Currently, QEL filters are case sensitive. Therefore capitalization matters
- Results can be found by entering a partial phrase, doesn't have to contain the whole word
Searching for items within Users:
- In this specific case searching is done on the browser-side on already retrieved results to provide the capability of searching by username (currently not available vie QEL filters)
- No limitation for a minimal amount of characters
- No case sensitivity
- Results can be found by entering a partial phrase, doesn't have to contain the whole word
- Users search field now searches also for emails & user Id
Retrieving data in pages for Tenants, Groups, Devices, and Applications:
- Each page is retrieved from the server separately upon request (by entering the page) instead of preloading all results and keeping them in the browser's memory
- The amount of records per page is defined by the user and saved in local storage
Sorting data within Tenants, Devices, and Applications:
- For Tenants, Applications results are sorted on the server-side and retrieved to the Portal application
- Devices don't have sorting by identity
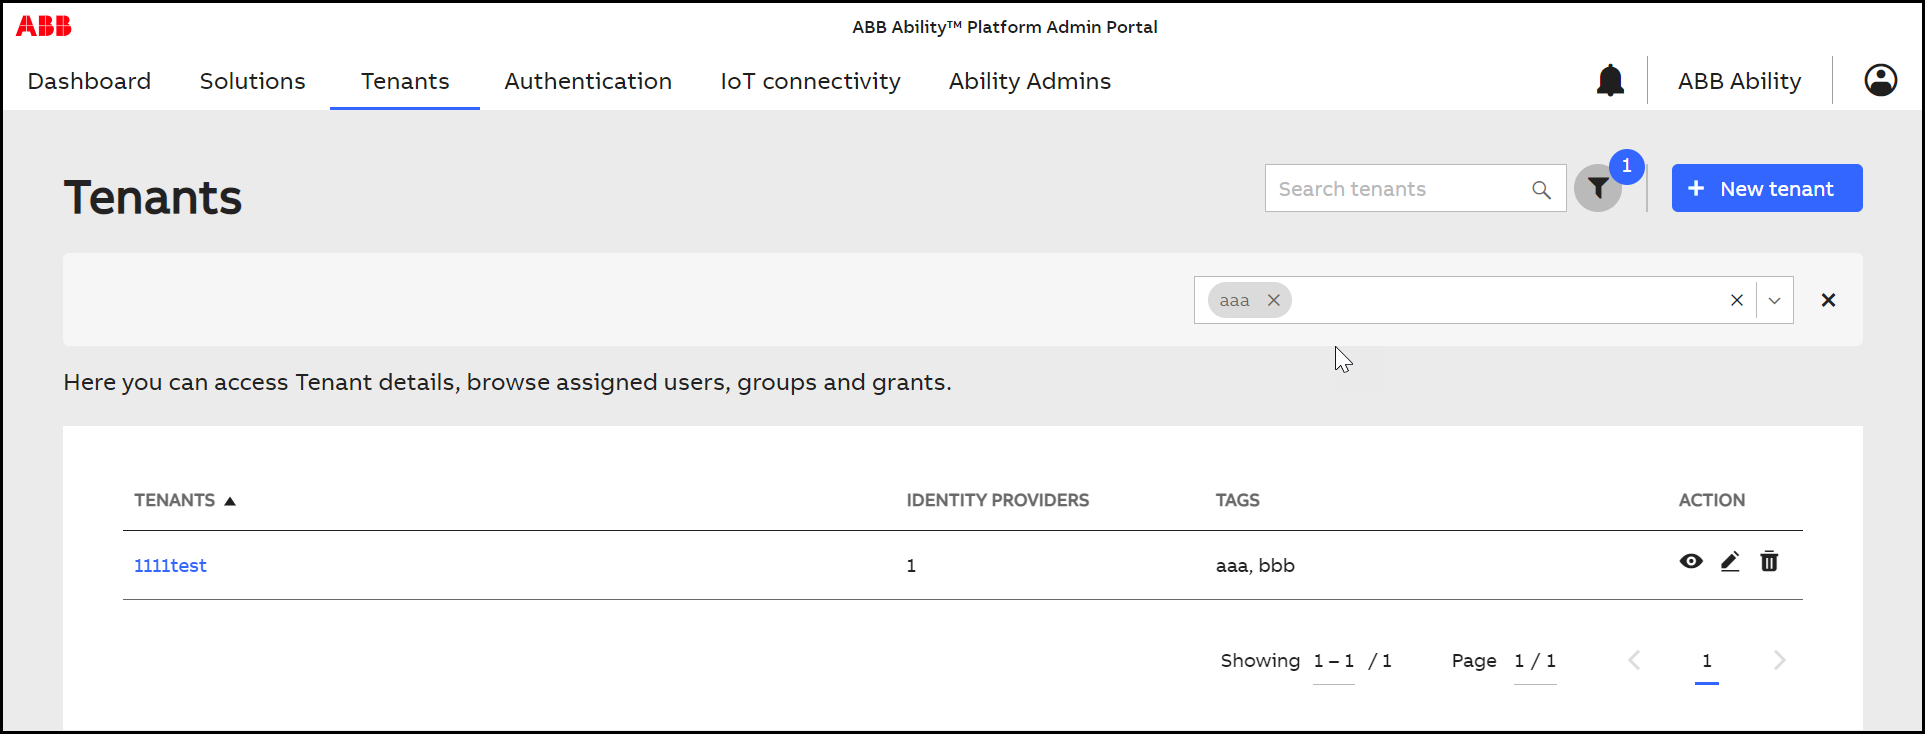
Filtering via Tags
With the Filtering via Tags feature, you can enhance the searching of items by
filtering via tags. Apart from the standard search field, an additional
searching option is available in all Admin Portal modules to provide filtering
by tags (represented by funnel shape icon).
Perform the following steps to filter items by tags:
Navigate to a particular module of the Admin Portal you want to filter items by tags.
Click the funnel shape icon on the right-hand corner of the screen.
The Enter tags search field is displayed.Enter the tags of the items you want to filter.
Note: Tags need to be put as exact phrases and are case sensitive.Press Enter.
The searched item is displayed on the screen.
# Notifications
A component located on the right side of the header allows the application user to browse through all notifications for Principal Manager API actions triggered on the application level (both success and failure scenarios).
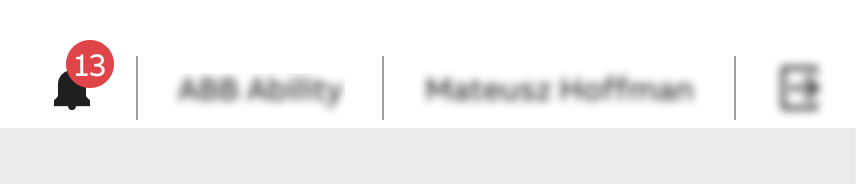
The actual status of notifications is represented by the red badge with a sum of available items. After triggering a new action, an application user is alerted with a pulse animation that ends by increasing the total number of items.
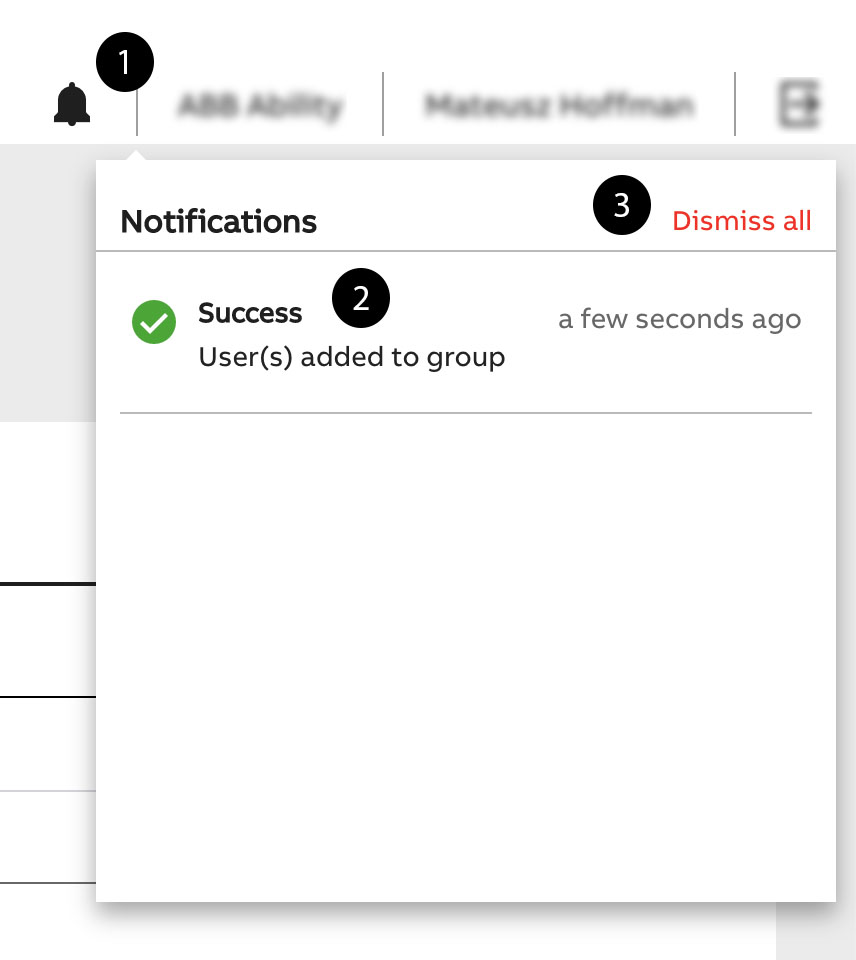
The procedure for viewing details requires clicking on the bell icon (1). This triggers the Notification Panel which lists all items (2). Notifications inform the user about PM API action status, detail information, and time of execution. After this, the application user is able to clear the particular item by selecting the X icon to the right of the item or to quickly remove all items by clicking the Dismiss all (3) button.
Correlation ID is displayed in the application/website's footer for logged users.
Correlation ID helps the Ops/Support team to trace issues raised.
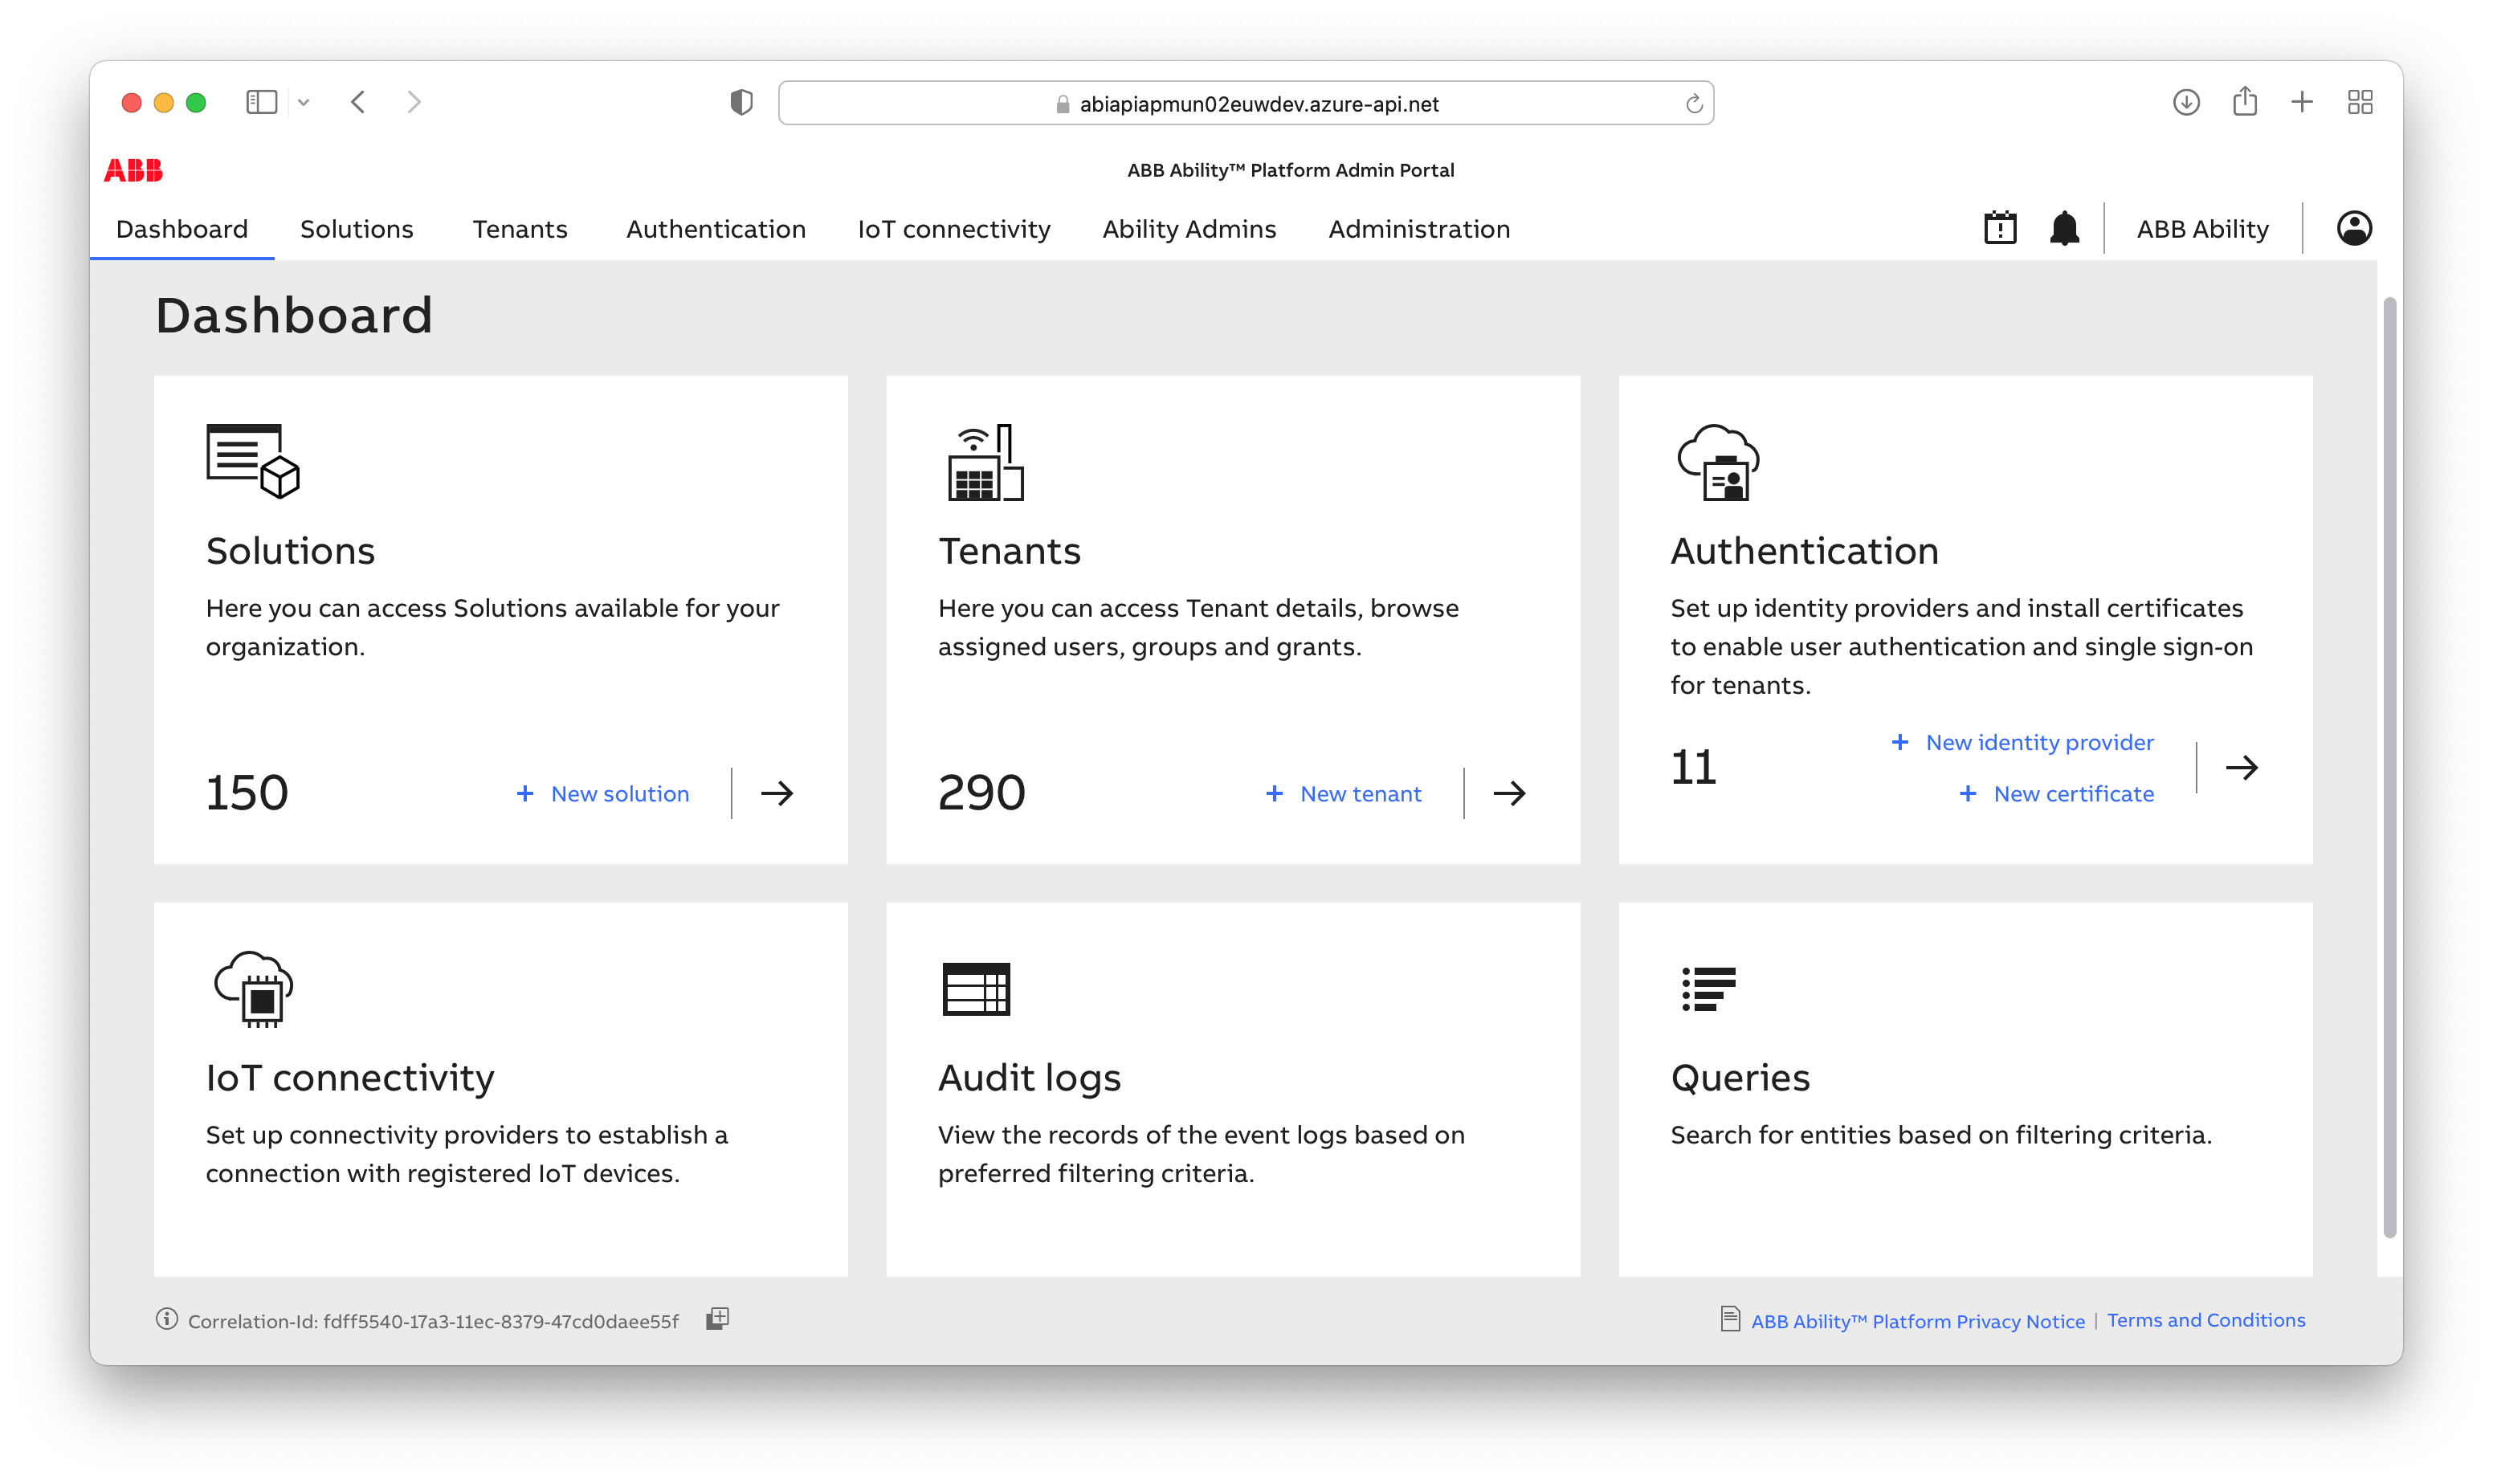
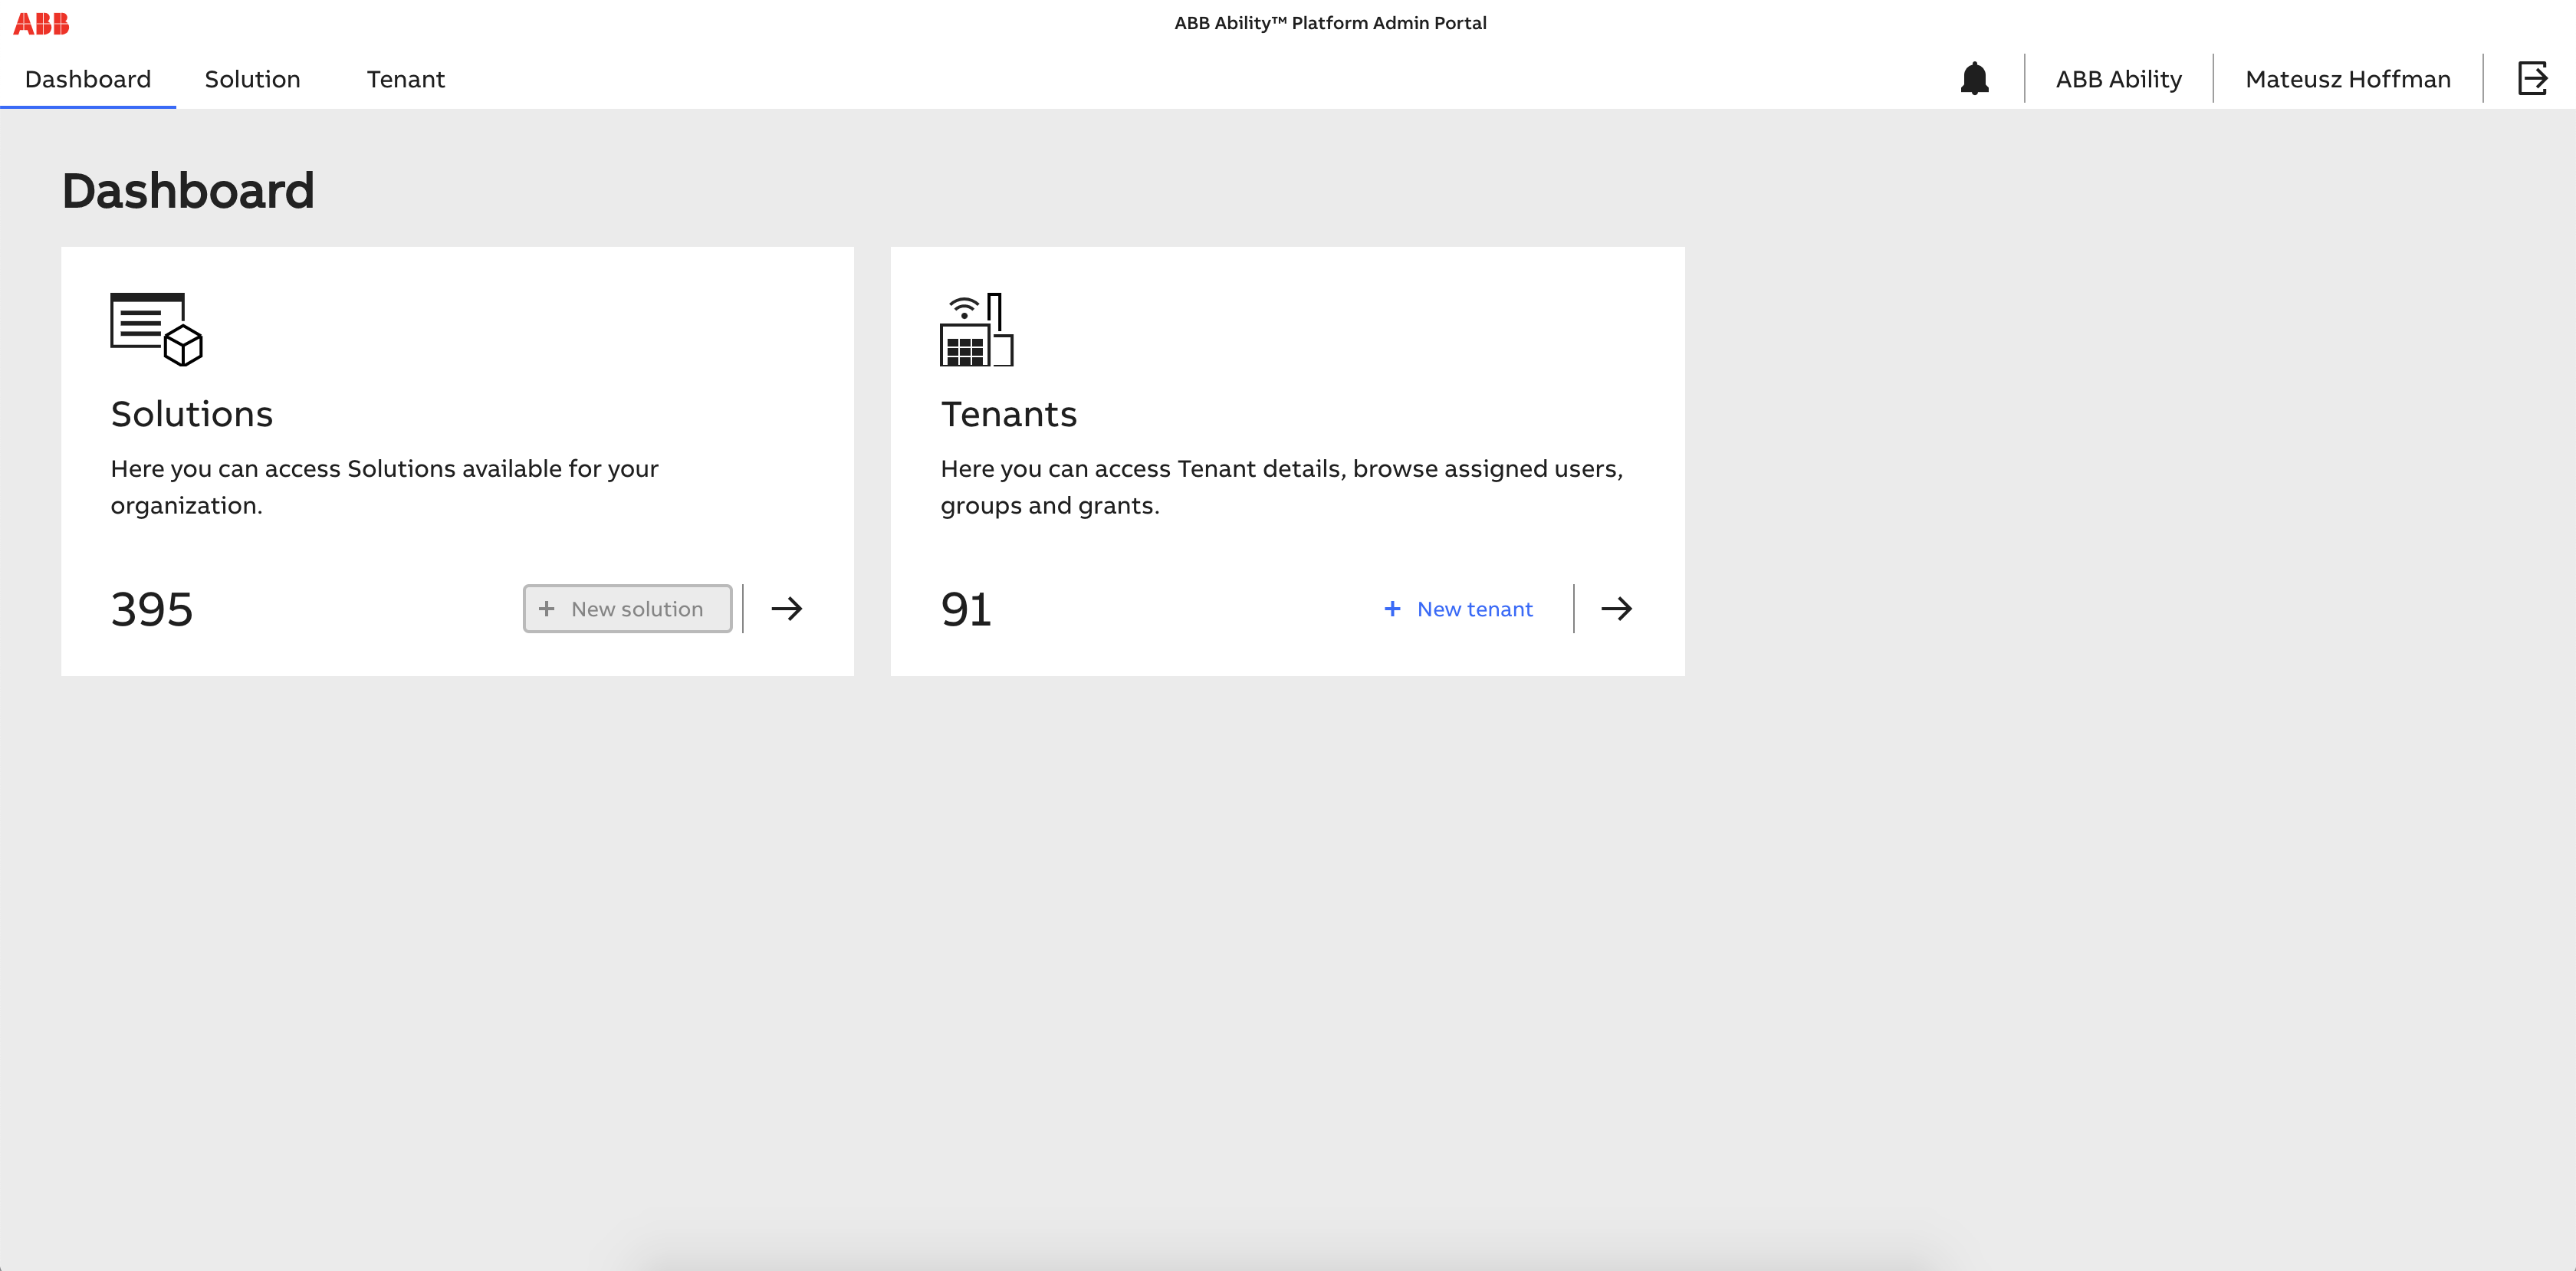
# Dashboard tab
The dashboard is a default overview screen that can be treated as an application home page. It contains high-level information about manageable assets (e.g. solutions and tenants) and can be an easy starting point for navigating through concrete application sections.
# Tenants tab
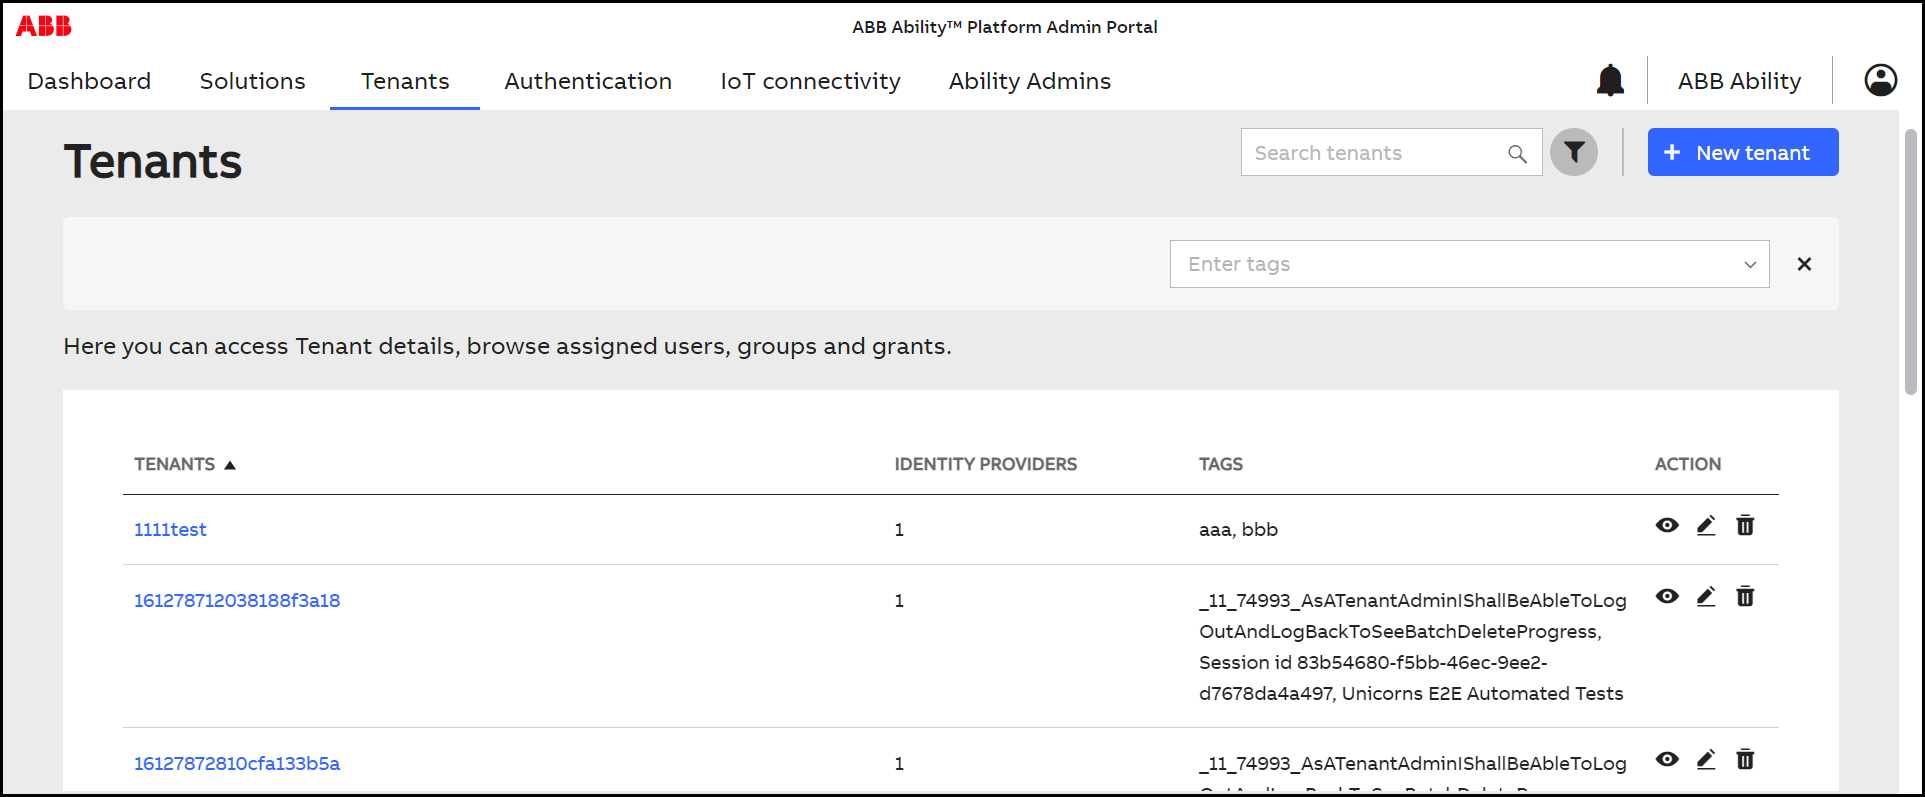
# List page
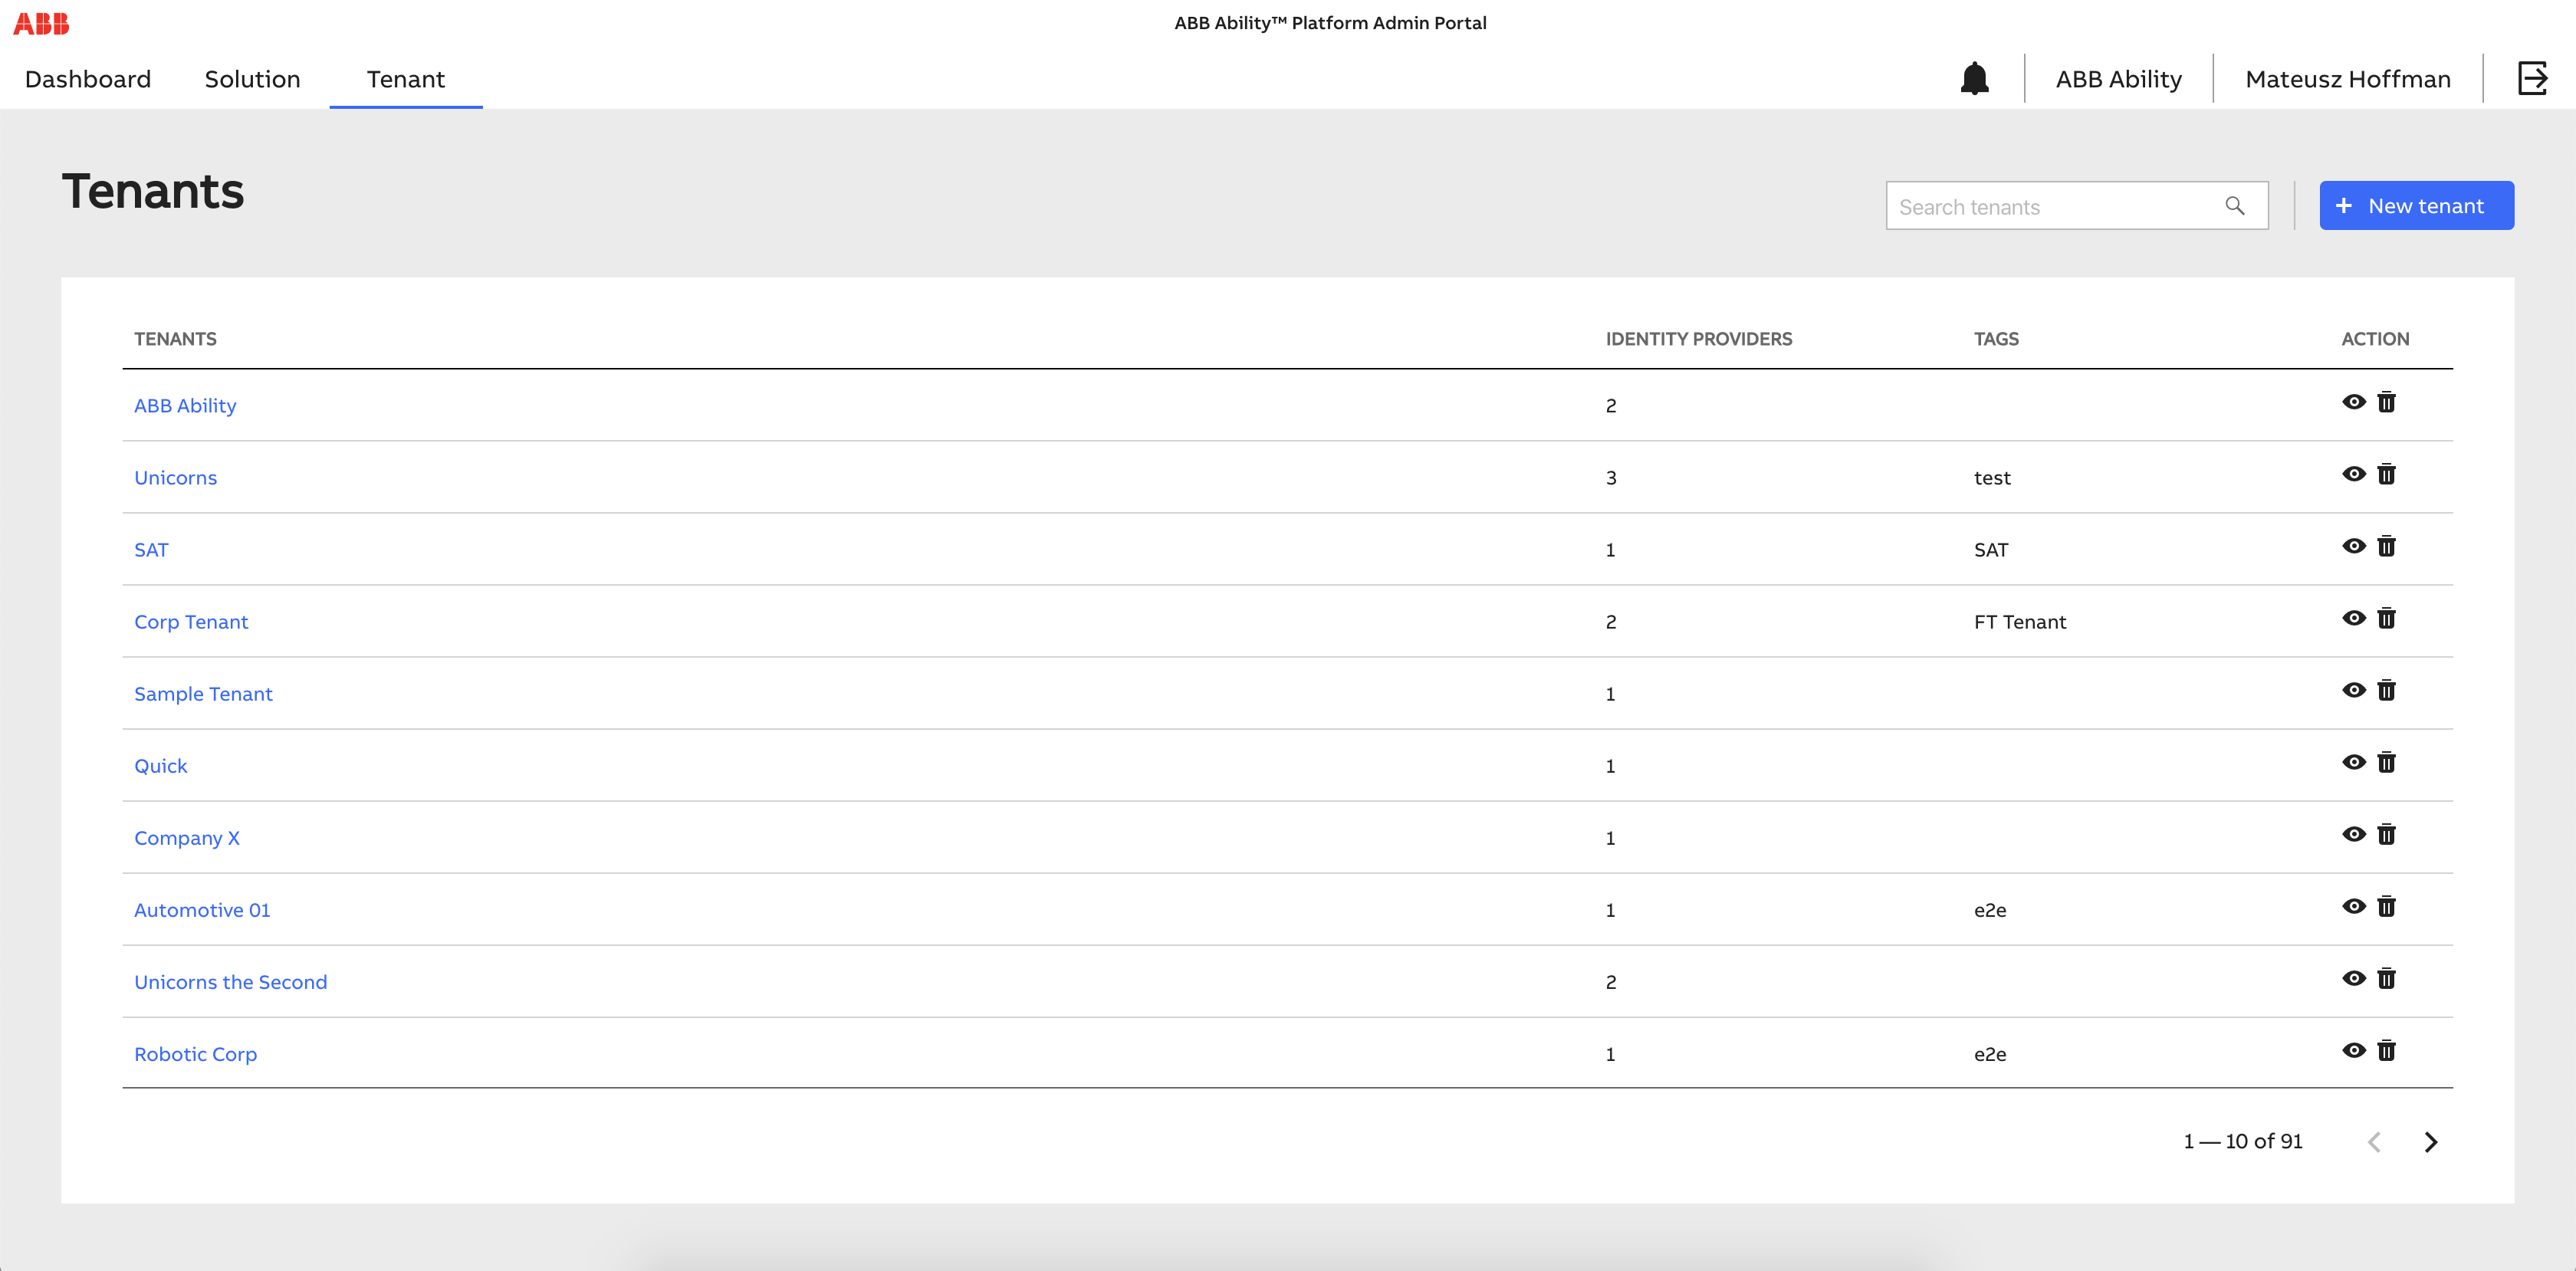
The list page contains a table view of all accessible tenants with basic information like the number of identity providers, tags, and available actions (based on user permissions - viewing, editing and deleting). After clicking the tenant name, or an eye icon, the user will be redirected into a section with data specific to the selected item known as the tenant context view.
If a user has access to only one tenant and doesn't have rights to create new tenants, the user will be redirected automatically to their one tenant context.
If a user has create permissions, the New tenant button allows the user to create a tenant. By default this is reserved for the Ability Admin persona only.
# Creating a new tenant
To create a new tenant, you need to provide the following:
Name (required)
B2C policy type (required)
Static
Static allows you to create a new policy file for the tenant, which will allow you to have more than one provider at the same time, but the number of tenants available will be finite.Dynamic
Dynamic allows you to overcome the limit of tenants by using the existing policy file, but due to the way authentication is set up, only Azure Active Directory will be available to choose from the list of identity providers.
B2C Policy
Changing the B2C policy is possible only if the Tenant is not associated with any identity providers other than Azure Active Directory. Otherwise, the system won't allow changing policy from static to dynamic (first, the Identity Provider needs to be disassociated from this Tenant).
Sign in page URL (optional)
Error page URL (optional)
Tags (optional)
Tags can be provided as free text (Textarea), or they can be provided as tags (Pill). The Textarea setting is useful if users want to enter more content conveniently, including line breaks. The Pill setting is valid for short words, typical tags. Switching from Textarea to Pill will show a warning about losing the line breaks and formatting.Identity providers (required)
- Azure Active Directory
Certificates (optional)
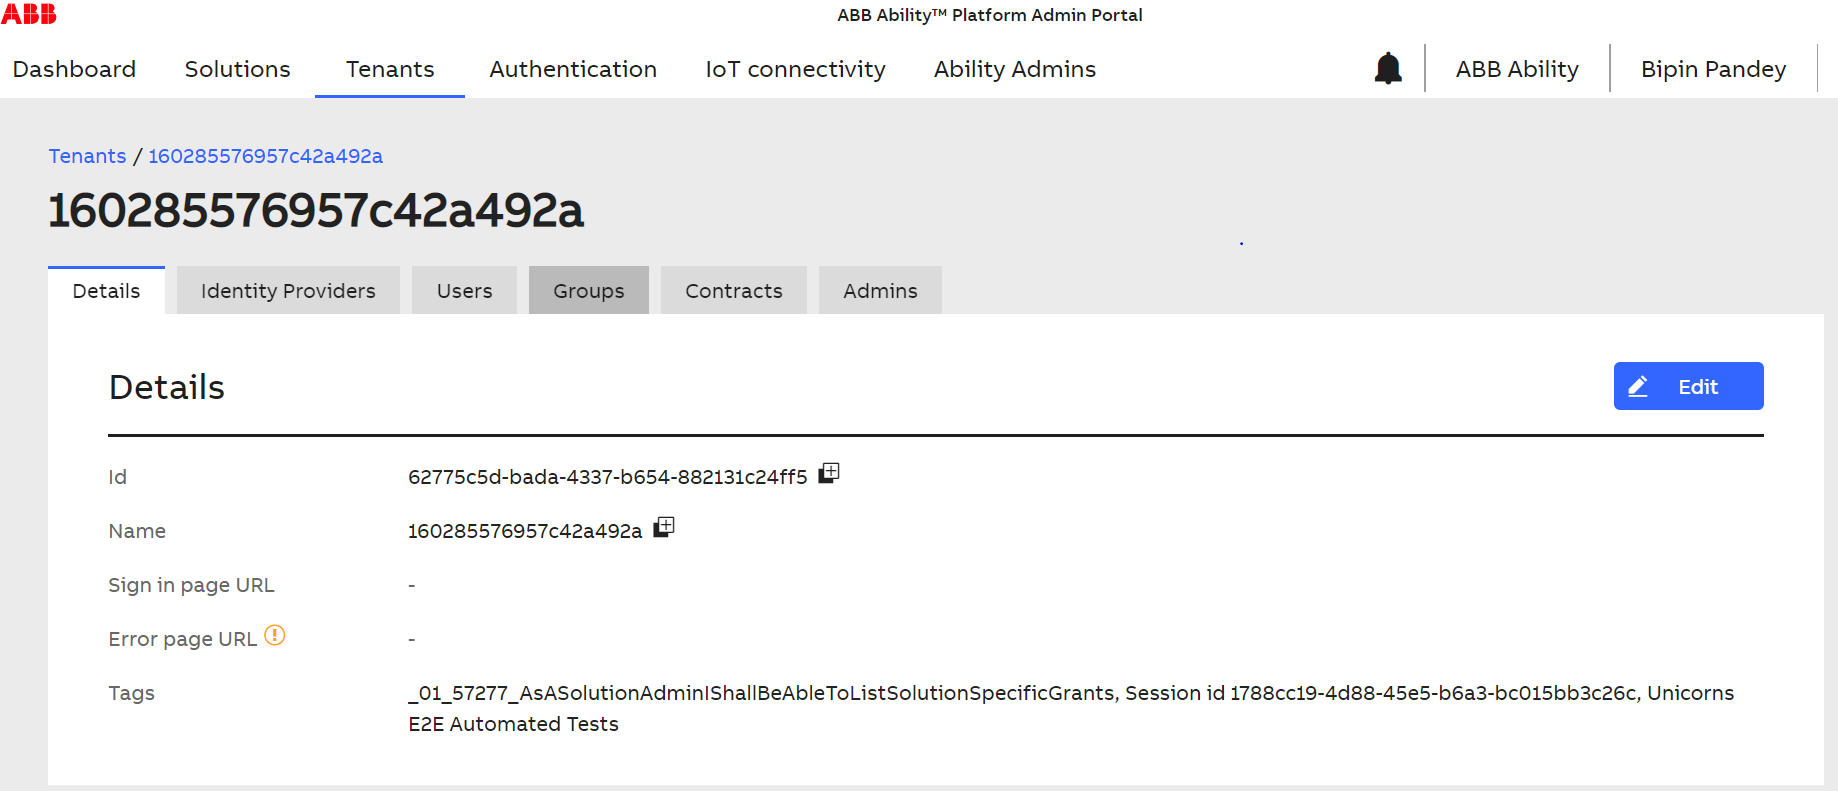
# Tenant details page
This area is oriented with a specific tenant context and gives a user the ability to operate on 6 main tabs:
- Details
- Authentication
- Users
- Groups
- Contracts
- Admins
In the next part of this documentation, we will take a deeper look into each of them to describe its meaning and available actions.
# Details
The details section is dedicated for providing the user with most important data about the selected tenant. Based on their permissions, the user is able to see information about the name, ID, and tags.
Note: Authorized users can assign a Tenant Admin grant to other users or groups directly from the Admins tab as well as revoke a Tenant Admin grant from users or groups.
From this page, by clicking the name value from the administrators list, the application user is able to navigate to its details. See the User Details and Group Details sections, below.
Identity provider data information is available in the Authentication tab.
# Authentication
Users can associate (or disassociate) OpenID Authentication and Certificate
Issuer URL field has UX improvement that improves the ease of adding & updating issuer URLs.
- Issuer's URL placeholder changed to "INSERT_YOUR_TENANT_ID".
- Tooltip message changed to: "Please replace the placeholder part of the URL with real ID of your Identity Provider's Tenant"
- Does not allow to save the changes, when the placeholder "INSERT_YOUR_TENANT_ID" is not changed.
- When user clicks on the Issuer URL, the placeholder "INSERT_YOUR_TENANT_ID" is highlighted. This enables user to replace the URL.
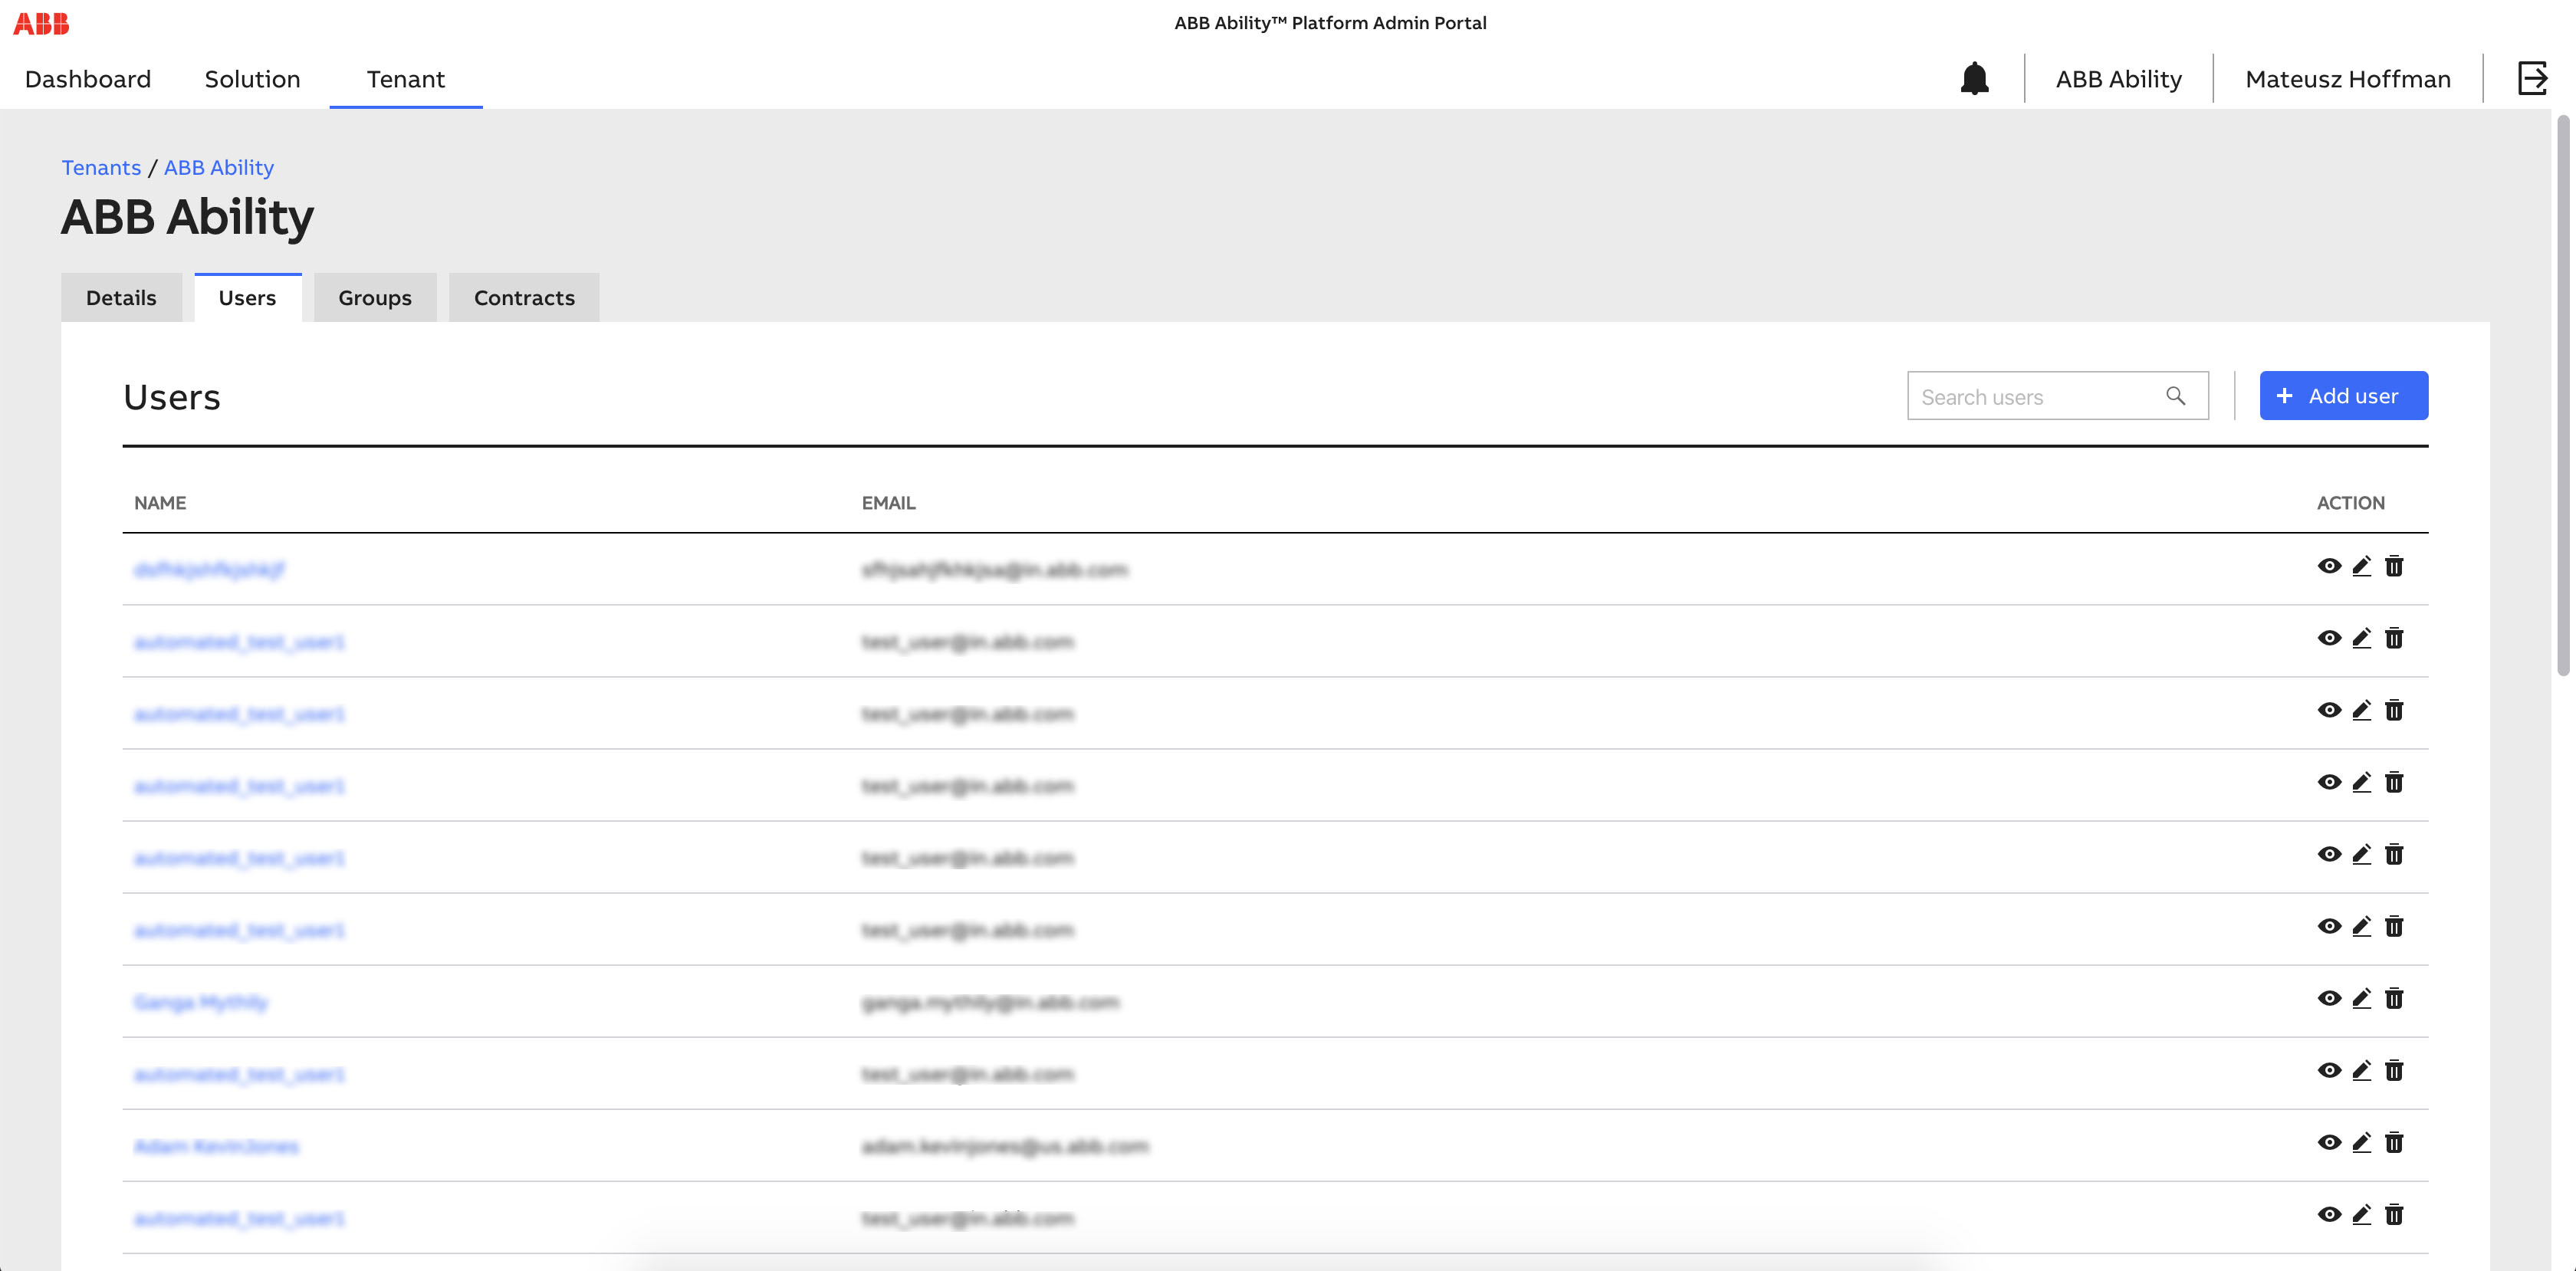
# Users
The users section contains a list of users associated with/assigned to the operated tenant with quick access to its data, e.g. username and email. Each list item also contains action icons with access to perform procedures like moving to user details, editing, or deleting.
Note: You can delete multiple users through the Delete users feature. See the Multiple Users Deletion section for detailed information.
On the top right corner of the section panel, you can also quickly add new users by following and filling in the necessary inputs related to the user onboarding process based on the Principal Manager API.
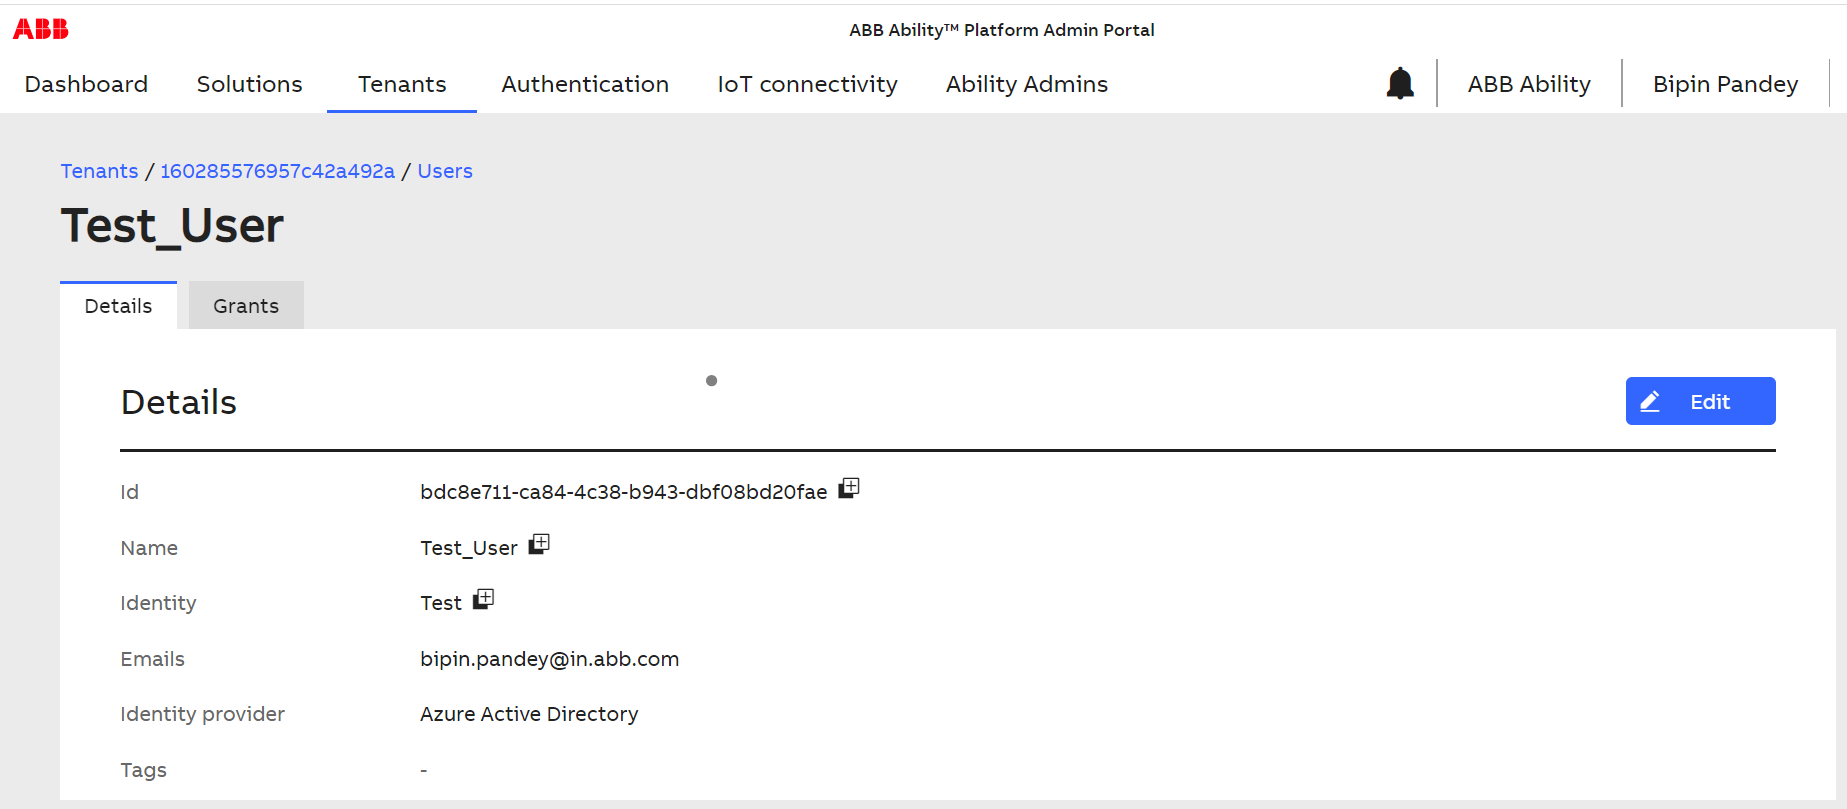
# User Details
After selecting the username or an eye icon, the application user is redirected to a page filled with details of the tenant user. For example, the name, and identity provider data.
Note: The list of assigned grants is available in the Grants tab.
# Multiple Users Deletion
With the Delete users feature, you can delete multiple users by selecting check boxes visible on the left of the user's list.
Perform the following steps to delete multiple users:
- Navigate to Tenants > Users tab.
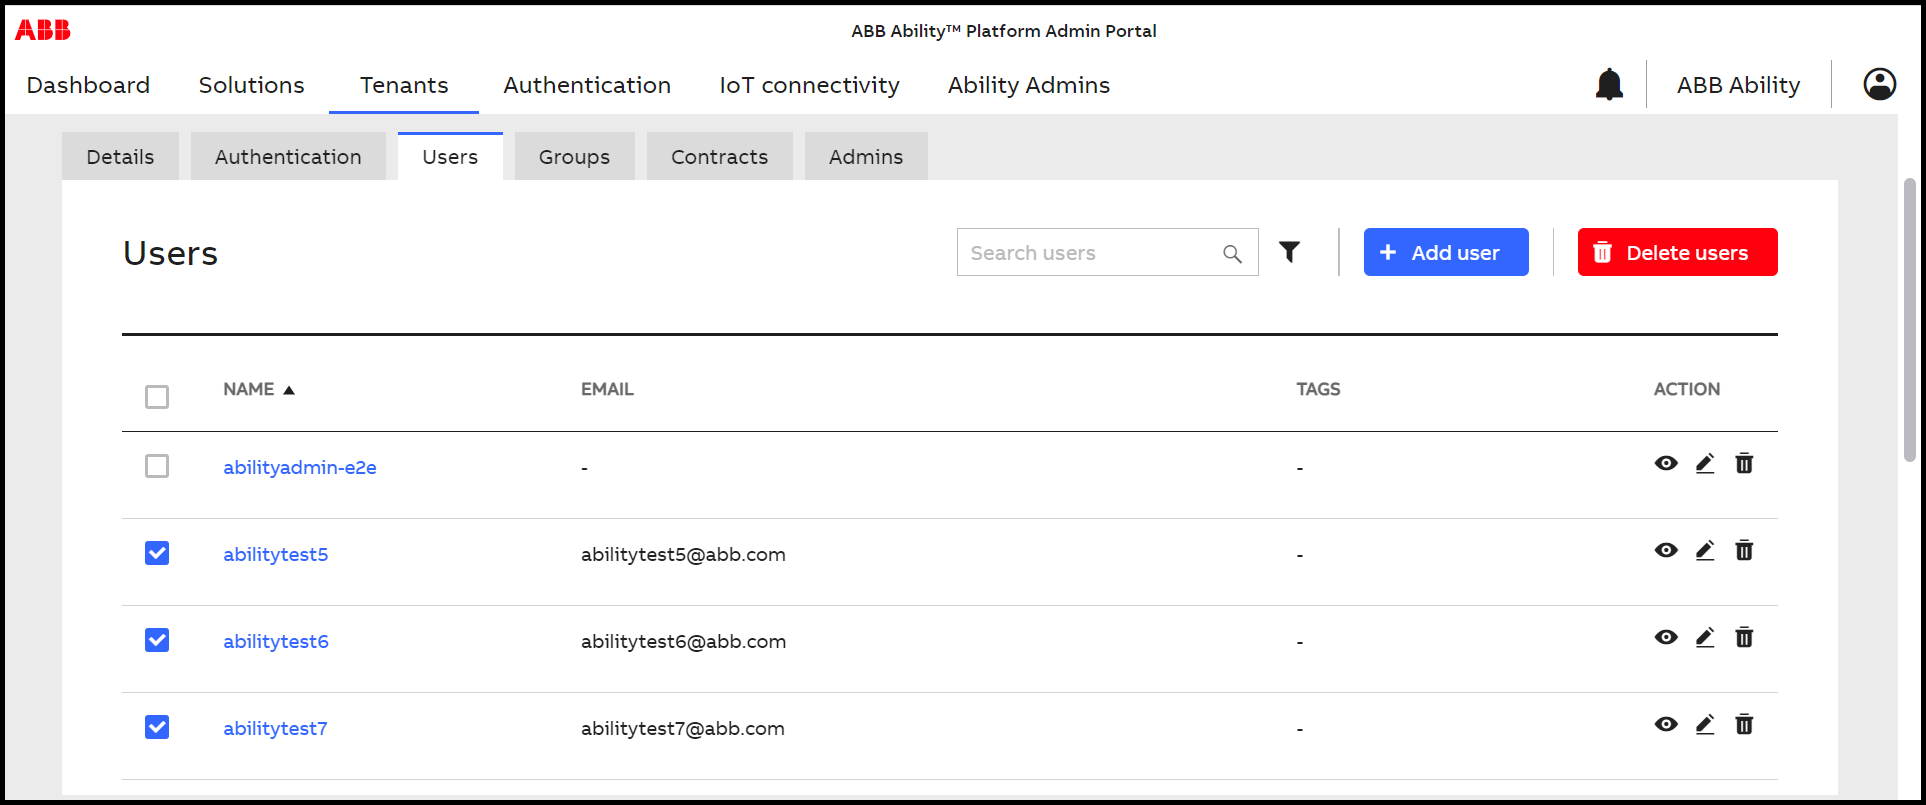
Select the check boxes you want to delete.
Click Delete users.
The Delete 3 users? confirmation window is displayed.
Enter Yes for confirmation and click Delete.
Check the status of the request in the Notification panel.
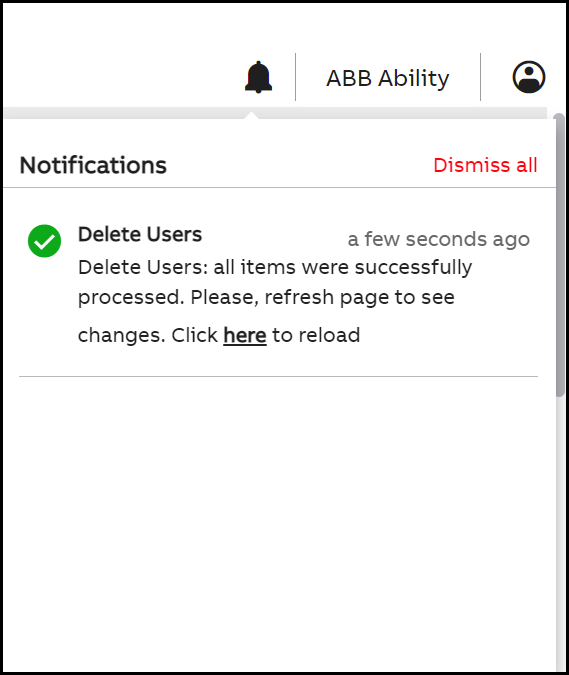
Note: The deletion process may take several minutes. Admin can continue to navigate through the Portal while deletion process; however, logging out from MS SSO will abandon the operation (logging out from the Admin Portal application will allow the delete operation to run in the background). While the users' removal is in progress, deletion candidates are greyed out and can not be modified anymore unless the operation is canceled. In case of cancellation, the unremoved users will remain in the system.
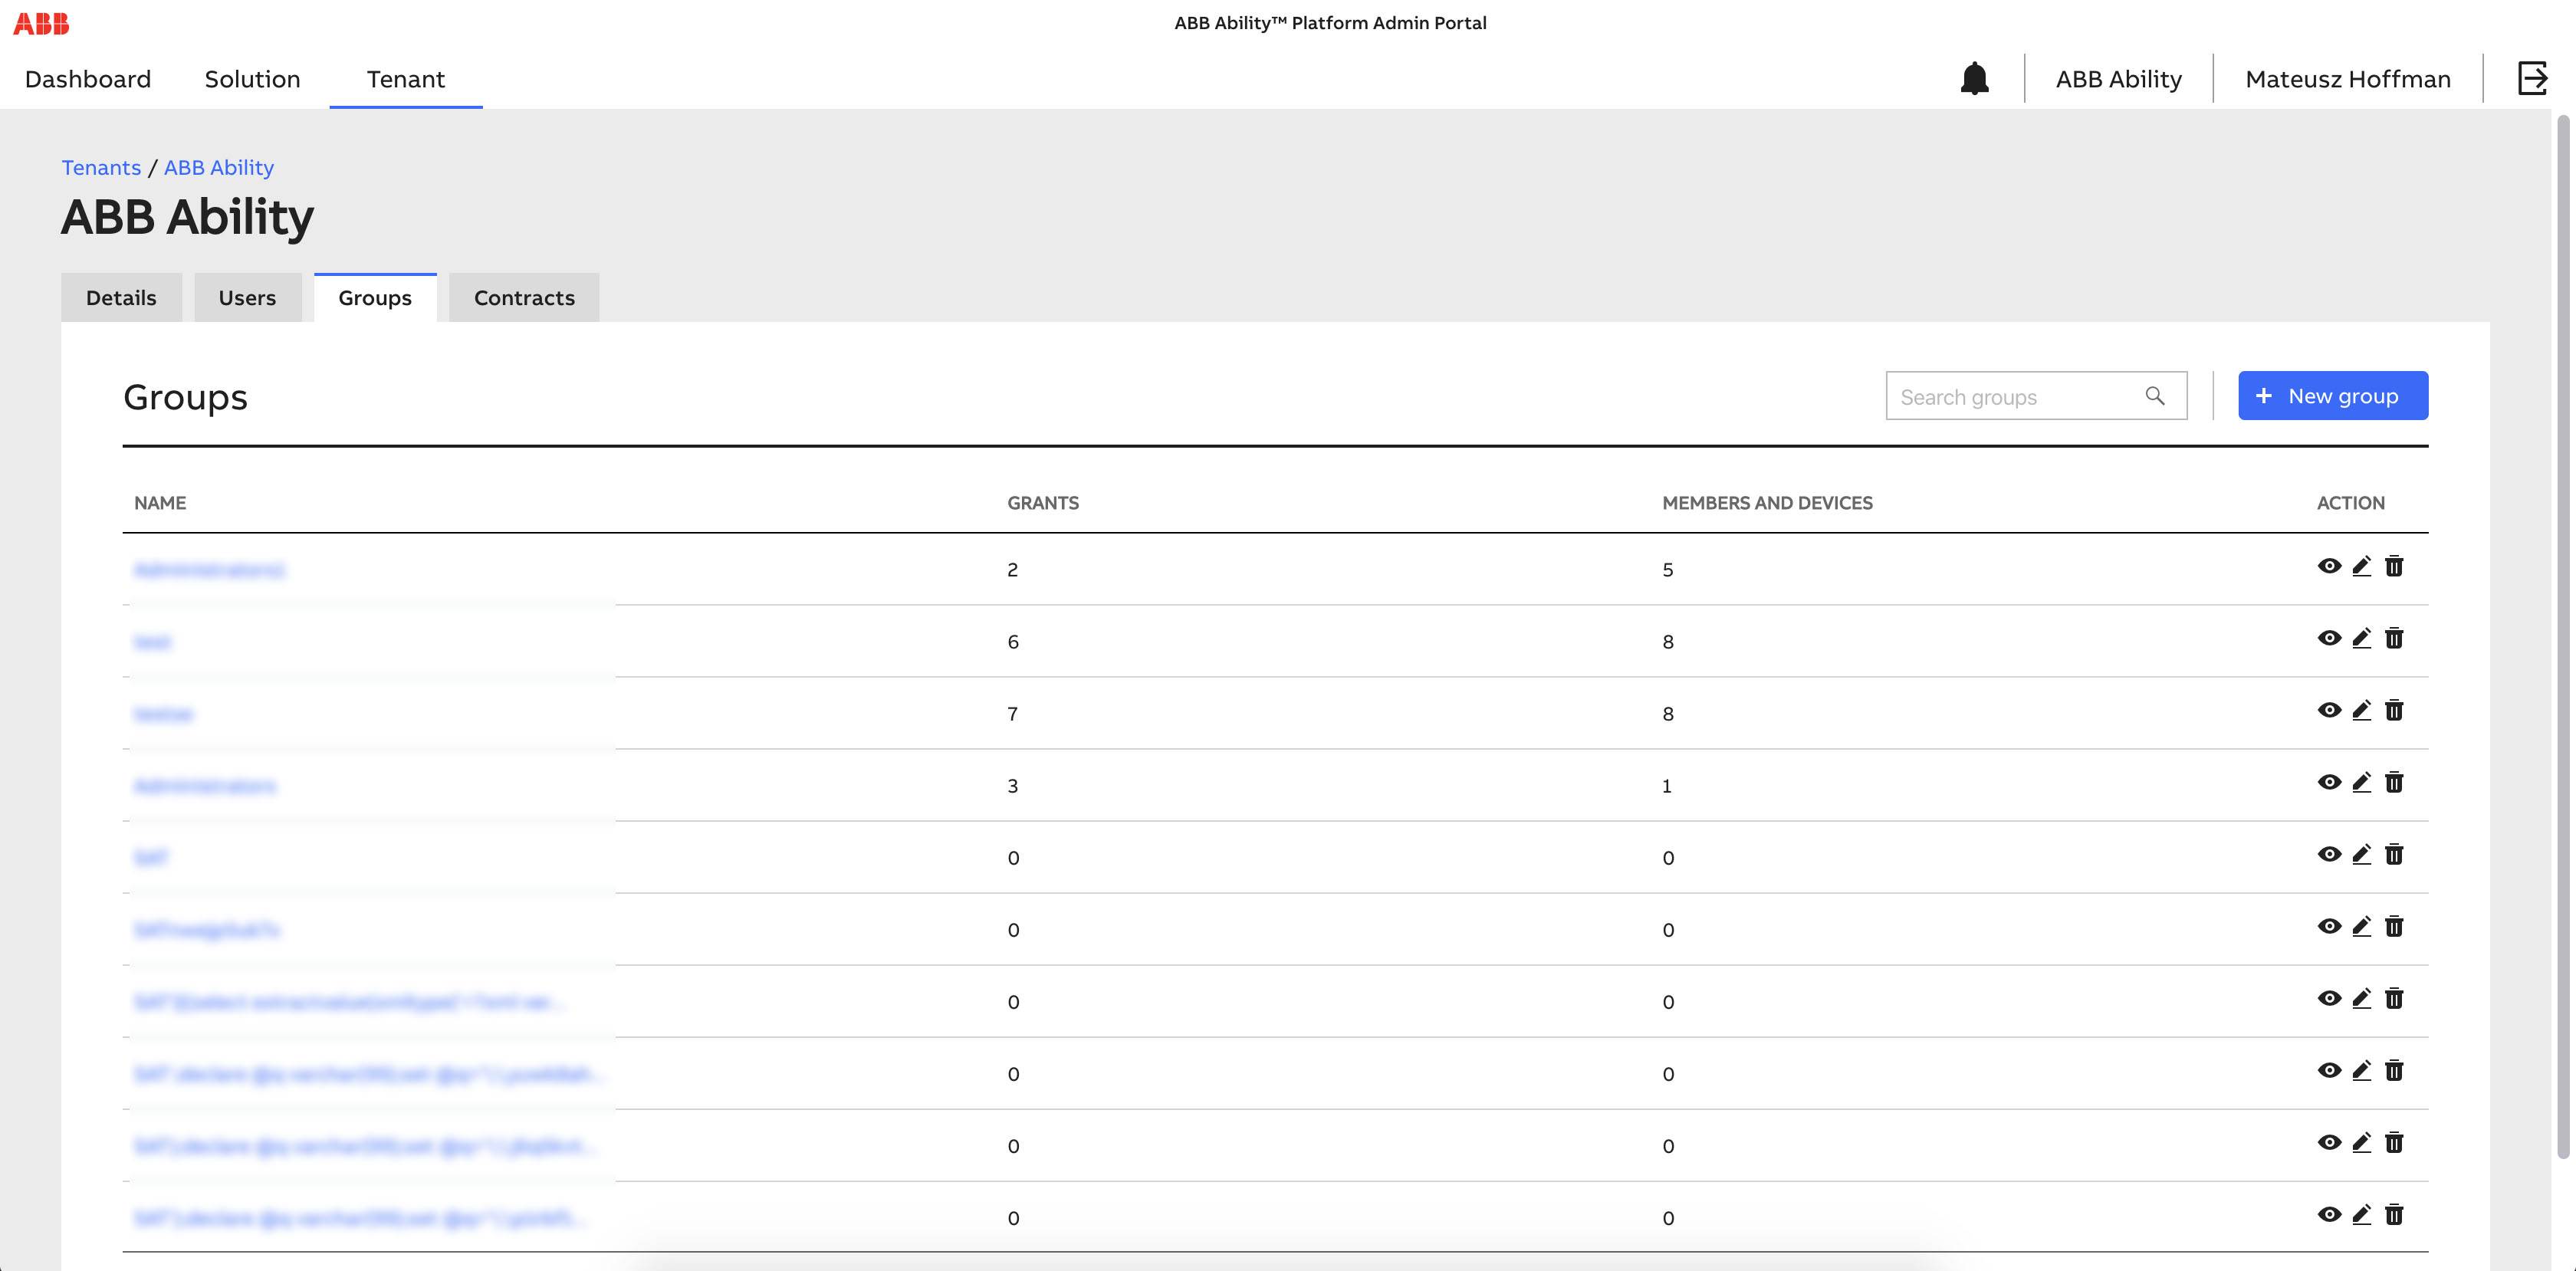
# Groups
The Groups section contains a list of all Ability Platform groups associated with/assigned to the operated tenant with quick access to its data, such as a number of grants assigned to the group and number of its members (defined as both users and devices). From this section, the application user has access to quick actions, followed by action column icons for viewing, editing, and deleting.
At the top right corner of the section panel, you can also quickly add a new group by filling its name and tags in the pop-up triggered by clicking the New Group button.
# Group Details
After selecting the group name or an eye icon, the application user is redirected to a page filled with details of the group, e.g. name and tags.
Note: The list of assigned grants is available in the Grants tab.
From this level, the application user can perform various operations like group mapping, listing, and assigning group members, viewing devices and operating on group-related grants (assigning, revoking).
# Group Mapping
Group Mapping functionality gives application users the possibility to create a direct connection between existing identity provider groups and Ability-based ones. This allows the user to perform multi-assignment for a specific group of users to provide them a set of access rights (grants).
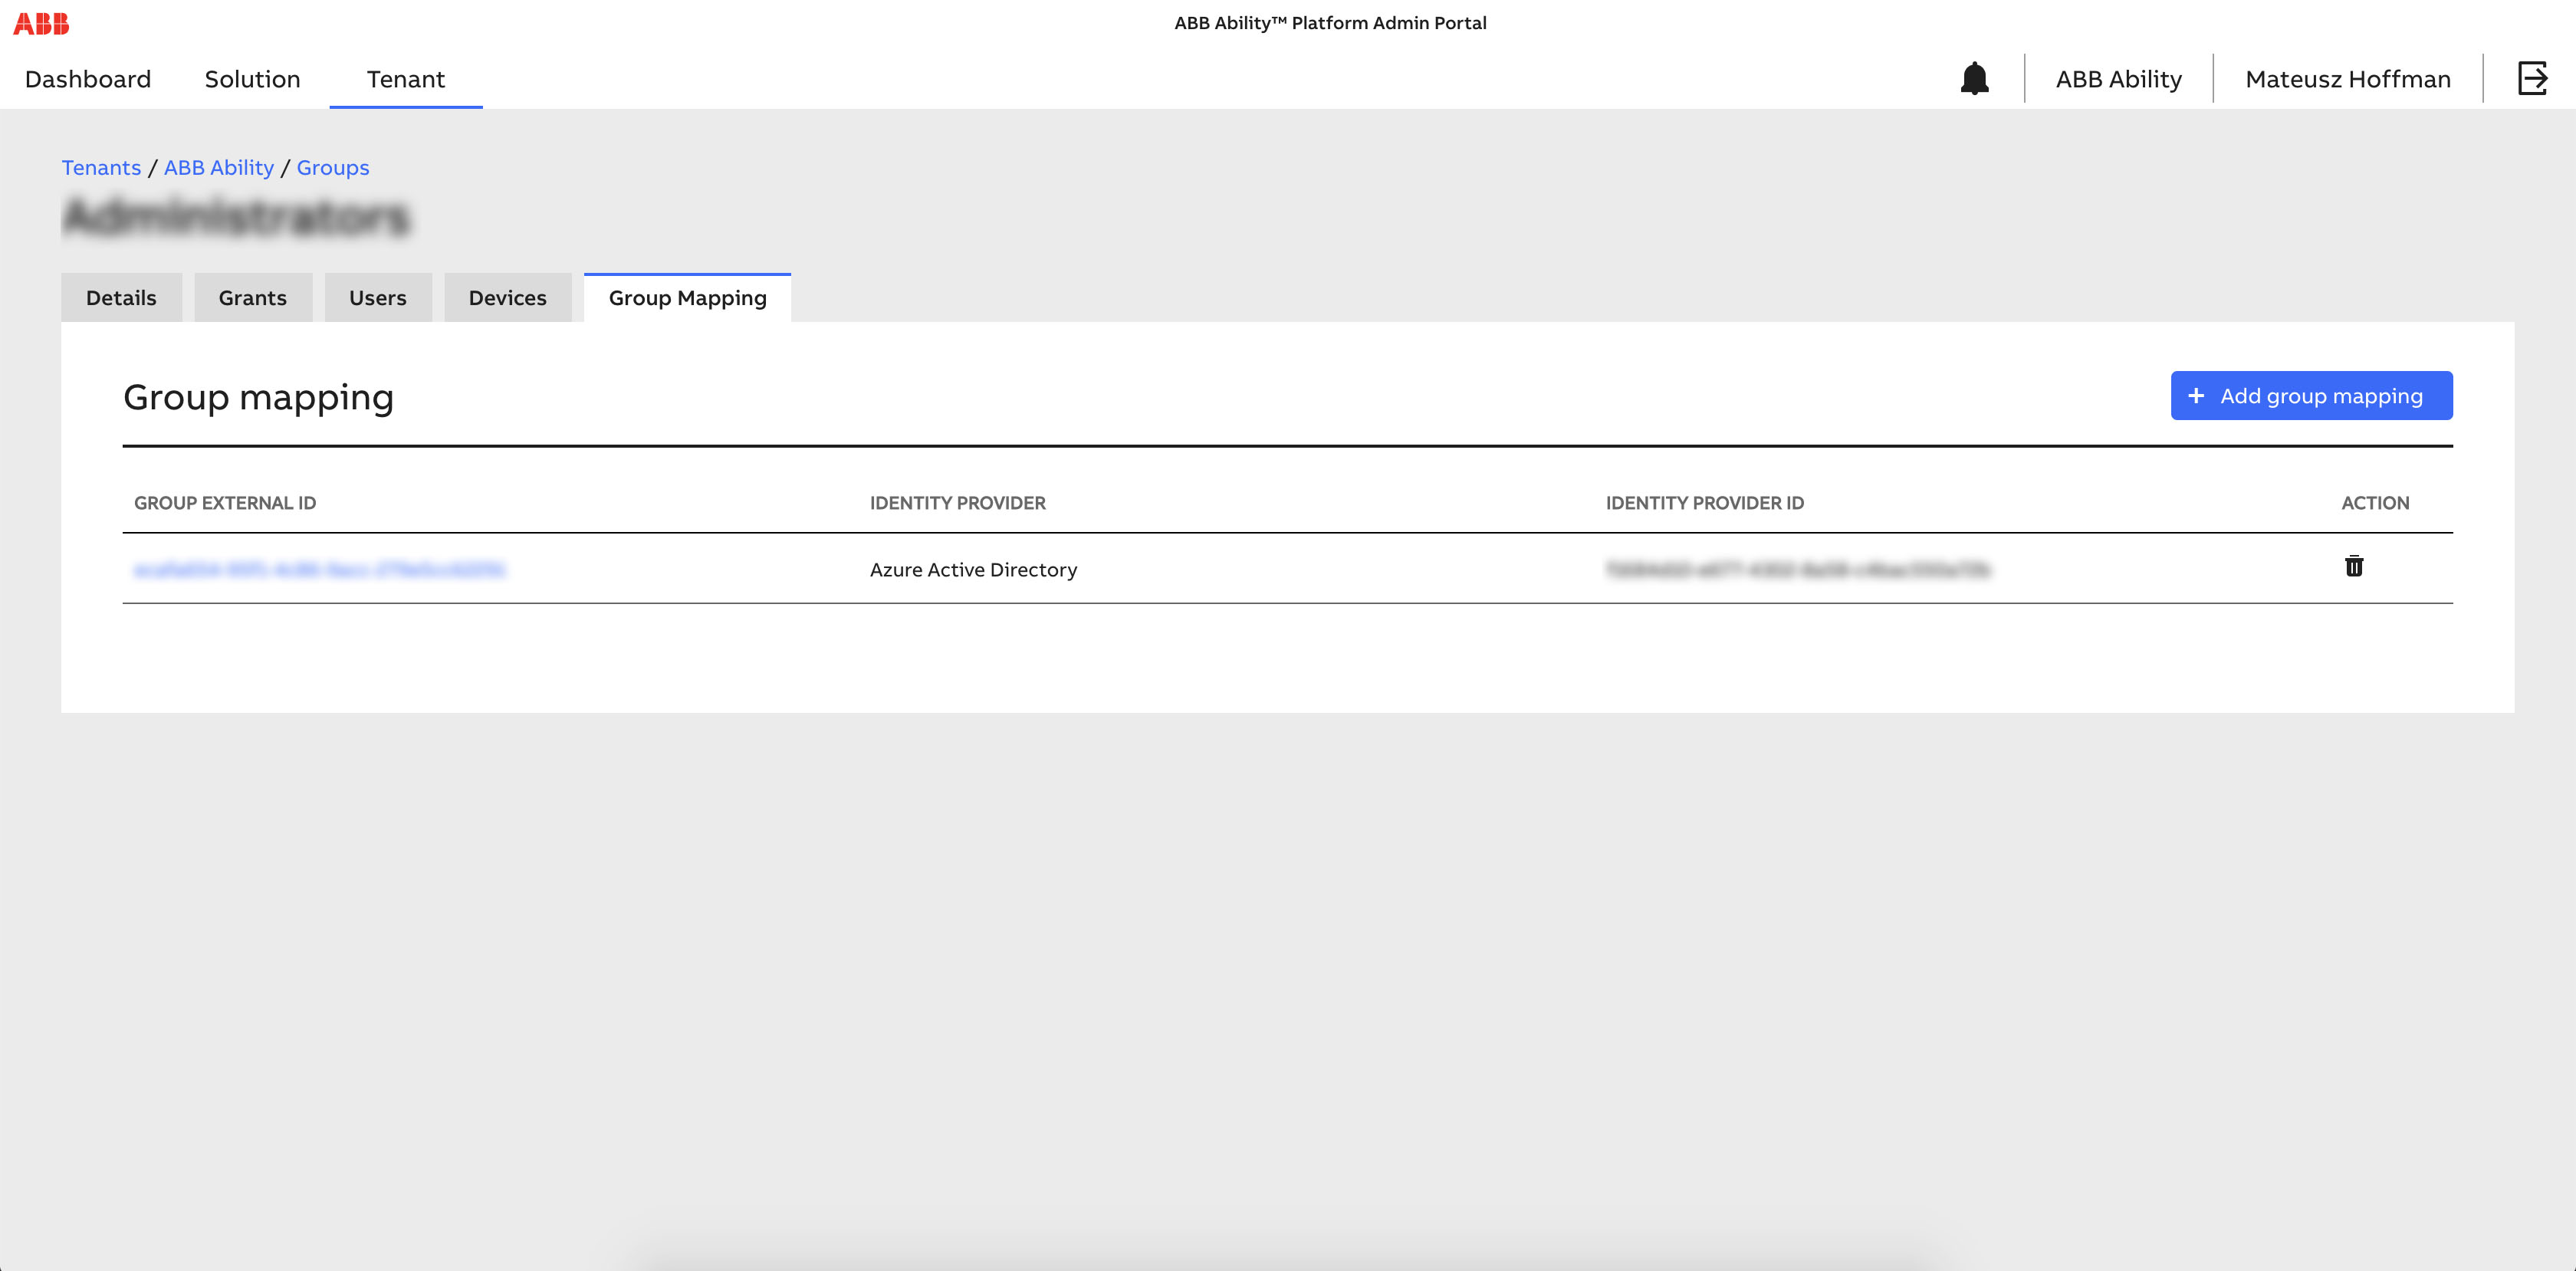
The procedure for adding new mapping requires the user to click the Add Group Mapping button located in top right corner, then to fill out the displayed pop-up form by providing a selection of registered Identity Provider and unique identifier related to its group.
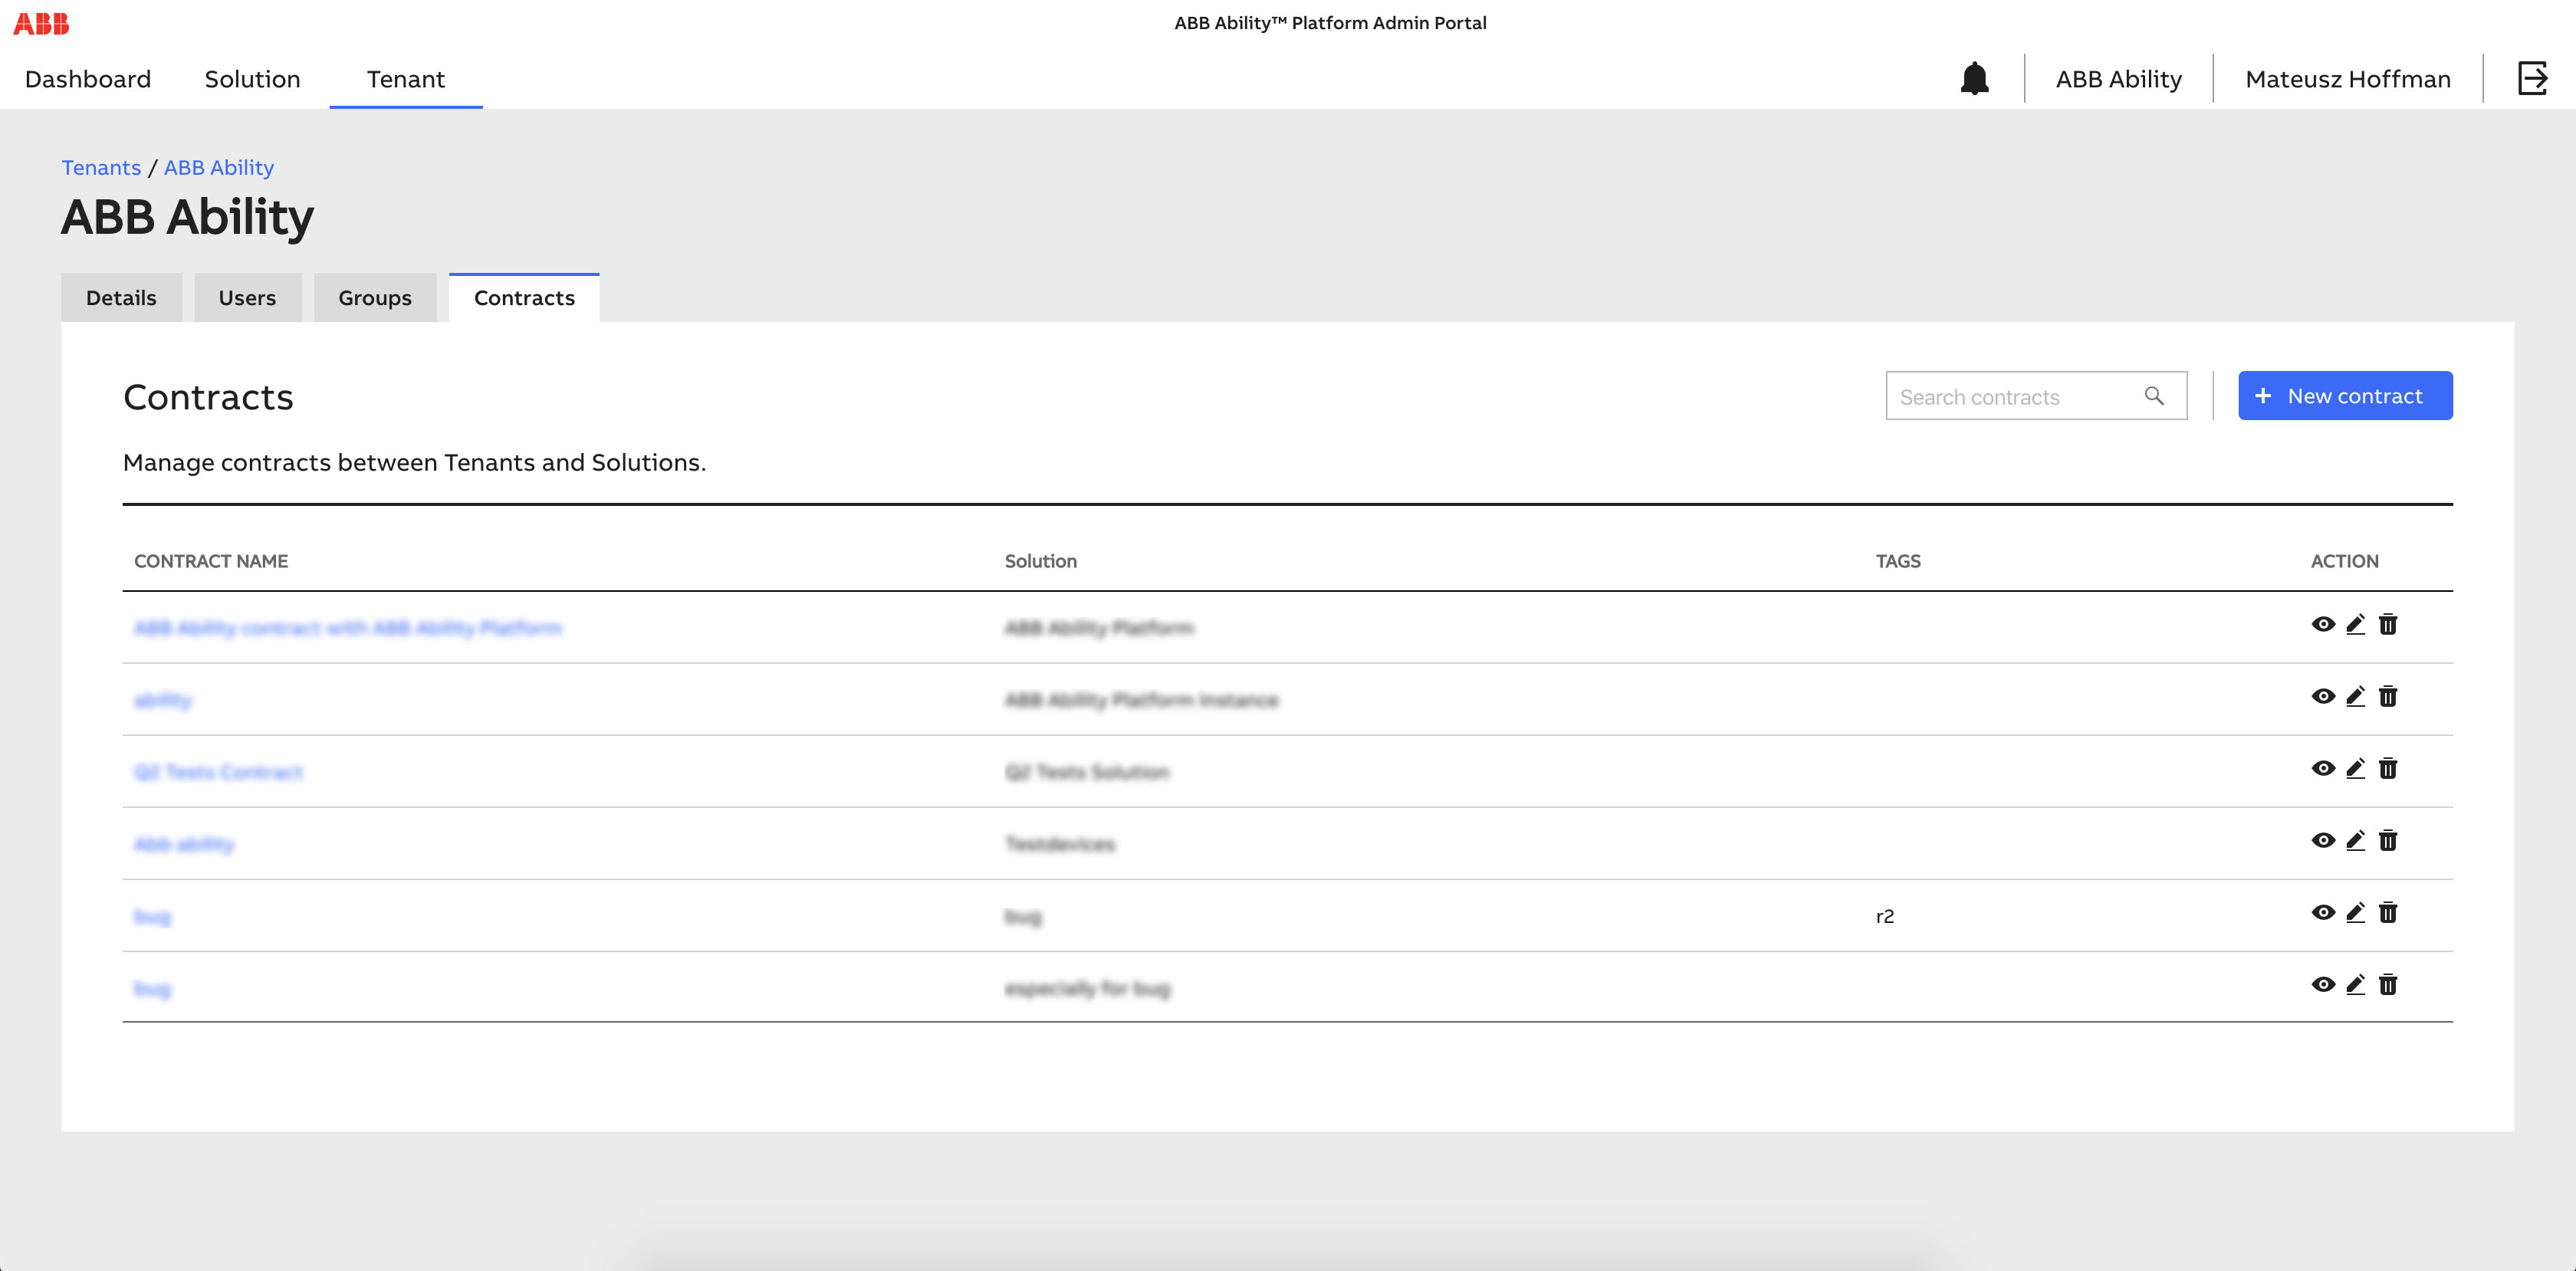
# Contracts
This section is dedicated to managing existing contracts between Ability-based tenants and solutions (consistent with the Multitenancy concept).
From this level, the application user is able to view, add, modify and delete entities of this type by using the list view.
The page contains a table view of all accessible contracts with basic information like the name, solution, tags, and available actions (based on user permissions, i.e. viewing, editing, deleting). After clicking on a contract's name or an eye icon the user will be redirected to a section with data specific to the selected item (contract's context view). If the user has editing permissions, the pencil icon allows them to go to the contract edit mode (by default reserved for Ability Admin persona). If the user has deleting permissions, the bin icon allows them to delete a contract (by default reserved for Ability Admin persona). If a user has create permissions, the New contract button allows them to create a contract (by default reserved for Ability Admin persona).
# Create contract
The user needs to fill out the form in order to create a new Contract in the platform, by providing name, solution, custom sign in, and error page URL, tags.
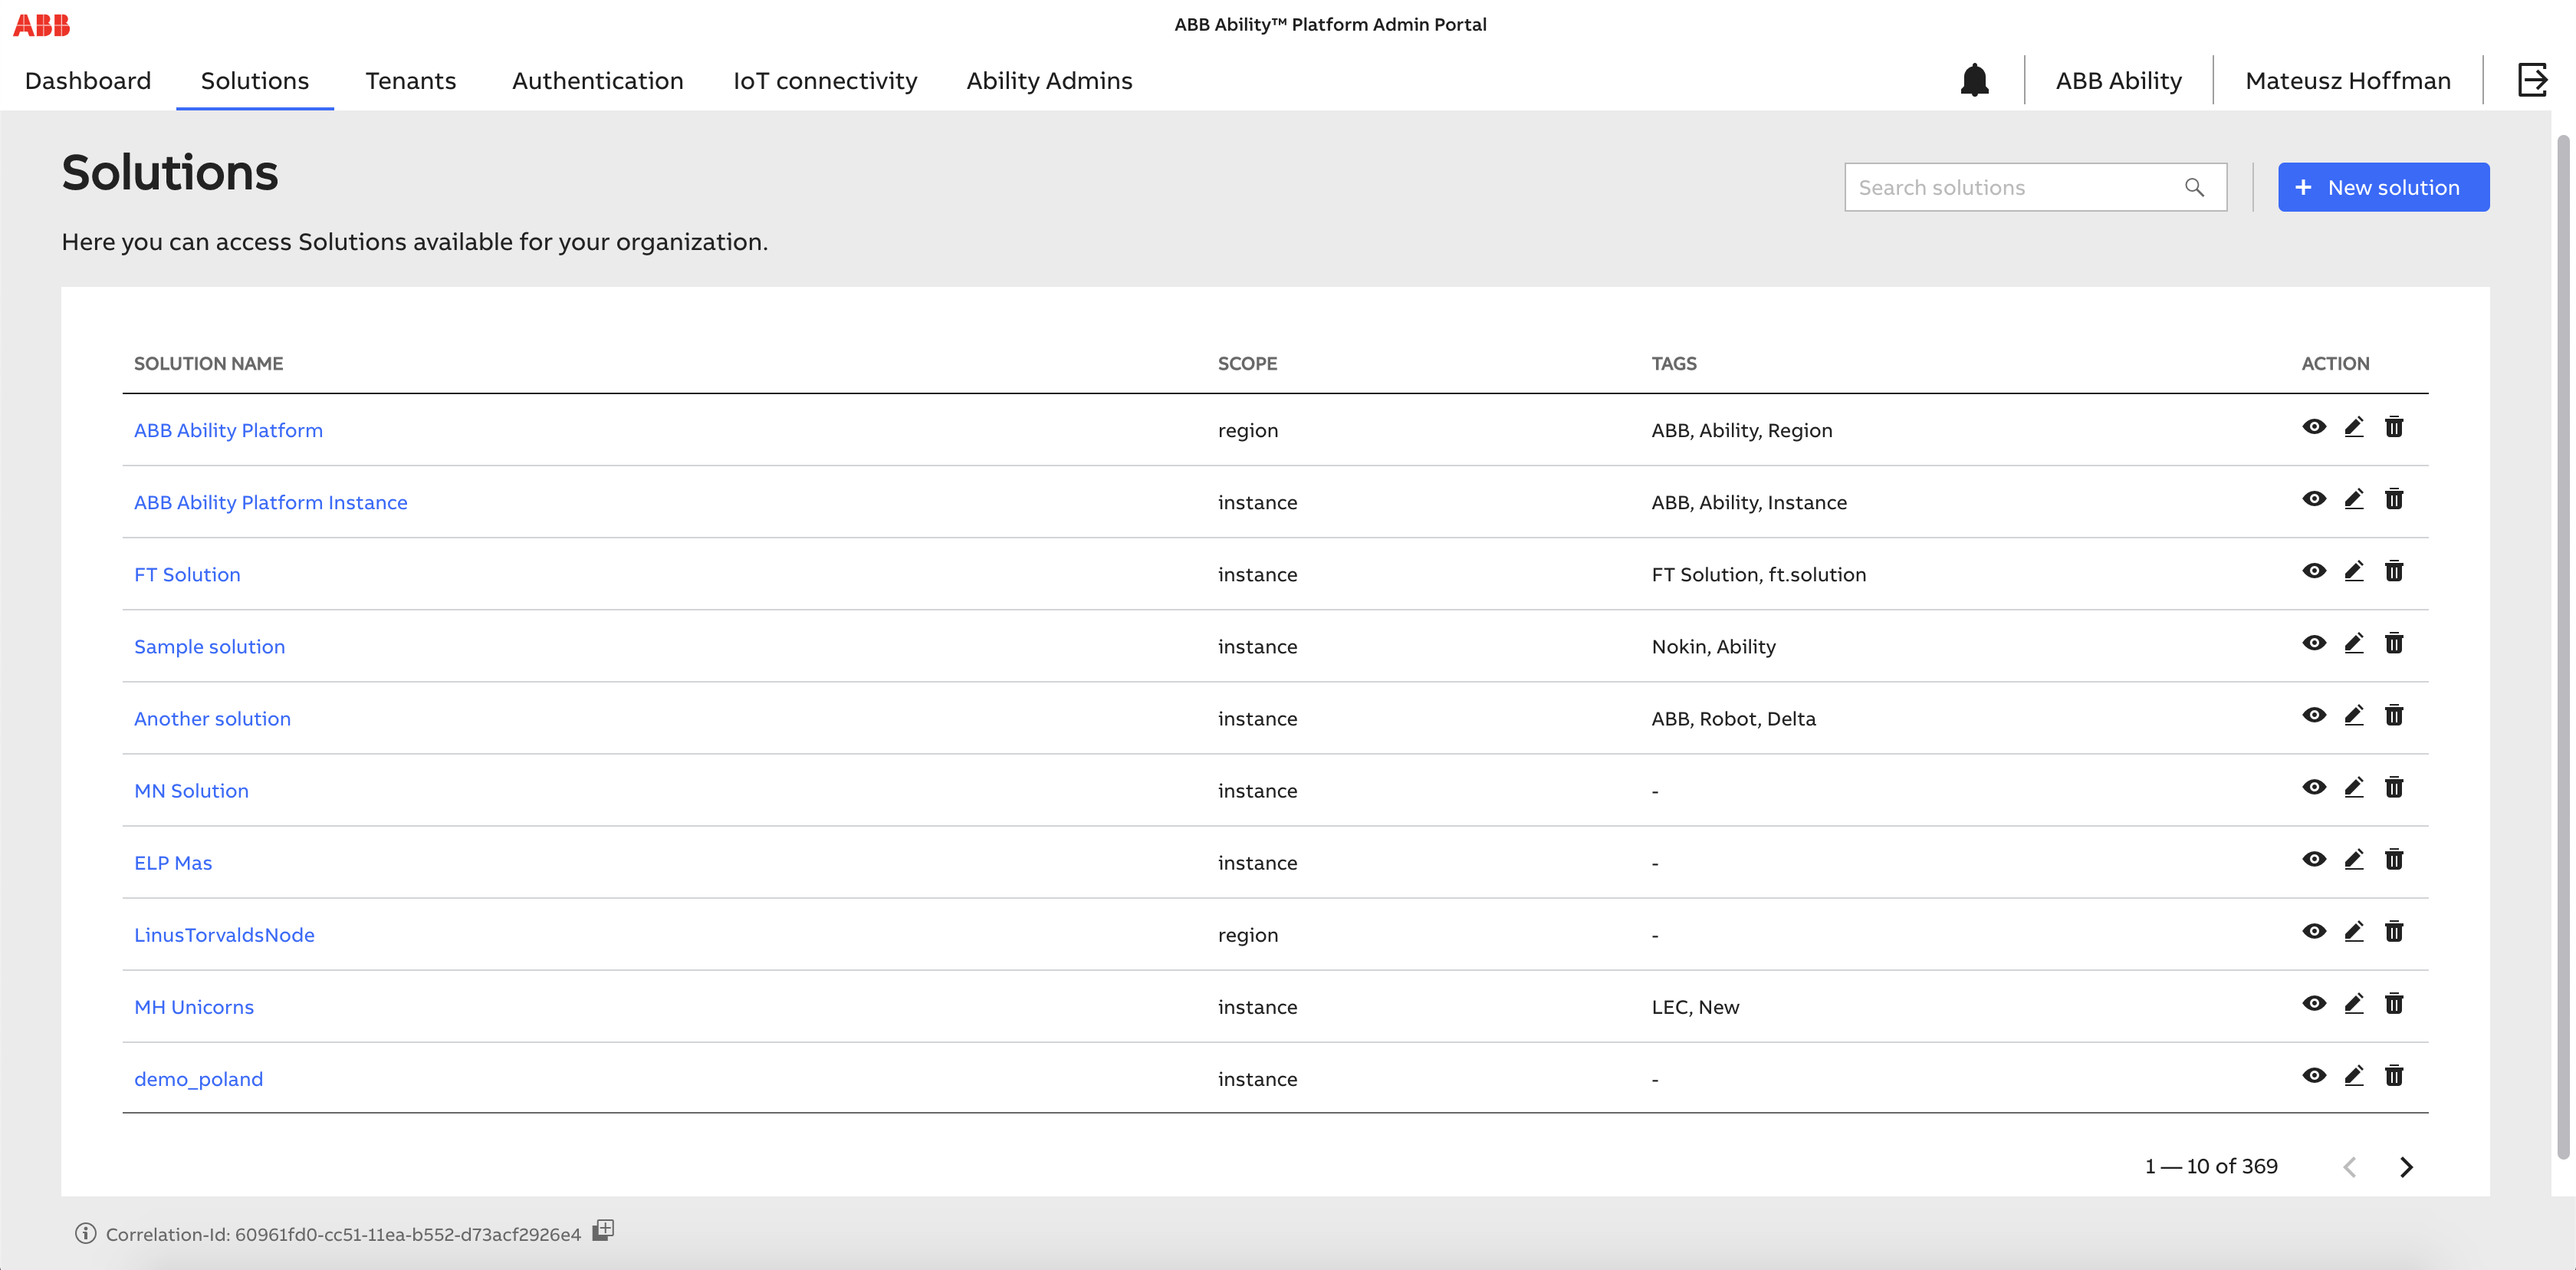
# Solutions
This page contains a table view of all accessible solutions with basic information like the name, scope, tags, and available actions (based on user permissions, i.e. viewing, editing, and deleting). After clicking the solution name or an eye icon the user will be redirected into a section with data specific to the selected item (solution context view). If the user has editing permissions, the pencil icon allows them to go to Solution Edit mode (by default reserved for Ability Admin and Solution Admin personas). If the user has deleting permissions, the bin icon allows them to delete a solution (by default reserved for Ability Admin persona). If the user has create permissions, the New solution button allows them to create a solution (by default reserved for Ability Admin persona).
# Solution create
The user needs to fill out the form in order to create a new solution in the platform, by providing Name, Namespace, Scope, and Tags.
# Solution details page
This area is oriented to a specific solution context and gives a user the ability to operate on the following main tabs:
- Applications
- Devices
- Roles
- Grants
- Contracts
- Resources
- Permissions
- Operations
In the next part of this documentation, we will take a deeper look into each of these tabs and describe the meaning of each, along with available actions.
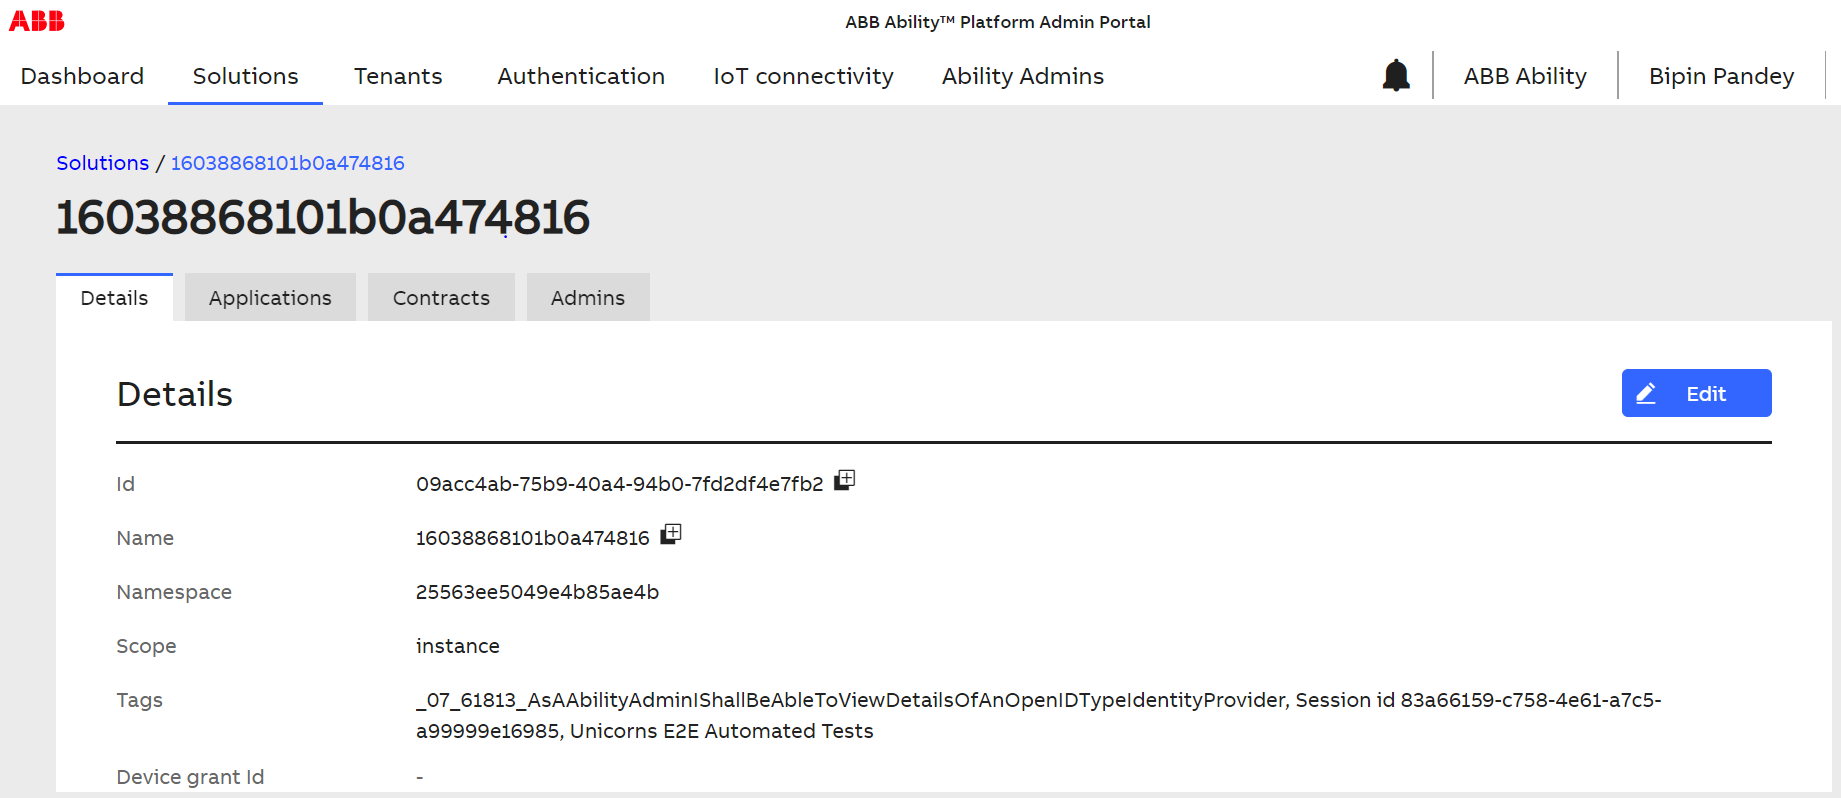
# Details
The details section is dedicated to providing the user with the most important data about the selected solutions. Based on their permissions, the user is able to see information about name, ID, tags, list of solutions administrators, or administrative groups (assigned and granted for such a role).
Note: Authorized users can assign a Solution Admin grant to other users or groups directly from the Admins tab as well as revoke a Solution Admin grant from users or groups.
From this page, by clicking a name value from the administrators list, the
application user is able to navigate to the list details. See the User
Details and Group
Details sections
# Applications
This page contains a table view of all accessible applications with basic information like the name, type, delegate, tags, and available actions (based on user permissions, i.e. viewing, editing and deleting). A warning icon is presented next to the application listed if it doesn't have any grants assigned. After clicking on an application name or an eye icon the user will be redirected to a section with data specific to the selected item (application context view). If the user has editing permissions, the pencil icon allows them to go to application edit mode (by default reserved for Ability Admin and Solution Admin personas). If the user has deleting permissions, the bin icon allows them to delete an application (by default reserved for Ability Admin persona).
If the user has permissions to create applications, the New application button will appear.
# Create application
The user needs to fill out the form in order to create new a app in the platform, by providing Name, Delegation, Type, Tags, and Redirect URLs. For Solution Admin the only Delegation available is 'User'. In case the 'User' delegation is selected, there is no possibility to select a 'Background' type.
# Application details
The details section is dedicated to providing the most important data about the selected application. Based on the user's permissions, the user is able to see information about name, delegation, type, tags, client ID, and client secret. The client secret is covered by default and needs additional user action to reveal the value. The user can regenerate a client secret by using the regenerate link. From this view users can reach the Grants tab, where capabilities are extended by assigning grants to the application and revoking existing ones.
Following addition has been implemented to prevent accidental updates.
Information icon appears next to the application currently logged in. New pop-up confirmation to avoid accidental regeneration of secret. Prevention of accidental removal of active Redirect URL of the app.
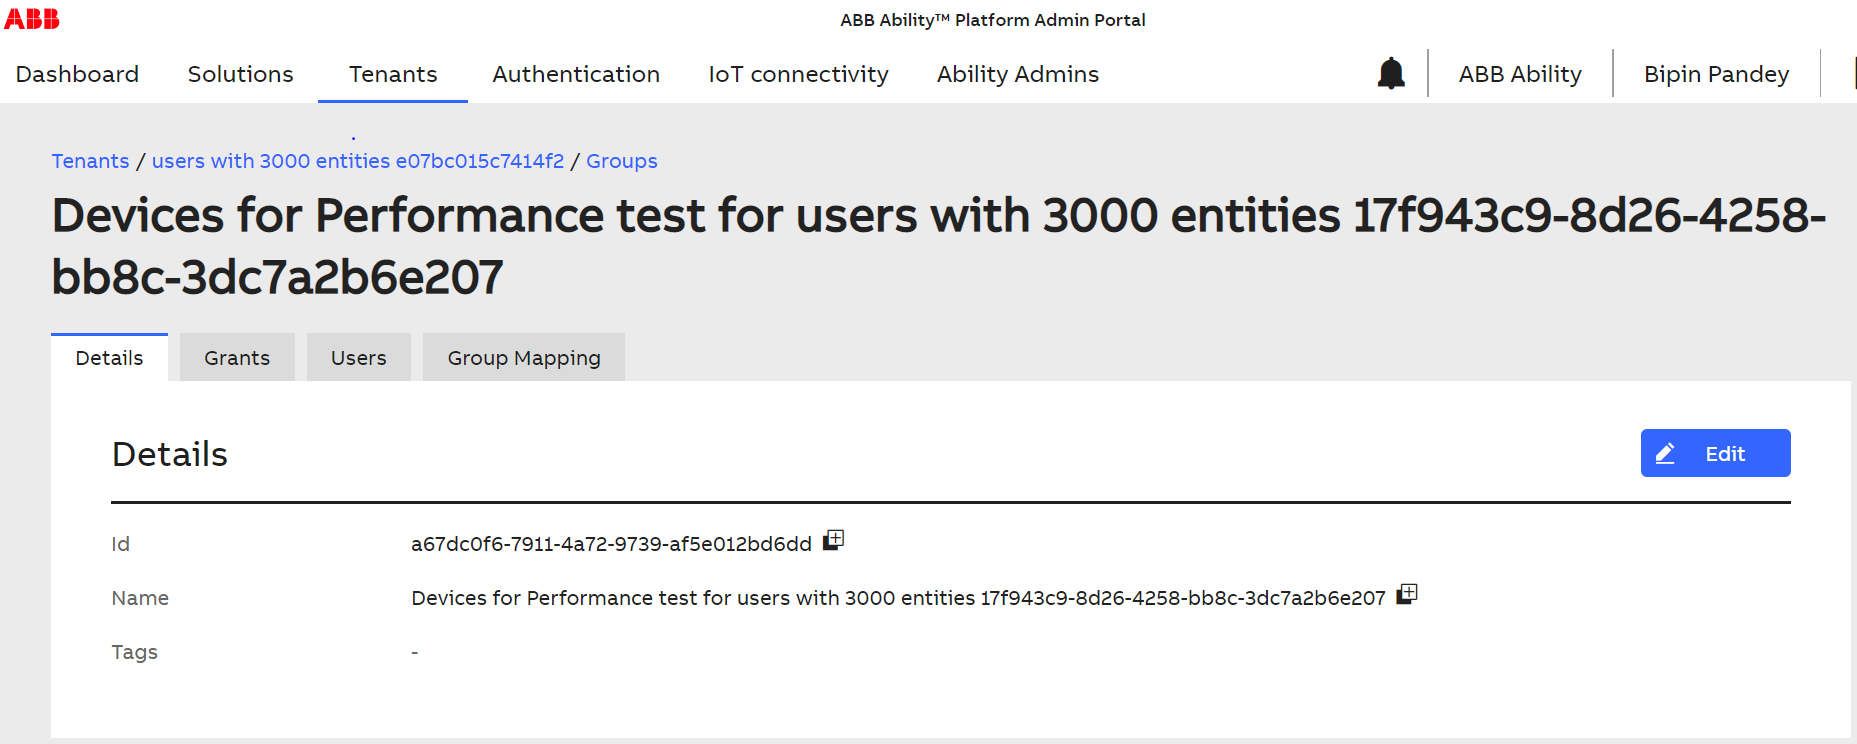
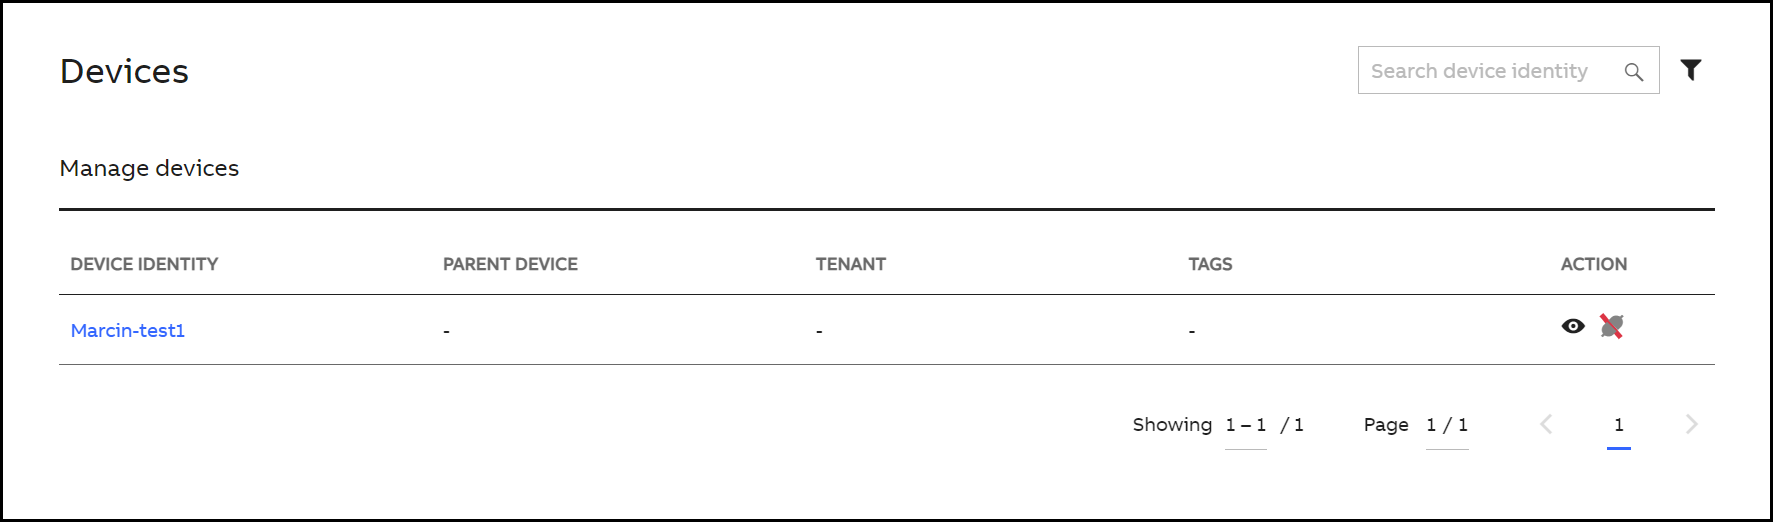
# Devices
This page contains a table view of all accessible devices with basic information like the name, parent, tenant, tags, connection status, and available actions (based on user permissions, i.e. viewing, editing, deleting, disconnecting). After clicking on a device's name or an eye icon the user will be redirected into a section with data specific to the selected item (device's context view). If the user has editing permissions, the pencil icon allows the user to go to device edit mode (by default reserved for Solution Admin persona). If the user has deleting permissions, the bin icon allows the user to delete a device (by default reserved for Solution Admin persona).
If the user has permissions to create Devices, a New device button will appear.
Solution Admin can connect a device through connect device plugin icon.
Note: The device must belong to a Tenant in order to be connected; otherwise, connect device plugin icon will be disabled.
# Create device
The user needs to fill out the form in order to create a new device in the platform, by providing Identity, Certificate Authority, Tenant, and Tags.
Admin can select the type for tenant's tag for editing tags in the form of Pill or Textarea. The Pill is valid for short words, typical tags; however, Textarea is an alternative if users want to enter more content conveniently, including line breaks. Switching from Textarea to Pill will show a warning about losing the line breaks & formatting.
# Device details
The details section is dedicated for providing the most important data about the selected application. Based on their permissions, the user is able to see information about name, delegation, type, tags, client ID, and client secret. Client secret is covered by default and needs additional user action to reveal the value. The user can regenerate a client secret by using the regenerate link. From this view the user can reach the Grants tab, where capabilities are extended with assigning grants to a device and revoking existing ones.
# Roles
The Roles page contains a table view of all accessible roles with basic information like the name, tags, and available actions (based on user permissions, i.e. viewing, editing, deleting). After clicking on a role's name or an eye icon, the user will be redirected to a section with data specific to the selected item (the role's context view). If the user has editing permissions, a pencil icon allows the user to go to Role edit mode (by default reserved for Solution Admin and Ability Admin personas). If the user has deleting permissions, a bin icon allows the user to delete a role (by default reserved for Solution Admin and Ability Admin personas).
# Create role
The user needs to fill out the form in order to create a new role in the platform, by providing name, tags, and selecting the available permissions that will be associated with this role.
# Role details
The details section is dedicated for providing the user with most important data about the selected role. Based on their permissions, the user is able to see information about name, ID, scope, solution ID, tags, and permissions.
Grants tab in role details will show grants available for this role. New grant with selected role can be created.
# Grants
The Grants page contains a table view of all accessible Grants with basic information like the name, role, tags, and available actions (based on user permissions, i.e. viewing, editing, deleting). After clicking on the grant's name or an eye icon, the user will be redirected to a section with data specific to the selected item (grant's context view). If the user has editing permissions, a pencil icon allows the user to go to Grant edit mode (by default reserved for Solution Admin and Ability Admin personas). If the user has deleting permissions, a bin icon allows the user to delete a grant (by default reserved for Solution Admin and Ability Admin personas).
# Create grant
The user needs to fill out the form in order to create a new grant in the platform, by providing name, tags, and by selecting the available role that will be associated with this grant. On top of the selected role the user is able to create conditions and traversals that will allow the user to impose restrictions on platform resources. The user can add multiple rules that will operate on different permissions (however two rules can't operate on the same permission).
This functionality is reserved for Solution Admin who creates Solution-specific grants.
The Admin Portal enables Tenant Admin to create Tenant-specific grants.
Tenant-specific grants are associated with a Tenant ID and can be further assigned to users or groups. Forms for creating a Tenant-specific grant is similar to Solution-specific grants with an additional field, Tenant ID to be selected.
# Grant details
The details section is dedicated for providing the user with most important data about the selected grant. Based on their permissions, the user is able to see information about ID, Solution ID, grant name, scope, tags, role, permissions, and rules. From here the user can also do a quick overview of grant assignments summarizing to which entity the current grant is assigned, along with the possibility of revoking.
# Managing Grants
With the Manage grants feature, you can perform the following operations:
- Assigning grants to all selected users
- Assigning grants to part of the selected users
- Revoking grants from the selected users
- Filtering grants by name and the assignment status
Perform the following steps to manage grants for selected users:
- Navigate to Tenants > Users tab.
- Select the user check boxes you want to manage grants.
The Manage grants button is displayed.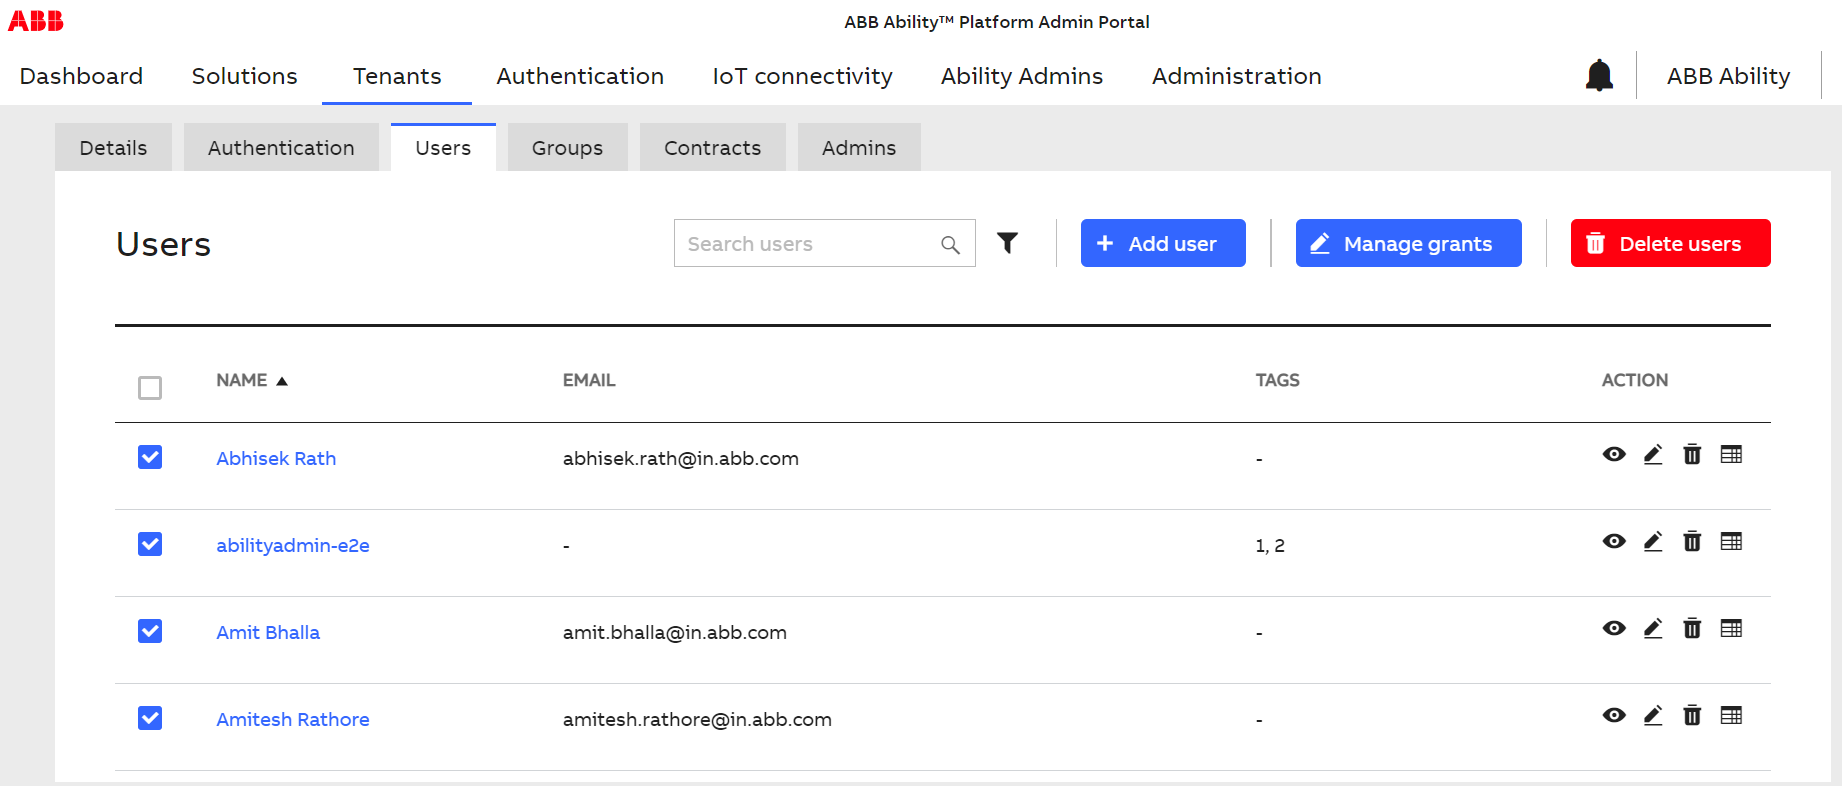
- Click Manage grants.
The Manage users grants window is displayed.
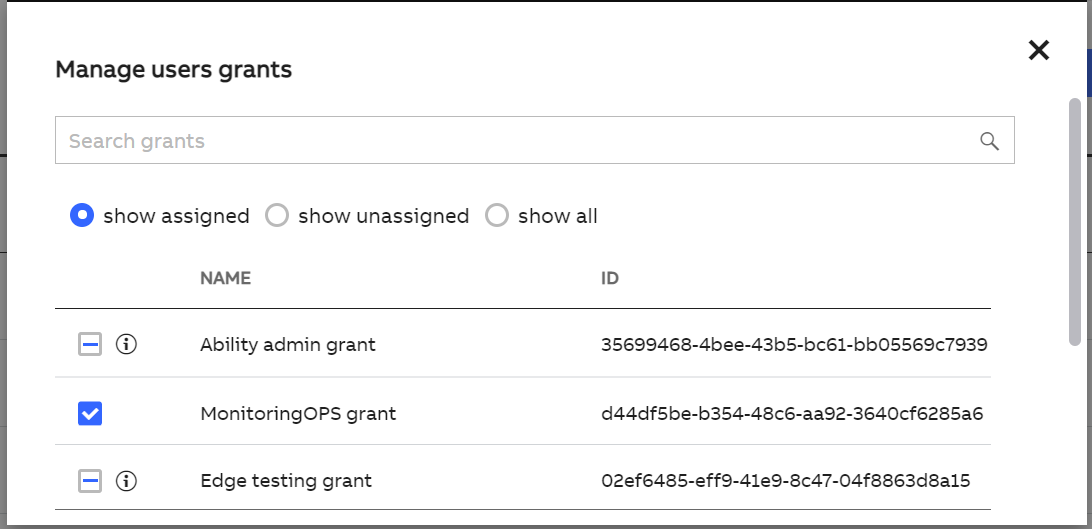
- Click show assigned to view users assigned grants.
Note: The intermediate selected check box indicates that not all the selected users are assigned with this grant. - Hover on the exclamation icon to view the grant assigned users detail.
- Click show unassigned to view all unassigned grants.
- Select the grant check box that you want to assign to users.
Note: The selected grant will be assigned to all selected users. You can choose multiple grants at a time. - Enter Yes for confirmation and click Confirm.
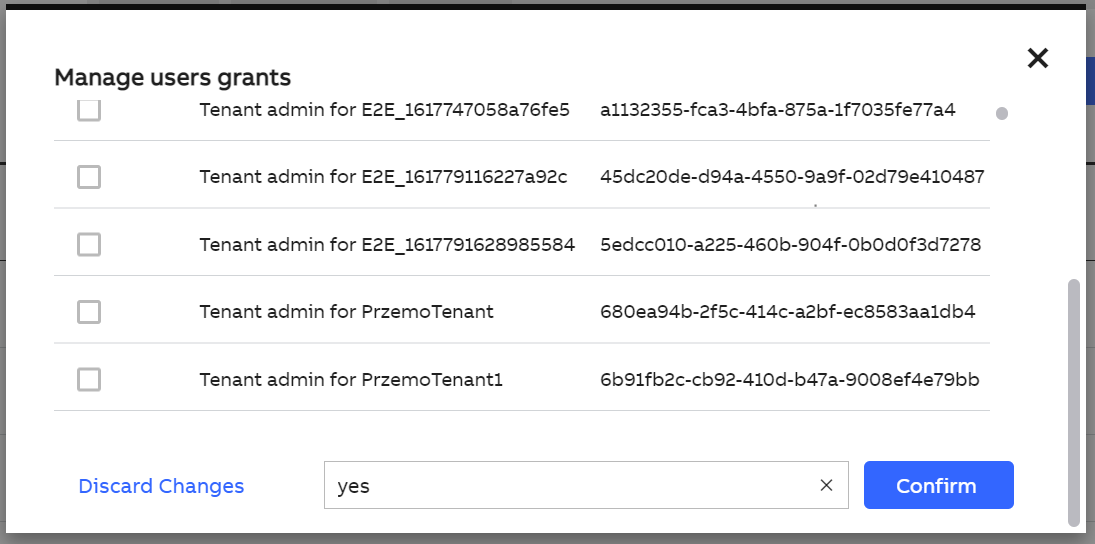
- Check the status of the request in the Notification panel.
Note: The managing grant process may take several minutes. Admin can continue to navigate through the Portal; however, logging out from the Admin Portal application will allow the process to run in the background). In case of cancellation, the assigned/revoked grants users will remain in the system.
# Contracts
The page contains a table view of all accessible contracts with basic information like the name, tenant, tags, and available actions (based on the user permissions, i.e. viewing, editing, deleting). After clicking on a contract's name or an eye icon the user will be redirected to a section with data specific to the selected item (contract's context view). If the user has editing permissions, a pencil icon allows the user to go to Contract edit mode (by default reserved for Ability Admin persona). If the user has deleting permissions, a bin icon allows the user to delete a contract (by default reserved for Ability Admin persona). If the user has create permissions, the New contract button allows the user to create a contract (by default reserved for Ability Admin persona).
# Create contract
The user needs to fill out the form in order to create a new contract in the platform, by providing name, tenant, custom sign in and error page URLs, and tags.
# Contract details
The details section is dedicated for providing the user with most important data about the selected contract. Based on their permissions, the user is able to see information about ID, Solution name, contract name, sign-in and error page URLs, and tags.
# Resources
The Resources page contains a table view of all accessible resources with basic information like the type, scope, tags, and available actions (based on user permissions - viewing, deleting). After clicking on the resource's name or an eye icon the user will be redirected to a section with data specific to the selected item (resource's context view). If the user has deleting permissions, a bin icon allows the user to delete a resource (by default reserved for Solution Admin and Ability Admin personas).
# Create resource
The user needs to fill out the form in order to create a new resource in the platform, by providing type, scope, tags, and properties (one or multiple).
# Resource details
The details section is dedicated for providing the user with most important data about the selected resource. Based on their permissions, the user is able to see information about type, scope, tags, and properties.
# Permissions
The Permissions page contains a table view of all accessible permissions with basic information like the name, scope, resource, access, tags, and available actions (based on user permissions, i.e. viewing, deleting). After clicking on the permission's name or an eye icon the user will be redirected to a section with data specific to the selected item (Permission's context view). If the user has deleting permissions, a bin icon allows the user to delete a permission (by default reserved for Solution Admin and Ability Admin personas).
# Create Permission
The user needs to fill out the form in order to create a new resource in the platform by selecting resource type, access type, name (automatically populated based on the selection of the previous two fields), scope, and tags.
# Permission details
The details section is dedicated for providing the user with most important data about the selected permission. Based on their permissions, the user is able to see information about name, scope, resource, access, and tags.
# Operations
The Operations page contains a table view of all accessible operations with basic information like the operation ID, permissions, tags, and available actions (based on user permissions, i.e. viewing, deleting). After clicking on the operation's name or an eye icon the user will be redirected to a section with data specific to the selected item (Operation's context view). If the user has deleting permissions, a bin icon allows the user to delete an operation (by default reserved for Solution Admin and Ability Admin personas).
# Create Operation
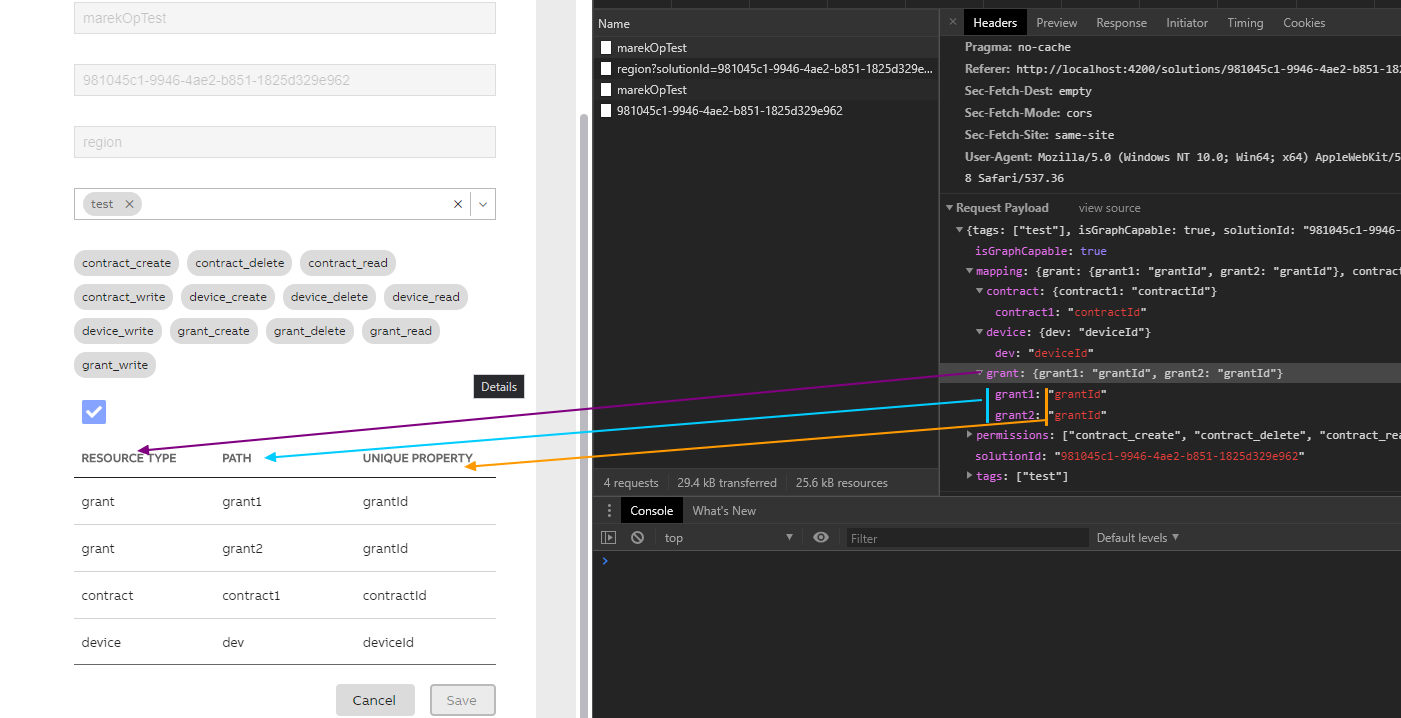
The user needs to fill out the form in order to create a new operation in the platform, by providing operation name, scope, tags, and permissions. Optionally, properties of resources can be mapped to properties of API endpoints.
Front end validation is added to handle valid Principal Manager API requests.
Valid Examples:
- Create operation with providing only operation ID (should be unique per solution operations scope). Optional fields:
tagsisGraphCapablepermissions
- If the user selects permissions and adds mapping, mapping should be filled out because all fields are mandatory and is object specific.
- Resource type should be selected
- Path is unique per resource type
- Unique property should be selected and depends on resource type
- If selected permissions don't have unique property it will not be available to select them in resource type.
- If the user un-selects permission and permission will be selected in resource type mapping automatically will be cleaned, and new resource type should be selected.
# Operation details
The details section is dedicated for providing the user with most important data about the selected operation. Based on their permissions, the user is able to see information about name, scope, tags, permissions, and mapping of properties.
# Authentication tab
# OpenID Identity Providers
This page contains a table view of all accessible identity providers with basic information like the identity provider name, tags, and available actions (based on user permissions, i.e. viewing, editing, deleting). After clicking on the identity provider's name or an eye icon the user will be redirected to a section with data specific to the selected item (Identity Provider's context view). If the user has editing permissions, a pencil icon allows the user to go to Identity Provider's edit mode (by default reserved for Ability Admin persona). If the user has deleting permissions, a bin icon allows the user to delete an identity provider (by default reserved for the Ability Admin persona). If the user has create permissions, a New Identity Provider button allows the user to go to Identity Provider's create mode (by default reserved for Ability Admin persona).
# Create OpenID Identity Provider
The user needs to fill out the form in order to create a new identity provider in the platform, by providing IdP name, OpenID connect URL, Client ID, is Multitenant, tags, and attributes mapping. Optionally the user can select a predefined configuration that will pre-populate the fields according to OpenID documentation.
# OpenID Identity Provider details
The details section is dedicated for providing the user with most important data about the selected identity provider. Based on their permissions, the user is able to see information about ID, type, name, connect URL, client ID, is multitenant, tags, and attributes mapping.
# Certificates
The Certificates page contains a table view of all accessible certificate authorities with basic information like the certificate authority name, tags, verification status and available actions (based on user permissions, i.e. viewing, editing, deleting). After clicking on the certificate authority's name or an eye icon the user will be redirected to a section with data specific to the selected item (Certificate Authority's context view). If the user has editing permissions, a pencil icon allows the user to go to Certificate Authority's edit mode (by default reserved for Ability Admin persona). If the user has deleting permissions, a bin icon allows the user to delete a certificate authority (by default reserved for Ability Admin persona). If the user has create permissions, a New Certificate button allows the user to go to Certificate Authority create mode (by default reserved for Ability Admin persona).
# Create Certificate Authority
The user needs to fill out the form in order to create a new certificate authority in the platform, by providing name, certificate, and tags.
Invalid certificate format warning message display.
When a user creates or edits certificate body without begin/end tags, a warning message is displayed below the text-area field along with a link. Clicking the link fills out the BEGIN & END clauses.
User cannot edit existing certificate body in the certificate update mode. This field has been disabled while editing the existing certificate
# Certificate Authority details
The details section is dedicated for providing the user with most important data about the selected certificate authority. Based on their permissions, the user is able to see information about ID, type, name, verification status, certificate content, and tags. From this view the user can perform the process of verification of the certificate. By clicking show certificate details, content of the certificate is displayed in a human-readable form (provided that the certificate is in a proper PEM format).
Format of the issuer info modified to display:
Template:
Issuer: key=value, key=value, key=value
Subject: key=value, key=value, key=value
e.g. Subject: O=ABB, OU=Ability, CN=Test
(key & values can be used mulitple times)
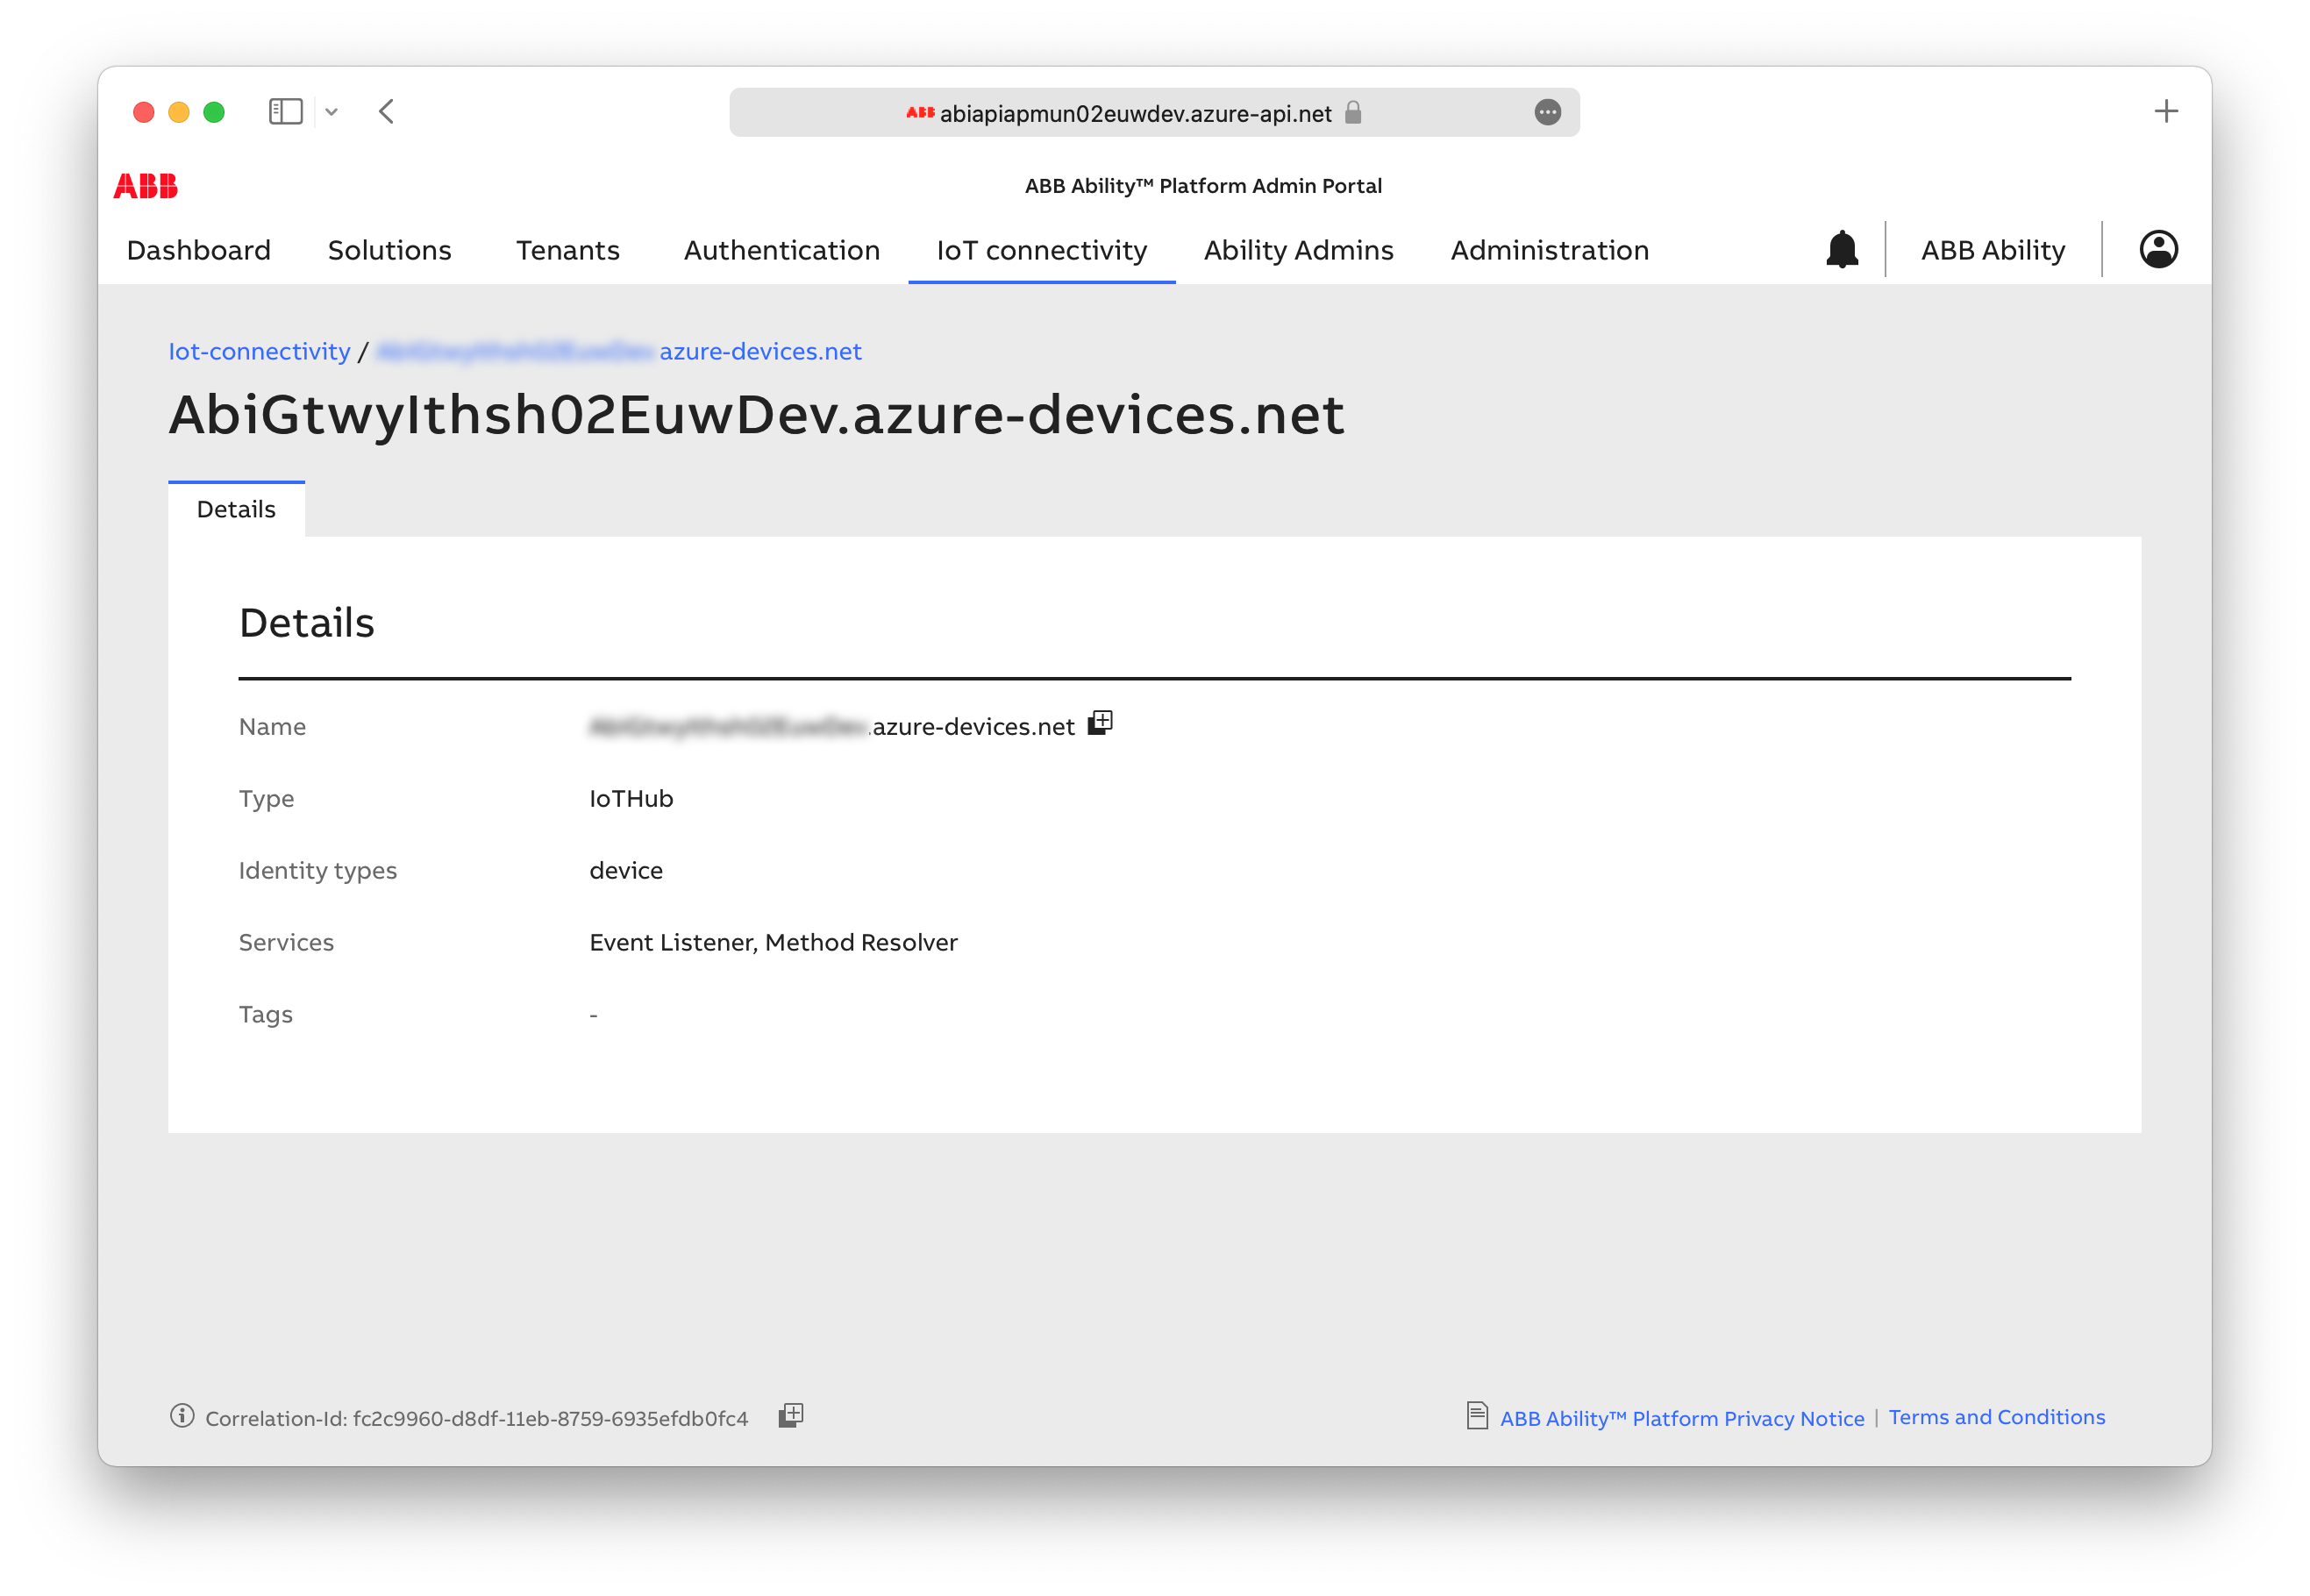
# IoT connectivity tab
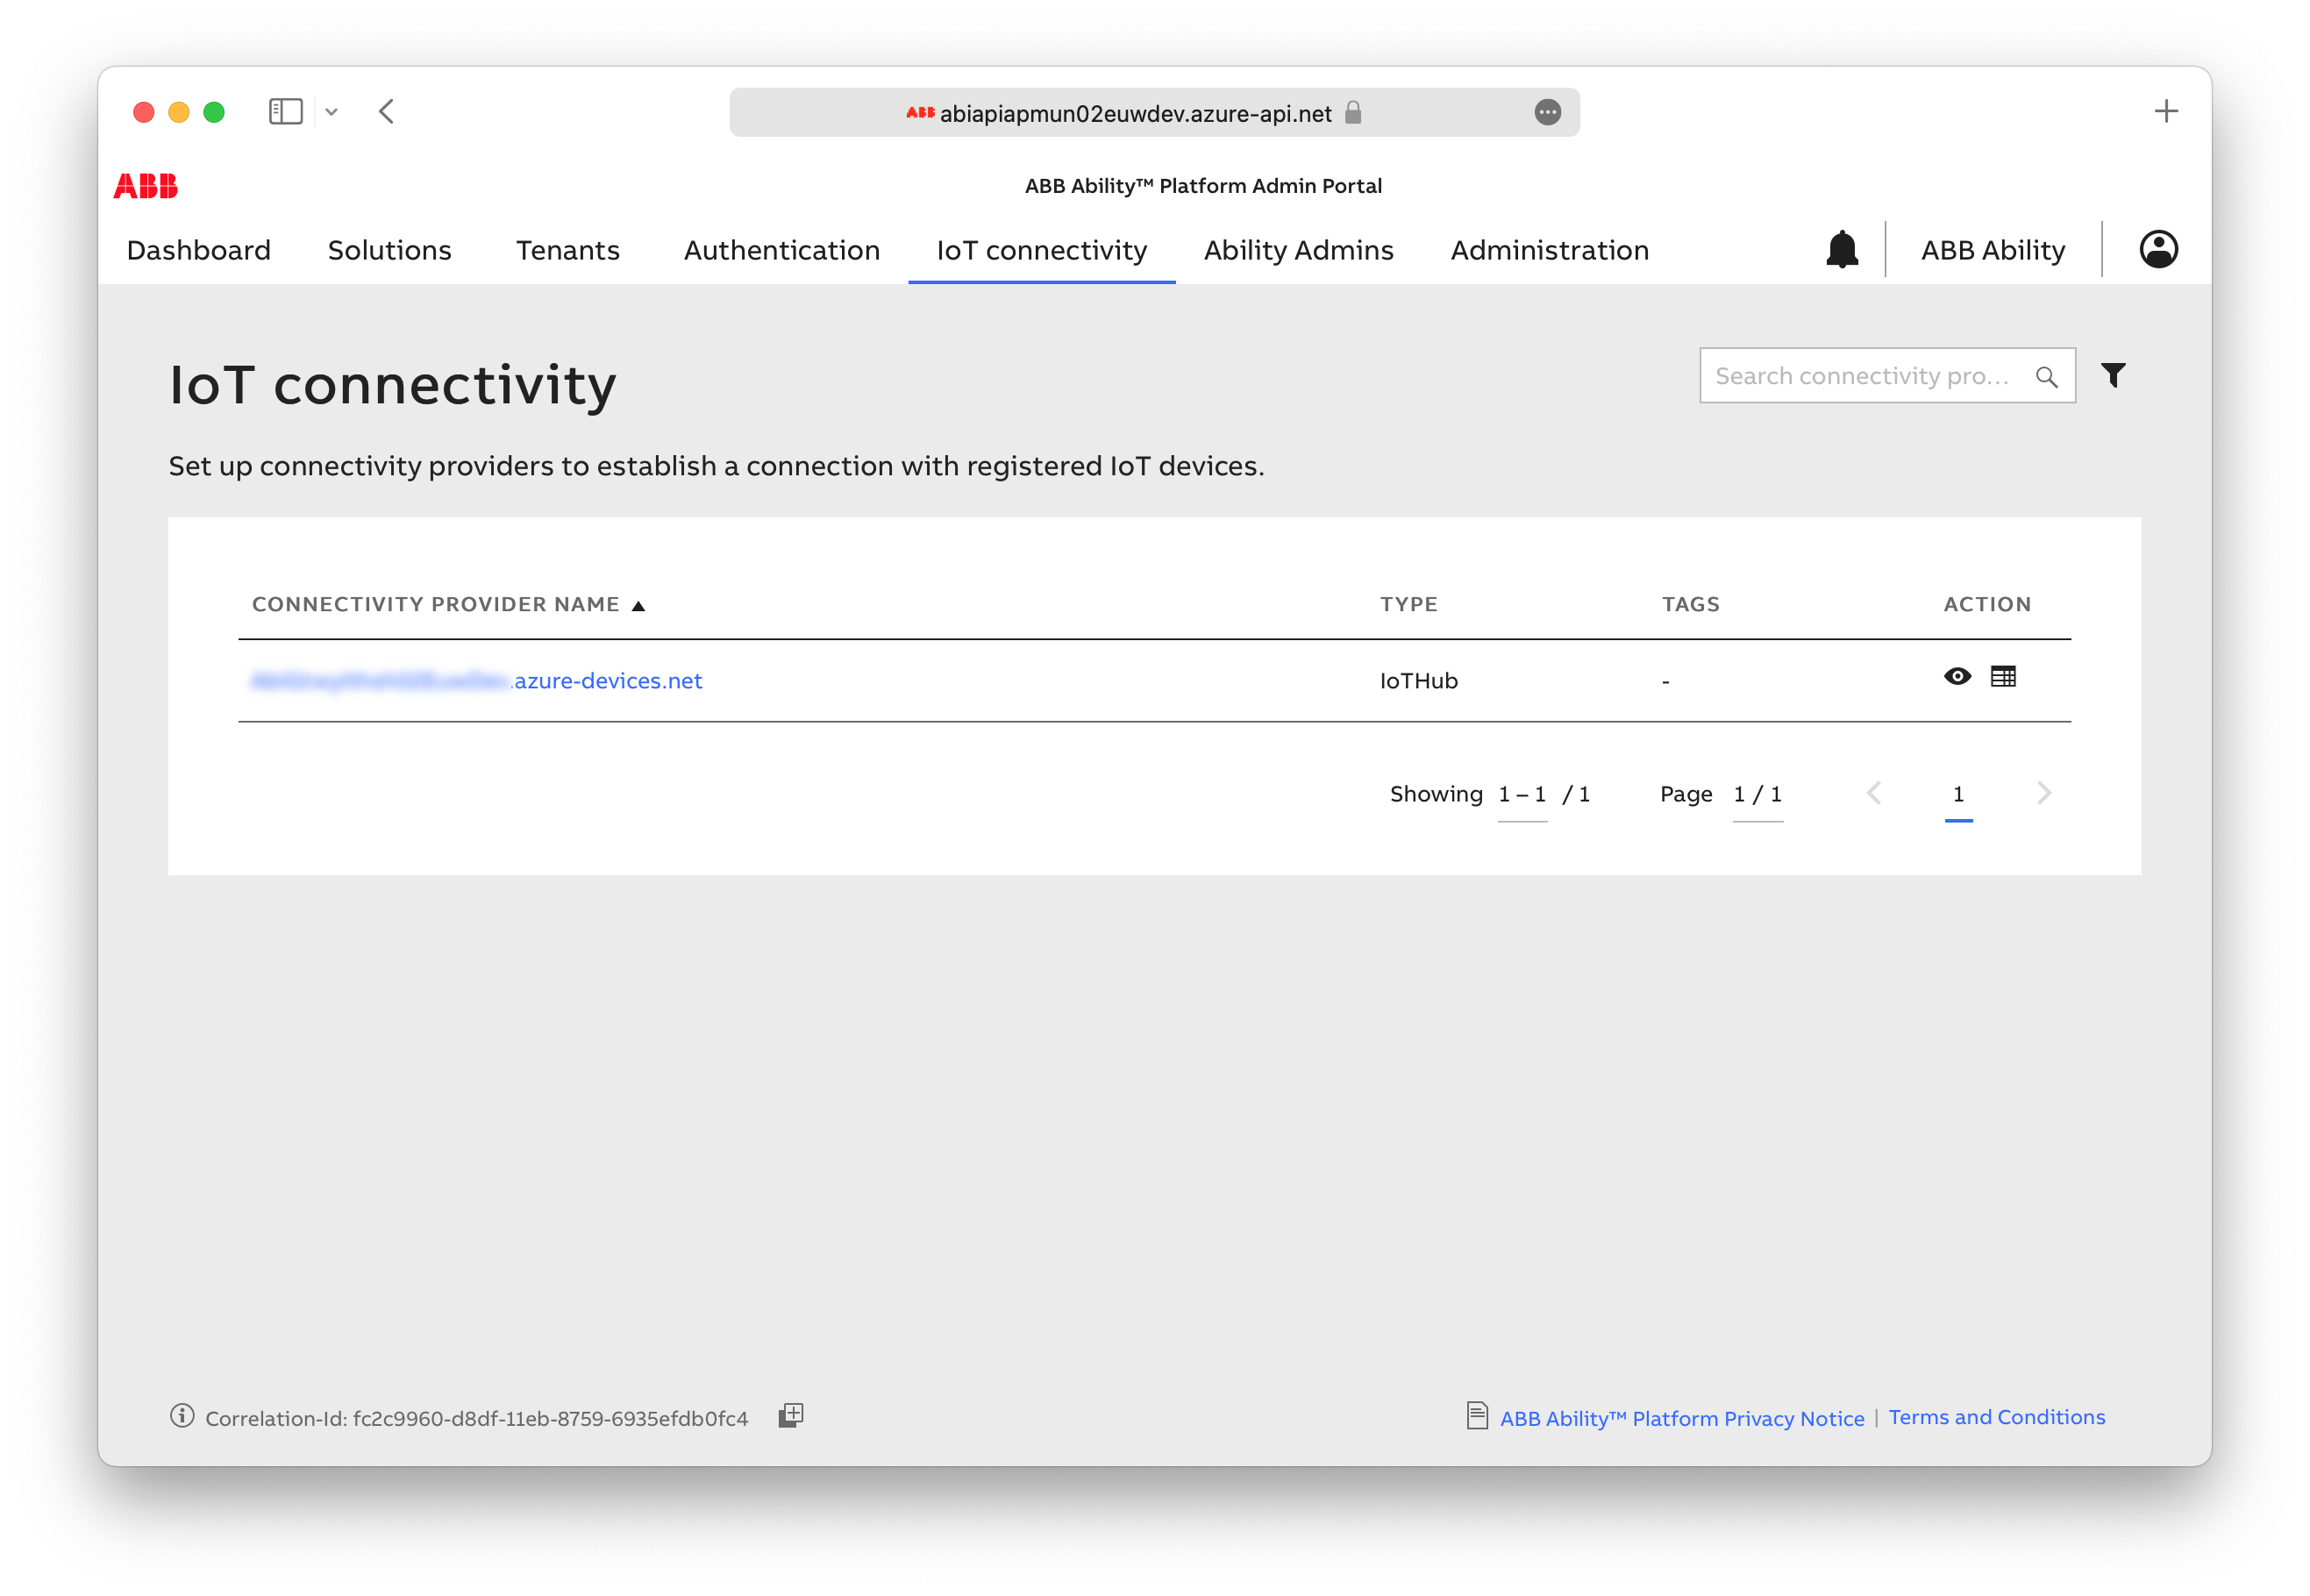
# Connectivity providers
This page contains a table view of all accessible connectivity providers with basic information like the connectivity provider name, type, tags, and available actions, i.e. viewing. After clicking on the identity provider's name or an eye icon the user will be redirected to a section with data specific to the selected item (Connectivity Provider's context view).
# Ability Admins tab
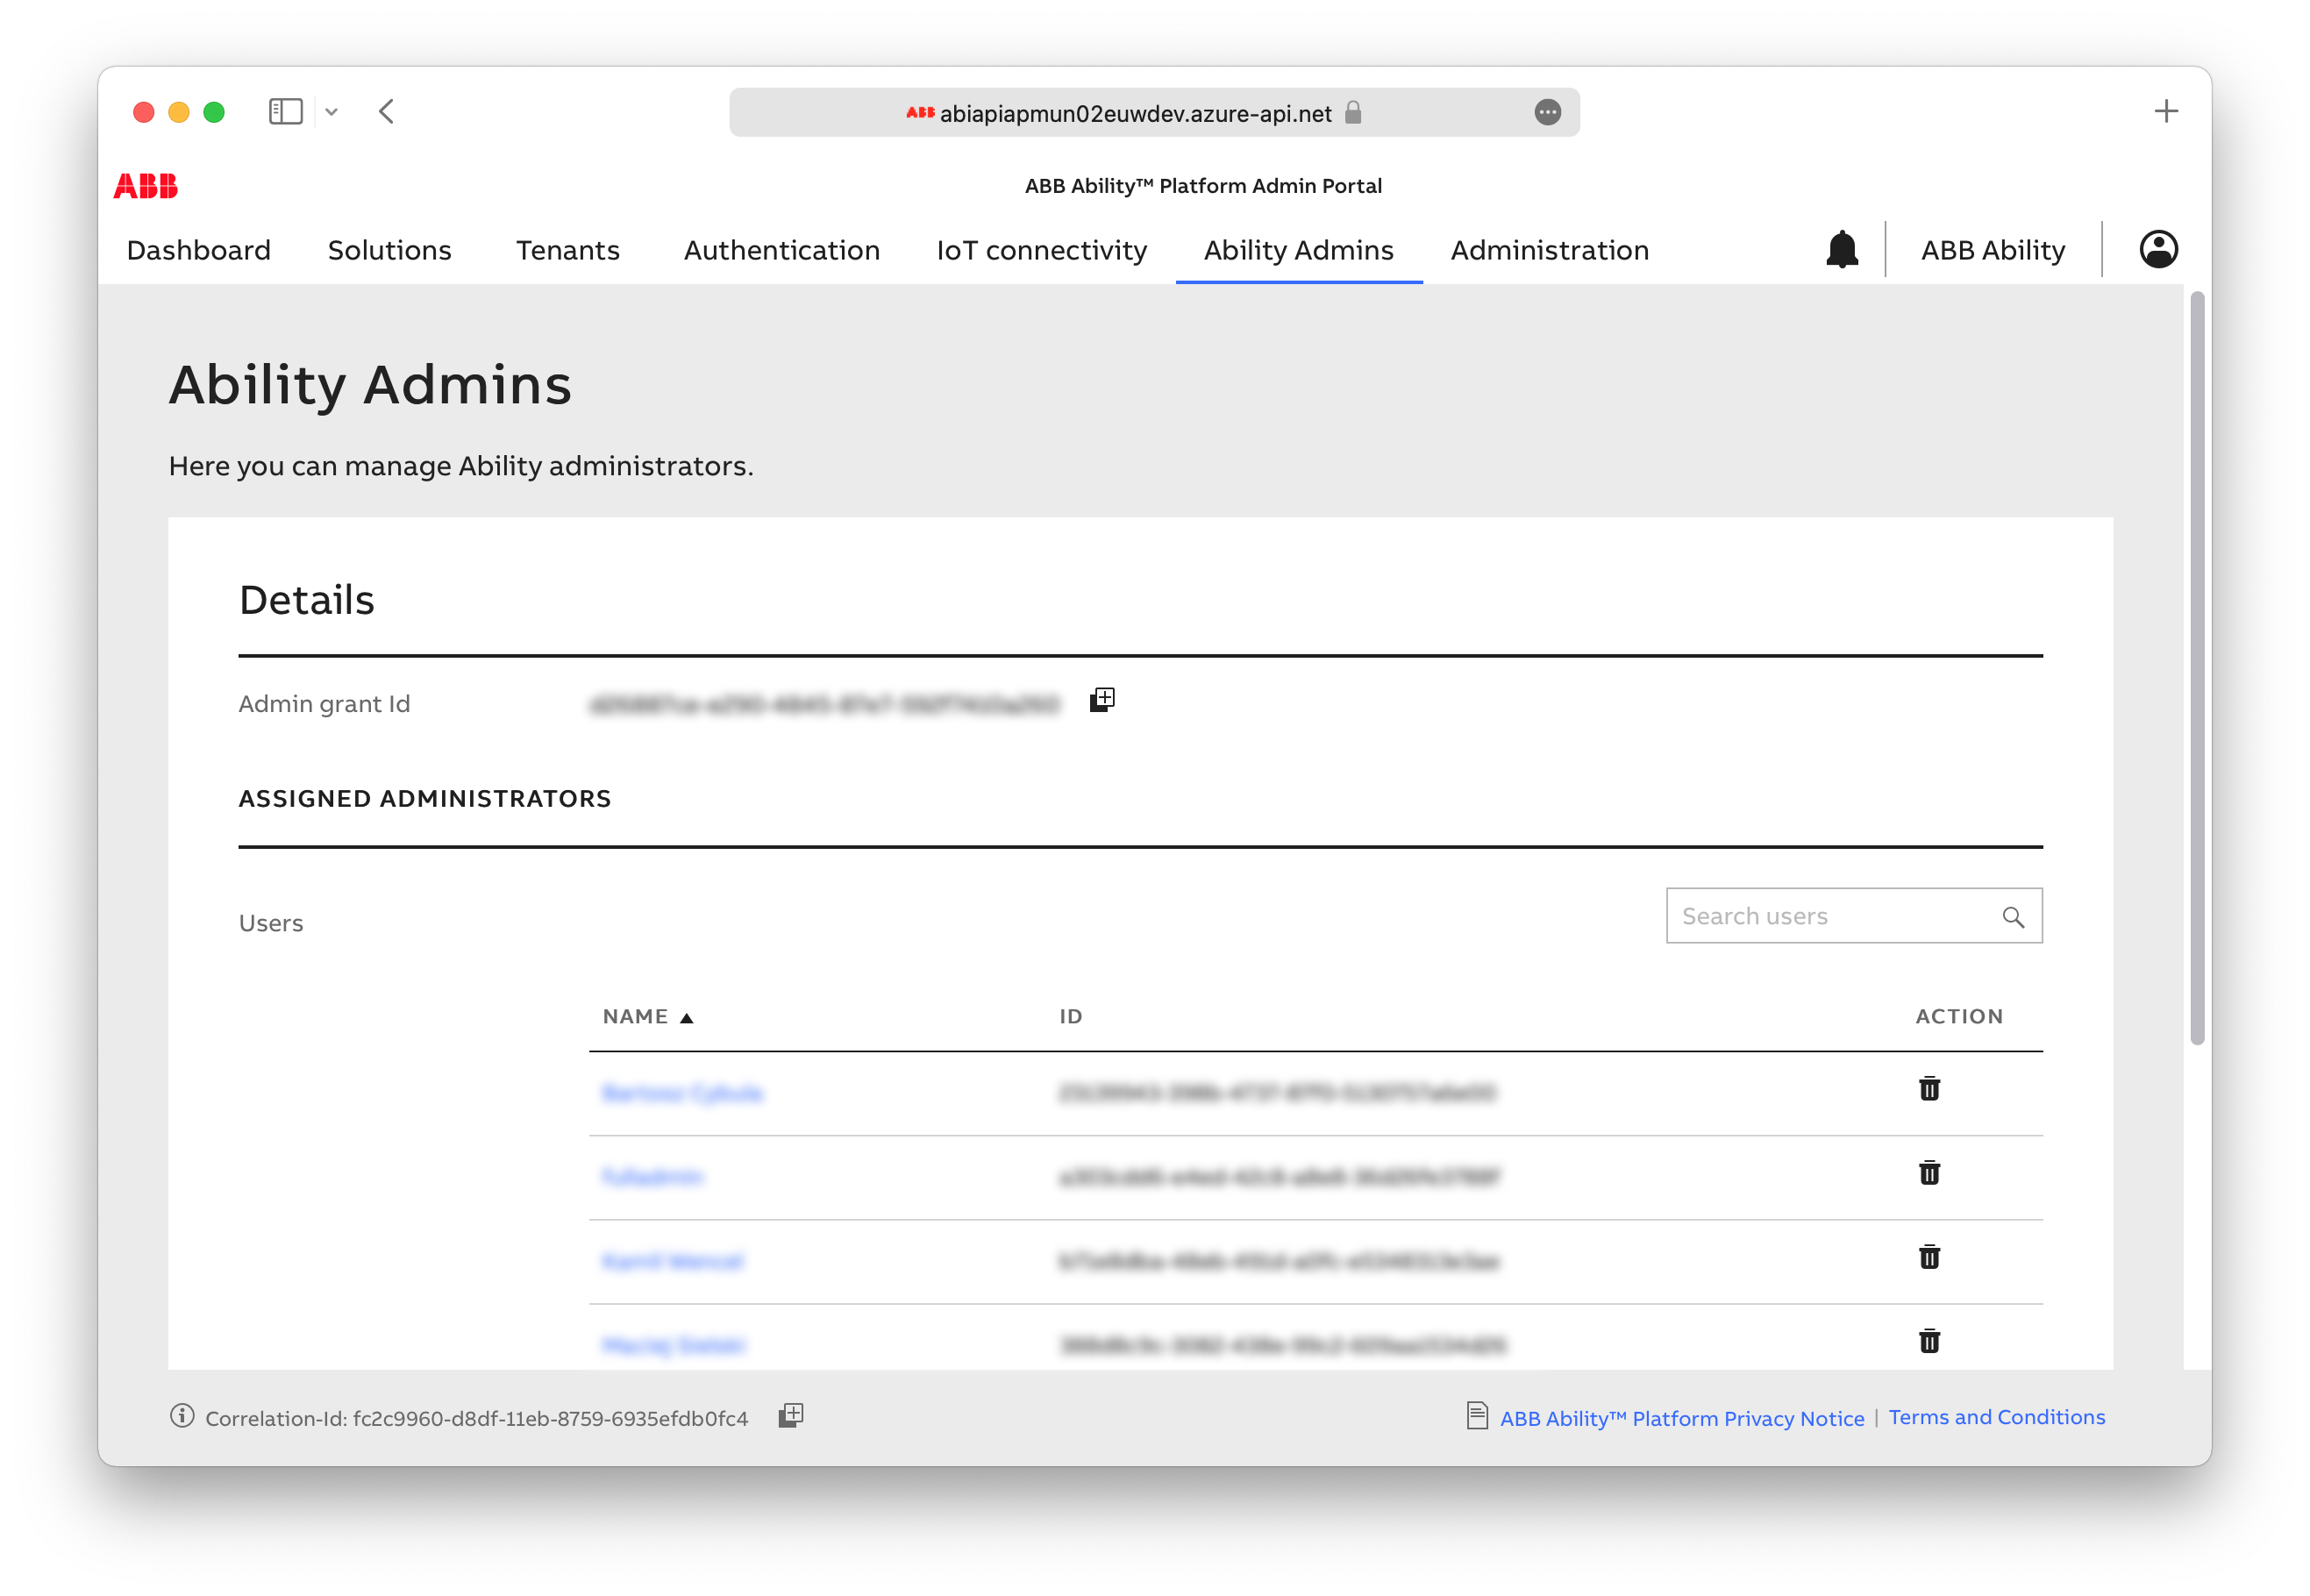
# Ability Administrators
This tab lists users and user groups that have the Ability Admin grant. The Ability Admin can grant administrative rights to other users or groups or revoke existing ones.
# Administration tab
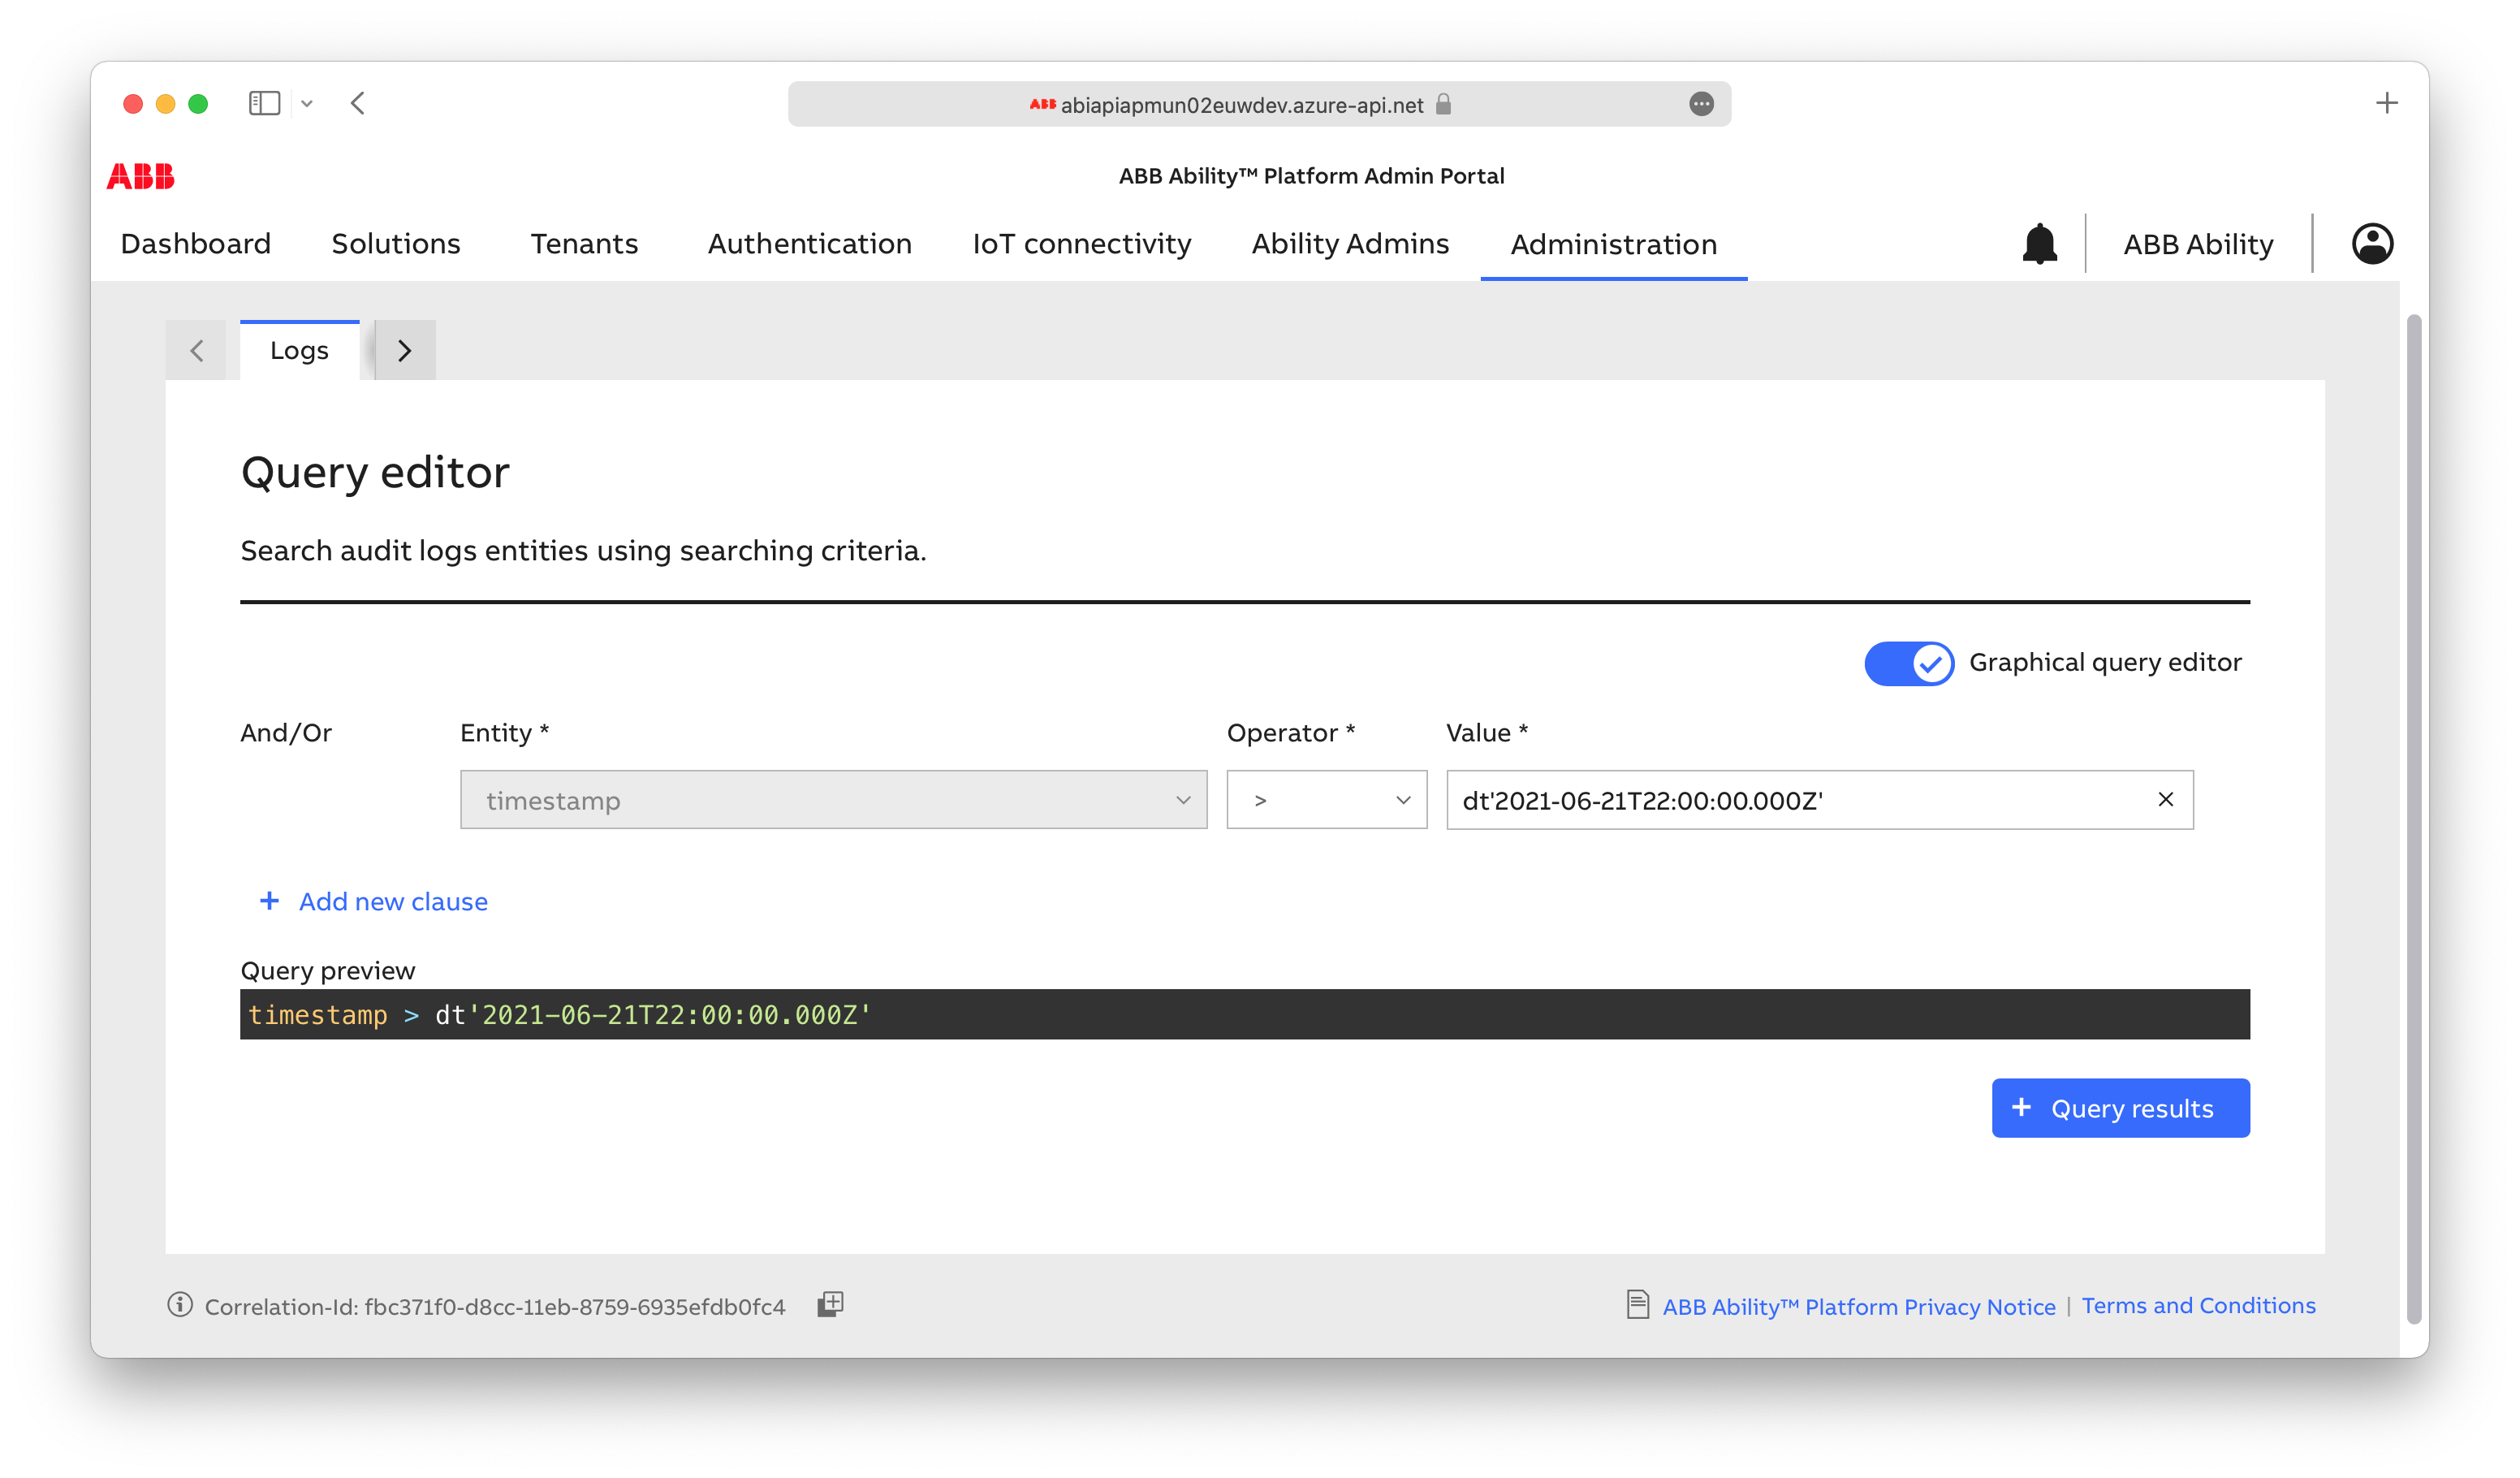
# Audit logs
The Audit logs section under the Administration tab allows users to search through the Regional audit logs. The tool allows users to list the logs for a given Principal (Tenants, Apps, Users, etc.) using the Audit Logging API provided by the ABB Ability™ Platform.
Audit Logging API
Audit logging is a group of services that capture all of the actions of users or systems in the Ability Platform, allowing for querying and scanning through different activities within the platform by consuming events produced by services within the platform.
See Audit Logging API and Audit Logging reference page for more information.
The Audit logs section can be divided into two parts:
- query editor
- query results
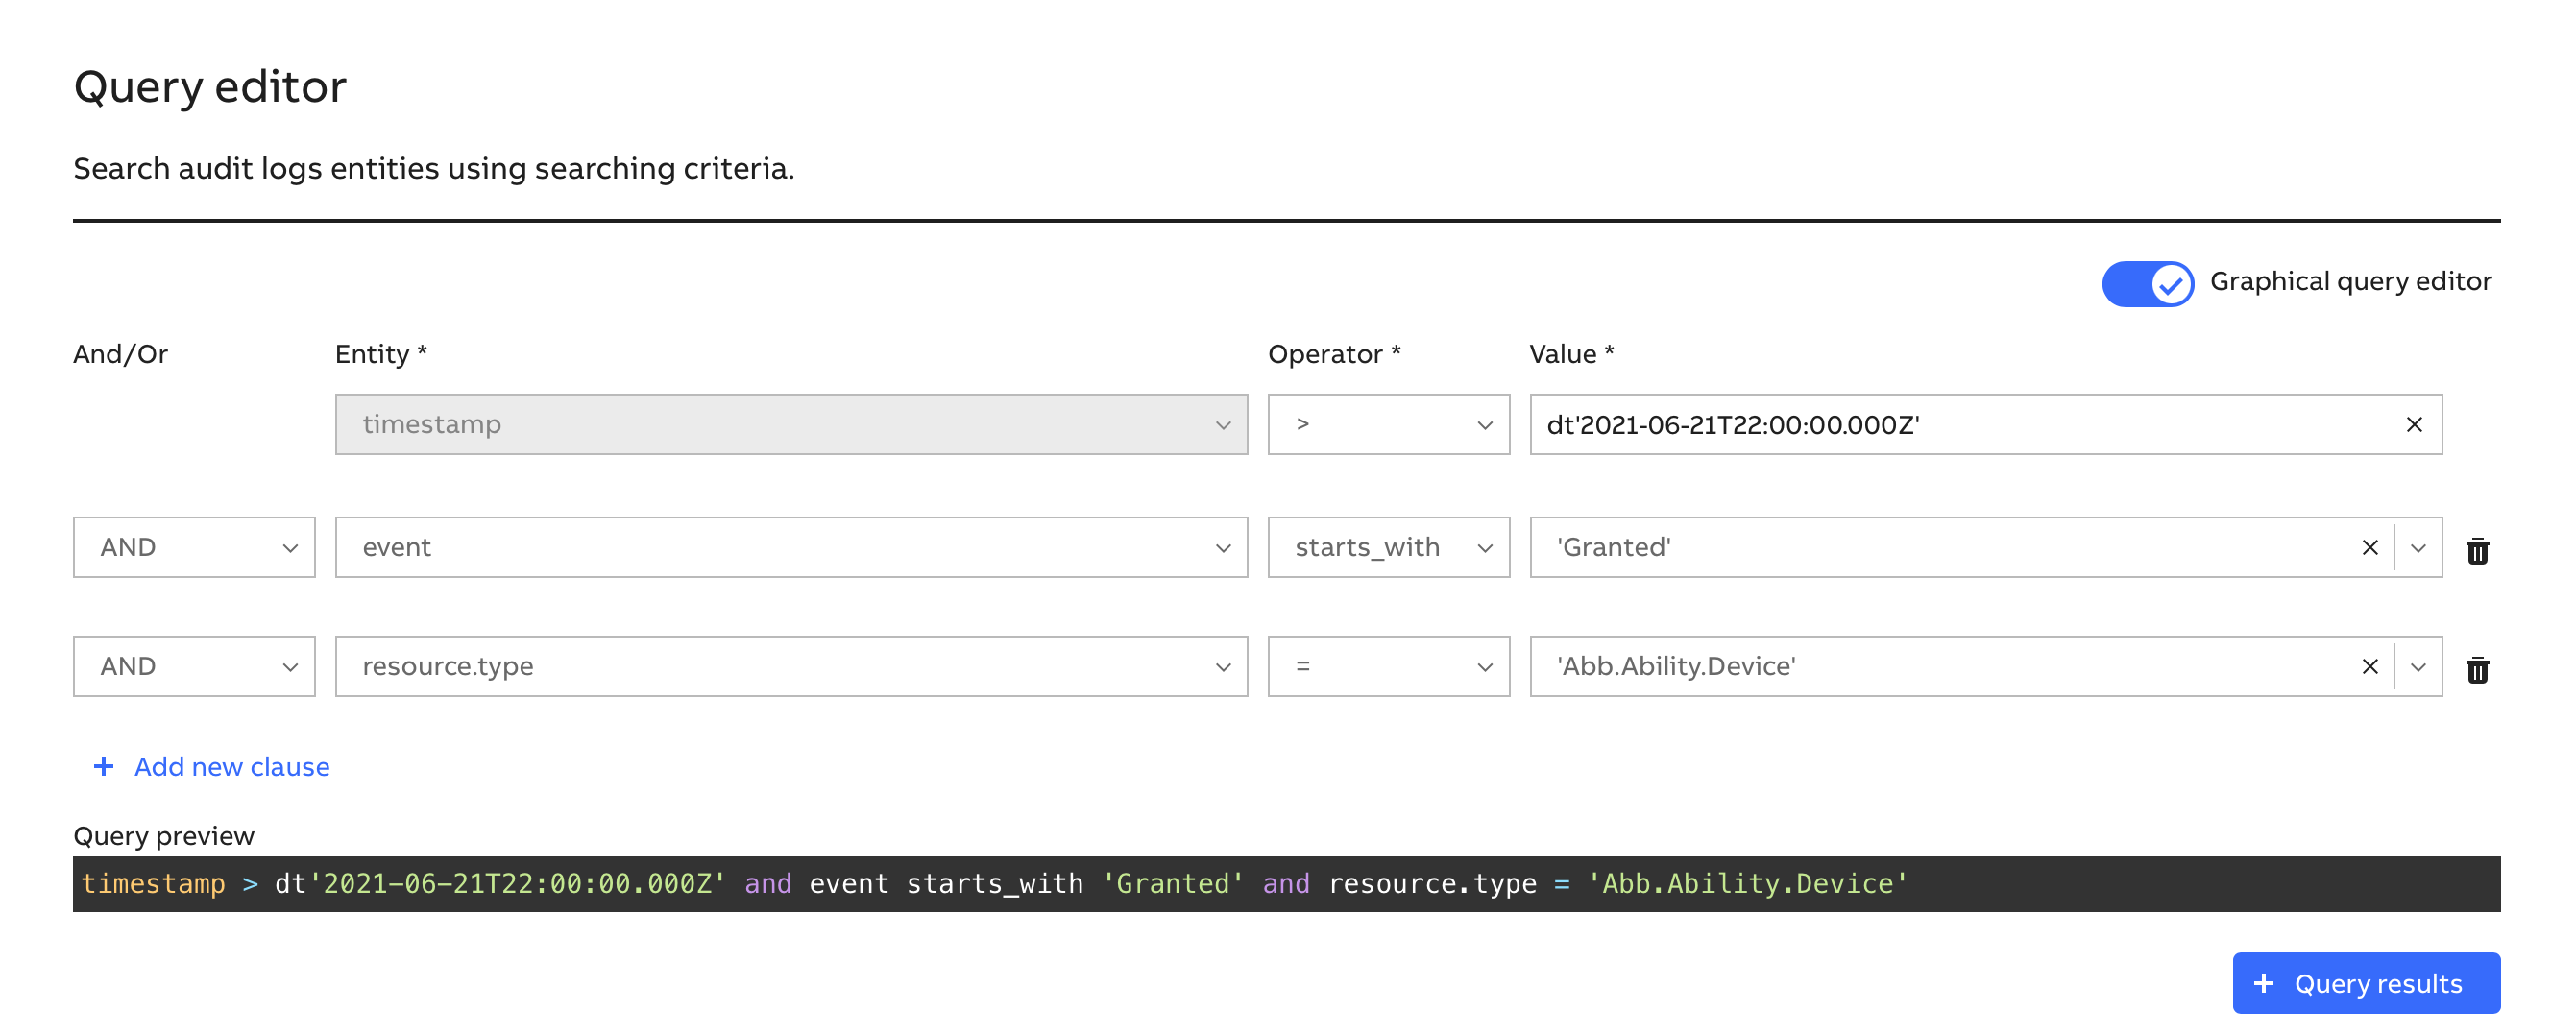
# Query editor
A query editor is a powerful tool, which supports both the graphical query designer and the text-based query designer. The graphical query designer is best for quick and simple searches, whereas the text-based query designer is intended for more complex, advanced, and custom queries. Switching between these modes is possible, however for complex queries (e.g. grouping of conditions into brackets), switching from text-based query to graphical editor will not be allowed (Admin will get a proper warning).
TIP
The query editor always requires the date range (unless removed in the advanced text-based editor), and by default, the date range is set to 7 days.
# Query results
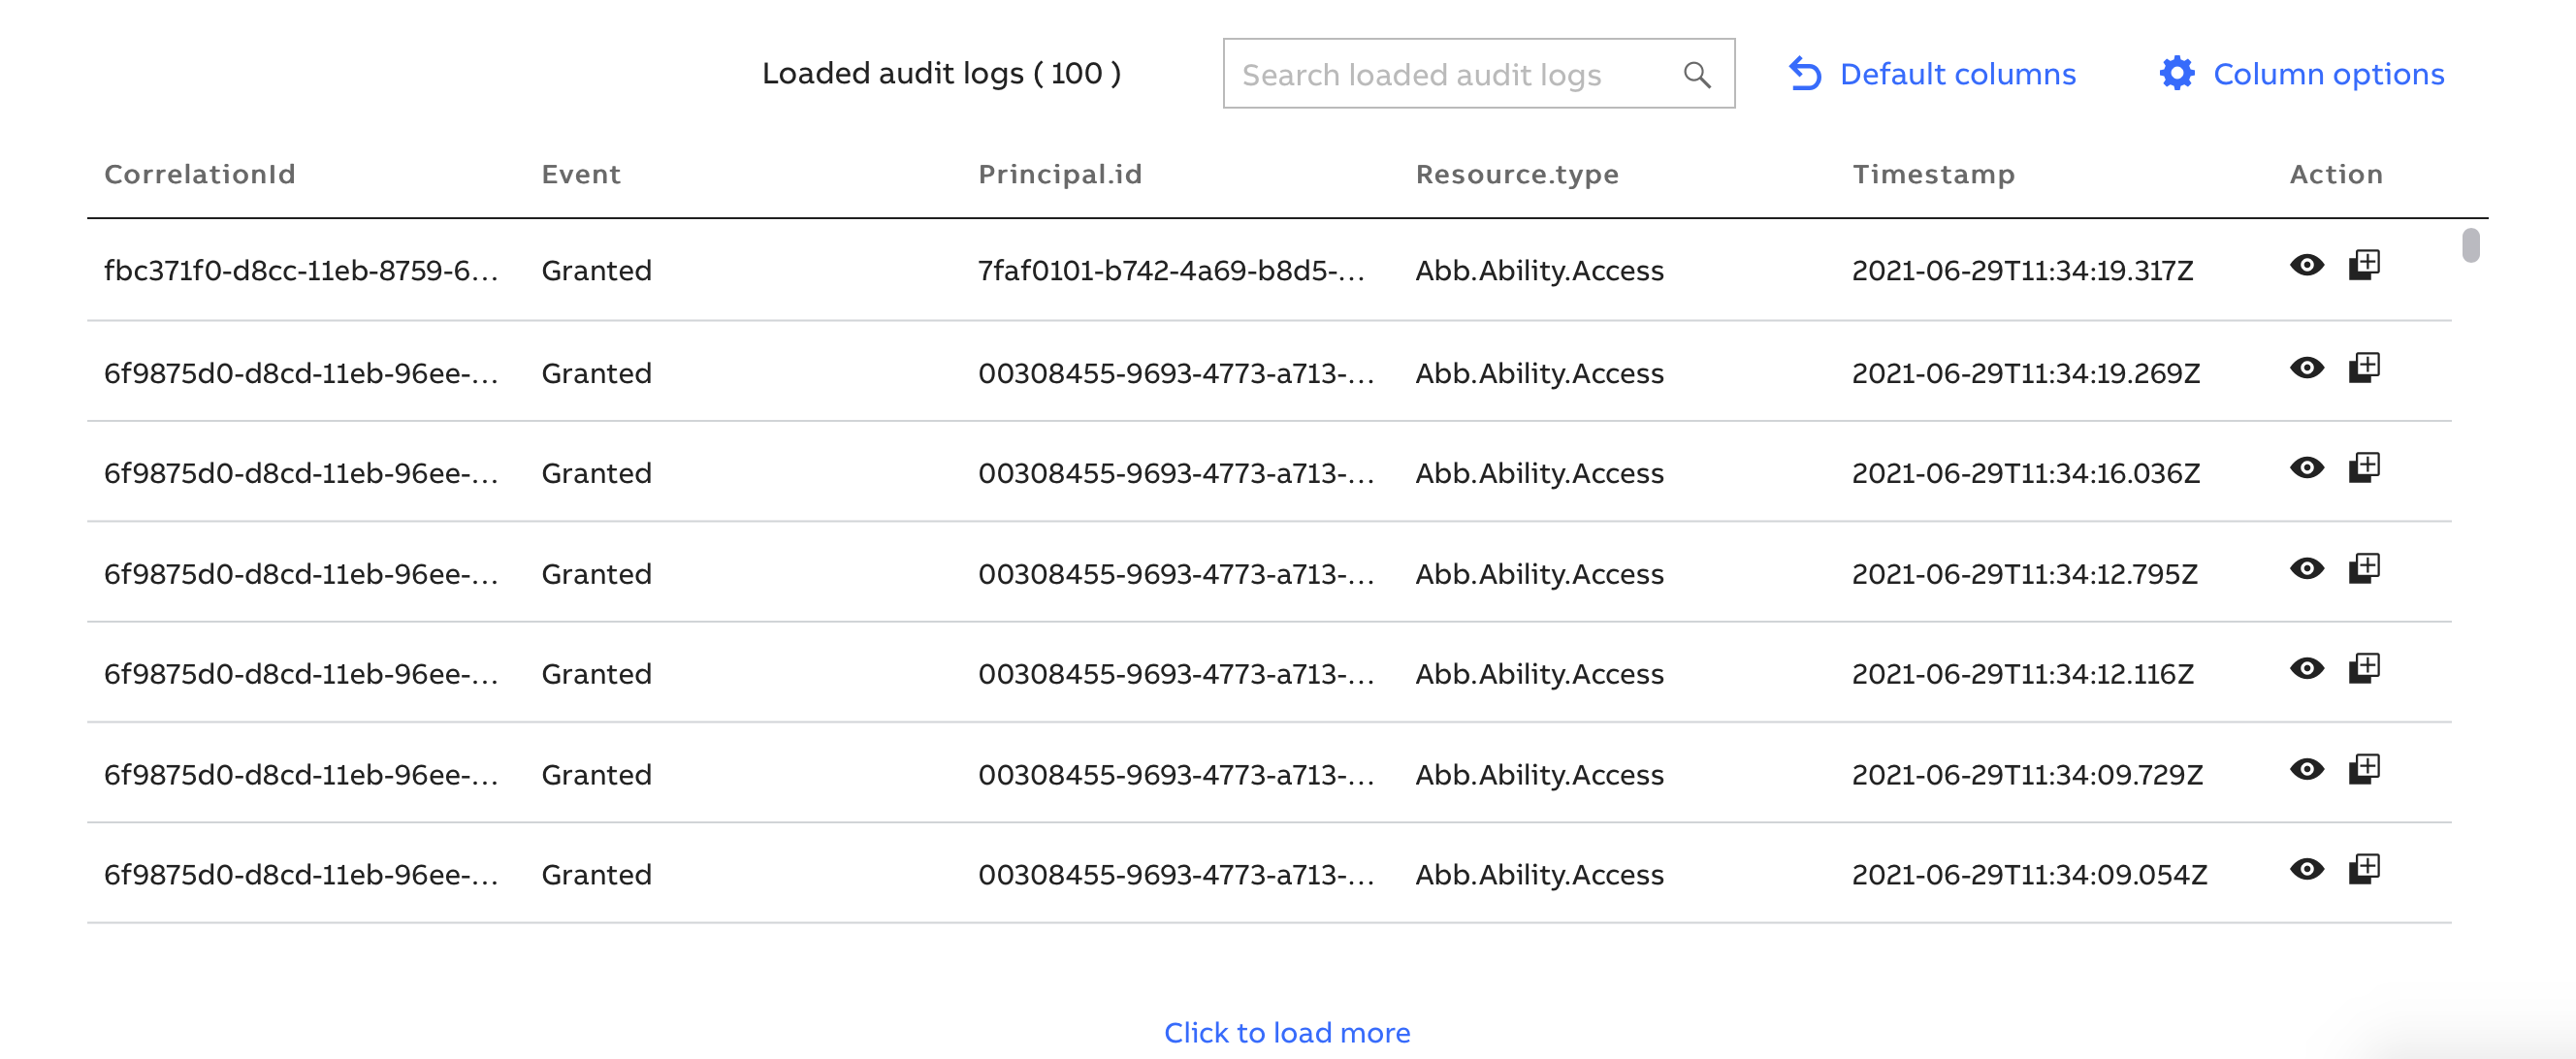
The results of a query are divided into pages that load automatically, and the user can:
- search within the query results,
- adjust the view of the results by changing the displayed columns,
- quickly revert default columns view,
- view audit log event,
- copy audit log to clipboard (json).
TIP
Dynamic data loading while scrolling is disabled when the filter is applied.
# Operators available in queries
| Operator | Description | Operand types | Services | Example |
|---|---|---|---|---|
| < | less than | number, dateTime, timeSpan | all | value < 10 |
| <= | less than or equal | number, dateTime, timeSpan | all | timestamp <= dt'2018-04-25T00:00:00.000Z' |
| > | more than | number, dateTime, timeSpan | all | quality > 1 |
| >= | more than or equal | number, dateTime, timeSpan | all | value >= 5.5 |
| = | equal | any primitive type | all | value = quality |
| != | not equal | any primitive type | all | value != 0 |
| IN | any in | left: any primitive type, right: set of literals of the same type or an array property | array properties in right hand side are only supported in IM and TR | value IN [1, 5, 9], 'foo' IN tags |
| STARTS_WITH | starts with string | string | all | model STARTS_WITH 'abb.ability.' |
| AND | and | boolean | all | (variable HAS 'utilization.') AND (model HAS 'abb.robotics.' OR model HAS 'abb.ability.') |
| OR | or | boolean | all | (variable HAS 'utilization.') AND (NOT variable HAS '.utilization') |
# Query examples
filter=resource.id.principalId='dd6c2095-223a-4cd0-89e1-612f0adce44d' and timestamp>dt'2020-04-06T04:15:00.000Z' and timestamp<dt'2020-04-07T00:55:00.000Z'
# Task Reminders
The recurring tasks reminders section under the Administration tab allows admins to define recurring reminders displayed for the specified target audience in the specified time frame.
The feature is available for Ability Admins who have the permissions to read, create, update, delete reminders (ABB Ability™ Admin Portal Reminder Admin Grant).
Reminders can be updated, deleted, disabled, activated (if the admin doesn't want to remove the reminder altogether, but just disable it temporarily).
Recipients specified by the admin will receive a reminder when they log in to the portal in a period specified by the admin. If they log later than the given occurrence, only the last occurrence will appear for that user. Users need to deliberately acknowledge the reminder to mark it as read.
# Creating a new reminder
While creating a new reminder, the admin must provide:
- Title of the reminder
- Message of the reminder (plain text)
- Recipients (can be combined):
- Tenant Admins (all tenants or a tenant specified by JWT property tid - Tenant Id)
- Solution Admins (all solutions or specified solutions)
- Ability Admins (specified by JWT property: role)
- Specific users:
- any user from the selected tenant that admin has access to
- all users (for all logged-in users)
- self
- Occurrence
- recurring or one-time
- weekly
- monthly
- yearly
- Active state (whether it's active or temporarily disabled)
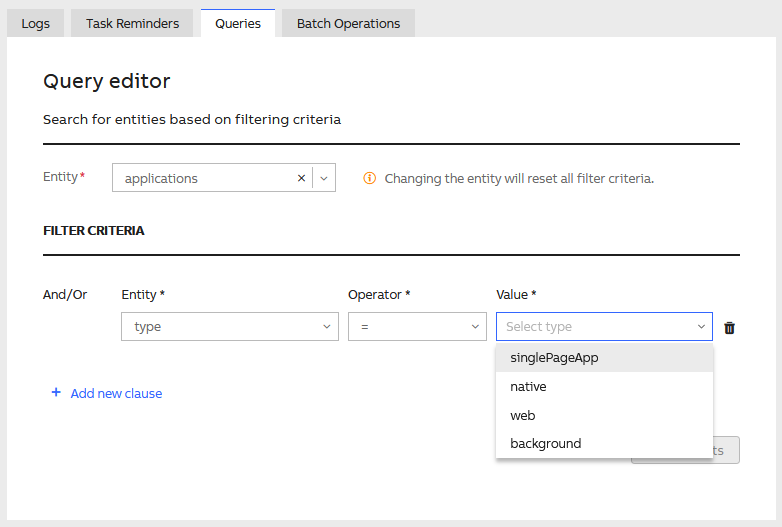
# Queries (data searching)
The queries section under the Administration tab allows admins to quickly search for different Principal Manager entities without navigating to specific contexts. The admin can search through the following entities:
- Tenants
- Groups, Group grants
- Identity Providers
- Users, User grants
- Contracts
- Solutions
- Apps & App grants
- Devices, Device grants, Device children, Device connectivity provider
- Grants
- Roles
- Permissions
- Resources
- Operations
# Query editor
The query editor allows users to choose entity and filtering criteria, which consist of:
- property (entity-related parameters, for example, Solution Id, Scope, Name, Namespace),
- condition/operator (for example,
starts_with,=,!=,in,has), - value (entered by the user, for example, name of the solution).
TIP
The value field shows built-in suggestions if the values regarding the selected entity are pre-defined.
For browsing convenience, the results are paginated.