# Background cloud application
Imagine a scenario where your devices produce a constant stream of raw data into the cloud. Perhaps, this data is not suited for your further needs - like visualization. One option for transforming your data is to manipulate it in the device on premises. That is not always possible. In such cases you might want to do the data transformation in the cloud, after the data has been sent and stored in the Ability Platform. This article aims to show you an example of such application. The following list shows you the topics that will be discussed:
- Creating identity for your application.
- Developing cloud application with the usage of C# Ability SDK.
- Deploying the application to Azure Functions.
Article is based on the codebase that can be found on Codebits
repository.
The repository contains separate branches for different platform versions. Make sure to choose the
correct one (for example v19.09 for 19.09 version of Ability Platform). Some parts of the code
will also be presented in the article itself.
# Presented example
Before we go further, let's explain a bit what the presented application will actually do. Below illustration shows the involved parties and the flow of actions that are happening:
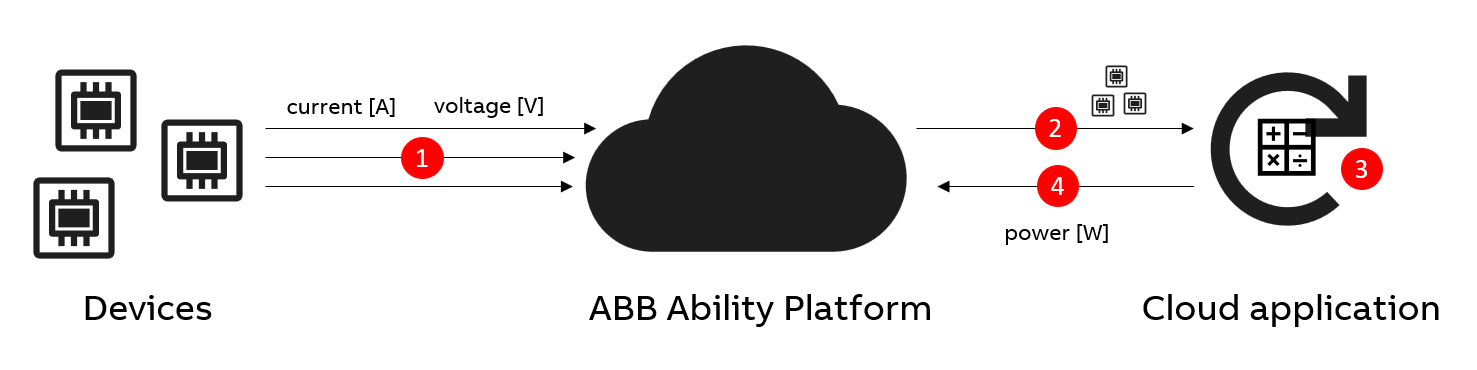
Looking from the left, we can see devices. In our example, these are going to be instances of type
abb.ability.cst.cloudCalculationExample.electricDevice. Below you can see the JSON representation
of this type:
{
    "model": "abb.ability.device",
    "typeId": "abb.ability.cst.cloudCalculationExample.electricDevice",
    "version": "1.0.0",
    "variables": {
        "voltage": {
            "dataType": "number",
            "unit": "V"
        },
        "current": {
            "dataType": "number",
            "unit": "A"
        },
        "power": {
            "dataType": "number",
            "unit": "W"
        }
    },
    "attributes": {
        "unit": {
            "dataType": "string",
            "appliesTo": [
                "number"
            ]
        }
    },
}
As you can see, we are dealing with a very simple type, which defines just three variables: voltage, current and power. Our devices will be generating only voltage and current since the device is not able to produce power values. Data goes to the Ability Platform and it is stored there. This covers point "1" in the illustration above.
The point is that we really need to know the power values. Voltage and current are not enough to present it in the frontend application for our clients. That's why we are introducing a cloud application that will calculate power based on voltage and current. The application will have three main operations to execute:
- Fetch voltage and current values of all the devices (point "2" on the diagram).
- Calculate power values for each pair of fetched data (point "3" on the diagram).
- Send the calculated values to the cloud (with the context of device that the values belong to) (point "4" on the diagram).
The above flow will be a repeating process executed on some schedule.
The actual implementation of the outlined application will be done using the Azure Functions service, which adds a few additional issues. However, first we are going to focus on the "core" - parts that are independent from the actual environment where the application is deployed.
# Authorization
Before running any application developed for the Ability Platform, we need to create an identity for it and grant it with the necessary permissions. Since our use case is an ideal example of a background, user-contextless service, we are about to use OAuth2's Client Credentials Flow.
# Registering the application
Since our application will run on its own (without user delegation), a "background" application needs to be registered in your Platform instance.
WARNING
Mind that "background" applications can be registered only by the Ability Platform Operations team on request. While issuing such request, you are able to specify which tenants of your platform should be covered by your application.
# Core codebase
The code accompanying this article is a .NET Core C# solution. It's separated into multiple projects:
- ABB.Ability.Cst.CloudCalculationExample.Models
- ABB.Ability.Cst.CloudCalculationExample.BusinessLogic
- ABB.Ability.Cst.CloudCalculationExample.CloudServices
- ABB.Ability.Cst.CloudCalculationExample.UnitTests
- ABB.Ability.Cst.CloudCalculationExample.IntegrationTests
- ABB.Ability.Cst.CloudCalculationExample.AzureFunctionApp
Other than that, the solution also contains projects:
- ABB.Ability.SDK
- ABB.Ability.SDK.Abstraction
These two are part of Ability SDK solution and they were brought into our example due to Azure Functions issues that will be explained a bit later. For now, let's just assume that our code will be using Ability SDK library for communication with ABB Ability™ Platform.
TIP
Ability SDK is a .NET Core library that makes it much easier for application developers to make use of Ability Platform APIs. It handles authorization and details of using all public APIs that the Platform offers. It also comes with a useful set of classes that enables your applciation to work with types instead of JSONs. Regarding access to the library, contact your CST representative.
The previous section mentioned three main operations that our application should handle. We'll focus on those and look at them in more details. However, before we do that, let's talk a bit about authorization.
# Authorization
We've already covered registering our application and granting the necessary permissions. It's time to show how to actually make use of that registration. Our program makes use of Ability SDK. The authorization is done during registration of IAbilityClient with the dependency injection framework:
public static void AddAbilityClient(this IServiceCollection services, AppConfiguration configuration)
{
    services.AddAbbAbilityHttpClients(
        new ManagementApiAddressResolver(
            new ManagementApiAddressResolverConfig
            {
                ApiManagementUrl = configuration.ManagementApiUrl,
                AppendApiServiceToUrl = false //for Platform version >= 19.09
            }));

    services.AddSingleton<ITokenResolver, ClientCredentialsTokenResolver>();

    services.AddSingleton(typeof(IAbilityClient), provider =>
    {
        var client = new AbilityClientWrapper(
            provider.GetRequiredService<ITokenResolver>(),
            provider.GetRequiredService<IHttpClientFactory>(),
            provider.GetService<ILogger<AbilityClient>>());

        var parameters = new ClientCredentialsTokenResolverConfig
        {
            AuthTokenUri = configuration.TokenEndpoint,
            ClientId = configuration.ClientId,
            ClientSecret = configuration.ClientSecret
            Scope = configuration.Scope
        };

        client.Authorize(parameters).GetAwaiter().GetResult();

        return client;
    });
}
As you can see, we are building a ClientCredentialsTokenResolverConfig object that stores our
credentials.
TIP
AuthTokenUri parameter, which is OAuth2 token endpoint URL, can be learnt from the Ability Platform
Operations team. Information about Scope can be found
here.
One thing that is worth noticing here is that we are using AbilityClientWrapper instead of Ability
SDK's provided AbilityClient. The reason for that is the fact that our application might be a
long-running one (depending on the deployment runtime). In such case, it might be necessary for our
application to authorize to Ability Platform multiple times, since the token that is received has a
validity period. In order to encapsulate authorization login in one place, AbilityClientWrapper
was created. It is a very simple class that implements IAbiltiyClient. It checks authorization
status every time an Ability related operation is requested. Internally it is just a wrapper around
AbilityClient - hence its name. Below you can see an example of wrapper's method:
public async Task<List<VariableMessage>> ReadVariableData(DataRequest request)
{
    await AuthorizeIfNecessary();
    return await _client.ReadVariableData(request);
}
Similarly, all other functionalities that are needed by our code, are implemented analogically.
Internally, wrapper just caches the original ClientCredentialsTokenResolverConfig object (or any
other object if different authorization flow is used) and uses it each time to re-authorize:
public async Task Authorize(object customParameters)
{
    _authorizationParameters = customParameters;
    await _client.Authorize(customParameters);
}

private async Task AuthorizeIfNecessary()
{
    if (_client.IsAuthorized() == null)
        await Authorize(_authorizationParameters);
}
As you can see, AbilityClient (type of _client) has a quite useful IsAuthorized() method to
check authorization status.
# Fetching calculation input from the cloud
First step of our calculation flow is to retrieve data from the Ability Platform - in our case, we need to:
- Fetch a list of instances of type
abb.ability.cst.cloudCalculationExample.electricDevice. - Fetch values of voltage and current for these instances.
First point is served with the below logic:
private async Task<IEnumerable<string>> GetObjectIds()
{
    var query = $"models('abb.ability.device').ofType('{_configuration.TypeDefinitionId}')";
    var instances = await _abilityClient.QueryObjects<ObjectInstance>(query);
    return instances.Select(n => n.ObjectId);
}
Since we do not need whole information models, we're just extracting objectIds from them.
Second point is implemented as follows:
private IEnumerable<Task<List<VariableMessage>>> GenerateDataFetchTasks(DateTime startTime, DateTime endTime, IEnumerable<IEnumerable<string>> instanceGroups)
{
    var propertyQuery = $"variable='{_configuration.VoltagePropertyName}' OR variable='{_configuration.CurrentPropertyName}'";

    var dataFetchTasks = new List<Task<List<VariableMessage>>>();
    foreach (var group in instanceGroups)
    {
        var request = new DataRequest
        {
            Date = new TimeRange
            {
                From = startTime,
                To = endTime
            },
            Filter = $"({propertyQuery}) AND ({String.Join(" OR ", group.Select(n => $"objectId='{n}'"))})",
            OrderBy = new OrderByNode { Order = "asc", Property = "timestamp" }
        };

        dataFetchTasks.Add(_abilityClient.ReadVariableData(request));
    }

    return dataFetchTasks;
}
You can see that we are dealing here with instanceGroups. Instead of fetching data for all
instances at once, we are limiting single fetch to lower number of them - each group is just a list
of maximum 10 instances. The thing that matters here the most is the filter that is being sent to
the Data Access API. Here's an example of how such filter can look like in the runtime:
(variable='voltage' OR variable='current') AND (objectId='8676e88b-be28-4c8c-a795-af7819d0ce34' OR objectId='5bd40c5d-bc9c-4b6d-a6ea-8e63688e46a2'))
In the end, the data is transformed into a collection of ElectricDeviceInputData, which is
required by the calculation class.
public class ElectricDeviceInputData : IEquatable<ElectricDeviceInputData>
{
    public string ObjectId { get; set; }
    public double CurrentInA { get; set; }
    public double VoltageInV { get; set; }
    public DateTime Timestamp { get; set; }
}
Each single input has a context of which object (device) it belongs to.
# Calculating power
This part of the solution is completely Ability-independent. Because of that it is placed under separate project - ABB.Ability.Cst.CloudCalculationExample.BusinessLogic. In our example it is a simple power calculaton logic:
foreach (var item in input)
{
    var power = item.CurrentInA * item.VoltageInV;
    var output = new PowerCalculationOutput { PowerInW = power };
    result.Add(output);
}
# Sending calculation results to the cloud
As soon as the data gets calculated, we can send it to the Ability Platform. The way to do that is to use Data Access's Publisher API. Since Ability SDK covers its endpoints, it is rather easy to make use of it:
public async Task WriteAsync(IEnumerable<BaseMessage> data)
{
    if (!data.Any())
        return;

    if (!IsPublisherValid())
    {
        _logger?.LogInformation("Publisher is not valid - a new one will be generated.");
        await Initialize();
    }

    _logger?.LogInformation($"Writing {data.Count()} messages via publisher.");

    await _abilityClient.SendMessagesViaPublisher(_publisher, data.ToArray());
}
The code checks for validity of _publisher - the reason of that is the fact that Data Access's
Publisher API needs a separate token to use it - these tokens are issued for a requested time. When
this time runs out, the token loses validity and needs to be requested again.
TIP
In order to better understand Data Access's Publisher endpoints, have a look at an article that describes it in detail.
# Azure Functions deployment
In order to actually run the code, one of the options is Azure Functions. It is a SaaS offering being an example of serverless computing service.
WARNING
Due to Azure Function runtime's dependency on old version of Newtonsoft.JSON library, our solution is using a custom fork of Ability SDK with lowered version of the mentioned library. This is the reason why Ability SDK is a part of our solution.
We will be using a time-scheduled function, which is run on some interval - this interval depends on:
- your expectations of availability of the calculated values
- amount of data to be calculated
- processing power of your App Service
Creating an Azure Functions project is a straightforward process, which is covered by Visual Studio's wizard. Instead of describing that, we'll focus on some other topics, that might be problematic.
# Dependency Injection and logging
In order to inject all necessary services, it's recommended to create a Startup class and do it
there. Thanks to that, the IServiceProvider used during runtime will be able to resolve
ILogger<T> instances properly - you will see the logs in the Azure Portal and also in Application
Insights, if you decide to use that. However, there is one more thing that you need to do in order to
enable logging. By default, Azure Functions has a rather restrictive logging policies that ignore
most of the log messages. In order to allow your logs to go through, you need to add the namespace
that your solution is using to host.json file:
{
  "version": "2.0",
  "logging": {
    "logLevel": {
      "ABB.Ability.Cst.CloudCalculationExample": "Information"
    }
  }
}
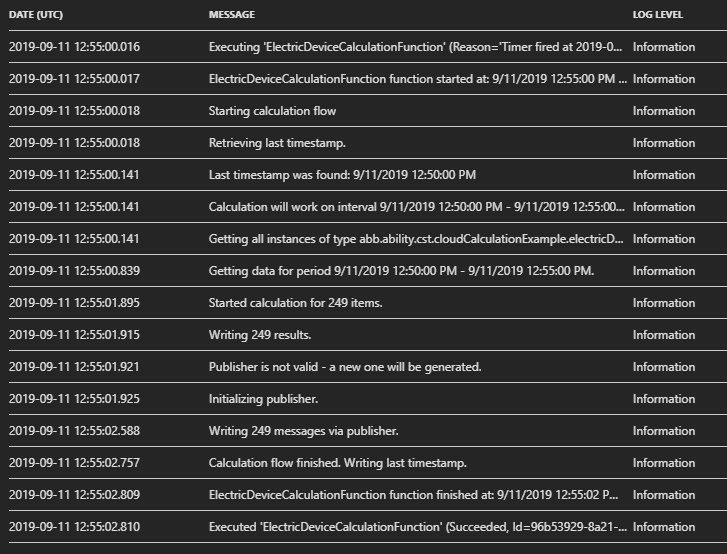
Below you can see an example of logs on the Azure Portal:
# Storing timestamp of last data fetch
In order for the application to run properly, it needs to be able to somehow cache the endtime of last data fetch. The application will know which data was already calculated and what is the correct timeframe to get data from. Since our application runs on a constant schedule, you could have an idea to always fetch data from the configured time interval. It is not a good approach - your Function will most likely start with some delay (milliseconds-seconds), which could lead to some data being uncalculated.
Azure Functions "instance" is always linked with an Azure Storage account. Functions uses it to
store some data necessary for proper functioning of the service. It is a perfect candidate to use
for our needs of storing a timestamp. ABB.Ability.Cst.CloudCalculationExample.AzureFunctionApp project
contains AzureTableStorageProvider<T> class, which enables usage of the Azure Storage. The
connection string for the storage is already available for you in the app settings.
In our example, we basically create a new table in the Azure Storage (it's done automatically, if the table does not exist) and store the timestamp in a row. In a real-life scenario, each row of the table could be used by different application. Since we have just one, always only one row will be used. When a new timestamp gets written, it just replaces the existing row.
# Calculation flow
Combining all the things together, the CalculationFlow class's Start() method contains the
high-level algorithm of the application:
        public async Task Start()
        {
            _logger?.LogInformation("Starting calculation flow");

            var startTime = await GetStartTime();
            var endTime = DateTime.UtcNow;

            _logger?.LogInformation($"Calculation will work on interval {startTime.ToString()} - {endTime.ToString()}");

            var input = await _inputProvider.GetData(startTime, endTime);
            var calculationOutput = await _calculator.Calculate(input.ToArray());
            await _outputProvider.Write(calculationOutput);

            _logger.LogInformation("Calculation flow finished. Writing last timestamp.");

            await _storageProvider.WriteAsync(new CalculationEntity(_configuration.CalculationName, endTime));
        }
This is basically what the Azure Function is doing each time it is invoked. GetStartTime() method
retrieves the endtime of the last data fetch, as it was described in the previous section. Then data
is fetched and calculated. After that we write it to the cloud and store the timestamp in the Azure
Storage.
# Summary
We've gone through development of a cloud application. You could see an example of various Ability-related operations combined together in order to achieve a desired result - a scheduled calculation of raw data coming from IoT devices. Whatever scenario you are facing, the presented parts might be useful for your own ABB Ability-based solution.