# Uploading Files from the Edge to the Cloud
This is the third in a series of tutorials which explain how to accomplish various functions with the context of an ABB Ability™ Edge. In this tutorial you will learn how to develop a simple edge module that uploads a file to the cloud's file storage.
# Before You Start
- Familiarize yourself with basic edge development concepts described in Standard Edge Module Operations
- Clone the sample code to your desired location.
- Download the .NET Core SDK
- Install favorite IDE or text editor
- Make sure you have the .NET Core CLI tools installed
- Optional: Download the Postman files archive containing the environment settings and a sample request to the Instance api used in this tutorial.
This tutorial will demonstrate:
- How to send a file to the cloud from the edge
# Known Microsoft Limitation
Microsoft has implemented a mechanism to limit concurrent file uploads to the IoT Hub, which enforces the limit by issuing a maximum of ten file upload tokens per device, which can co-exist at once. The IoT Hub releases a token once successful upload notification arrives or when a token expires after one hour. Once a token is released, the IoT Hub can issue a new one.
The Ability Team has observed that when network conditions are unreliable, the Device SDK might fail to notify the IoT Hub of the successful file upload. The Edge retry policy kicks in and makes a new attempt to upload the file. Typically, it succeeds. However, especially in an unreliable network, another file upload may fail and a notification never reaches the IoT Hub. In a situation when a module tries to upload files continuously, disregarding the previous failed attempts, the retry policies exhaust all the available tokens. We believe the perceived upload "stuck" behavior is retry policies waiting for new tokens to become available, which takes up to an hour.
The Edge limits concurrent uploads to a maximum of ten per device. Unfortunately, there is no mechanism it can use to track token expiration because the upload mechanism with token requests and upload notifications is abstracted away by the Device SDK. The current functionality propagates the failed upload error to the requesting module. It is advised that module developers implement a retry policy with exponential back-off. The Edge does propagate the failed upload notifications to the requesting modules already. This behavior has been thoroughly verified and there has been no observed data loss.
# Sending a File to the Cloud
If you need to upload any file to the cloud you need to:
- Save the file in the
/filesdirectory - Send an appropriate message on the
files_outtopic
Storing Files on the Edge
Every module on the edge is able to
persistently store files locally by saving them to the /files directory. You
don't need to check whether the folder exists because it is automatically created
by the edgeProxy in every container. Ability Edge is using the mechanism of
dockers bind mounts to provide
that functionality. On the host machine, files are located in
/var/ability/modules/your_module_name.
In order to send a file to the cloud, we need to save the file in the /files
folder and then send a notification on the topics_files_out. The edgeProxy
module is listening to these notifications and is responsible for doing all the
magic for you. We just need to make sure that the message that we send is in a
proper json format. After posting a properly formatted message we will be
notified about the success or failure of the operation.
Here is a sample json for uploading a file:
{
   "objectId":"ccf1aa10-4401-4ce7-b5b1-71e181dc8354",
   "model":"abb.ability.device",
   "fromFile":"ccf1aa10-4401-4ce7-b5b1-71e181dc8354.txt",
   "toFile":"ccf1aa10-4401-4ce7-b5b1-71e181dc8354.txt",
   "removeOnComplete":false,
   "correlationId":"123"
}
# Message Parameters
In the above example we are sending a file that is related to the device with
"objectId":"ccf1aa10-4401-4ce7-b5b1-71e181dc8354" in the
"model":"abb.ability.device" model.
We saved the file in the /files folder under
ccf1aa10-4401-4ce7-b5b1-71e181dc8354.txt. We want it to be saved in the cloud
under the same name.
The removeOnComplete parameter states whether we want the file to be removed
from /files after successful upload.
If we set the correlationId we get the acknowledgement upon upload completion
(whether successful or not) on the topics_files_in.
From the above parameters only objectId, fromFile and toFile properties
are required.
Sample acknowledgement:
{
   "objectId":"ccf1aa10-4401-4ce7-b5b1-71e181dc8354",
   "correlationId":"123",
   "isSuccess":true
}
The above response is the acknowledgement of the successful upload. As we can
see the returned correlationId is identical to the one we sent to the cloud.
# Upload Limits
The file upload process has been tested to identify limitations and boundaries and to provide a reasonable set of expectations for users of this functionality. The known upload limits are a combination of file size and frequency.
- The maximum file size that can be uploaded is 250 MB. File uploads of 250 MB files were tested and found to be performant with one device uploading a 250 MB file every 2 minutes.
- Maximum supported throughput of the file upload process is 10 MB/sec.
- The most performant throughput was observed at 7 MB/sec.
If there is a need to exceed the throughput limitations, then the instance must be scaled. Please contact engineering if your needs fall outside the noted boundaries above.
# Tested Scenarios
The following scenarios were tested, found to be performant, and are provided here for reference. If your needs categorically fall outside these listed scenarios, please contact engineering for support.
| # of concurrent devices | Size of uploaded file (MB) | Upload frequency (seconds) |
|---|---|---|
| 1 | 10 | 1 |
| 1 | 7 | 1 |
| 1 | 250 | 120 |
| 2 | 50 | 60 |
| 2 | 100 | 600 |
| 10 | 50 | 60 |
| 10 | 60 | 60 |
| 10 | 70 | 300 |
| 10 | 100 | 300 |
| 10 | 100 | 600 |
# Running the Sample Module
There are two ways to run this custom module. CST provides types for a given version of Ability Platform. If your CST contact has not already loaded these types into your Ability environment, these types can be manually uploaded to the environment. Once the types are loaded into the instance, any supported Edge setup can be used to run the Edge types provided by the tutorials.
Once you are familiar with the Edge, it is possible to build custom versions of the tutorials. Once a custom modules is created and the type(s) are loaded into an instance, any valid Edge can run the custom type.
# Verifying Your File Was Published
The 06-file-storage sample project illustrates the file upload functionality.
The sample project does the following:
- Connects to the
edgeBroker - Subscribes to the
topics_files_inandtopics_models_intopics - Simulates a directly connected device by creating an information model
instance for
abb.ability.device.cst.environment.sensor@1if it is not already created - Checks whether the file for this device exists.
- If it doesn't exist, it creates one and publishes the "upload file message" on
the
topics_files_outtopic - It listens for the acknowledgement and prints out the result in the logs
Let's see how it performs points 4-6 of the above list.
protected override void OnApplicationMessageReceived(object sender, MqttApplicationMessageReceivedEventArgs e)
{
    if (e.ApplicationMessage == null) return;

    var messageBody = Encoding.UTF8.GetString(e.ApplicationMessage.Payload);

    Console.WriteLine($"Message received on topic '{e.ApplicationMessage.Topic}': {messageBody}");
    var jsonObj = JObject.Parse(messageBody);
    var deviceId = Guid.Parse(jsonObj["objectId"].Value<string>()).ToString();

    if ((e.ApplicationMessage.Topic ?? string.Empty).StartsWith(this.Configuration.ModelInTopic, StringComparison.InvariantCultureIgnoreCase))
    {
        if (jsonObj["type"] != null && jsonObj["type"].Value<string>() == DEVICE_TYPE)
        {
            Console.WriteLine("There is a connected device. Beginning file upload for deviceId: " + deviceId);
            try
            {
                //File for this device exists. Print in logs
                string fileContent = LoadFile(deviceId);
                Console.WriteLine("Found a persistent file at files/" + deviceId + " with content: \n" + fileContent + "\nCloud upload aborted.");
            }
            catch
            {
                //File does not exist. Create a file and upload to cloud
                UploadFile(deviceId);
            }
            _noDeviceConnected = false;
        }
    }
    else if ((e.ApplicationMessage.Topic ?? string.Empty).StartsWith(this.Configuration.FilesInTopic, StringComparison.InvariantCultureIgnoreCase))
    {
        //This is the notification for our file upload
        var isSuccess = jsonObj["isSuccess"].Value<bool>();
        Console.WriteLine("File upload for device: " + deviceId + " " + (isSuccess ? "succeeded" : "failed"));
    }
}
The above method gets called every time a message is received on
topics_files_in topic or topics_models_in topic. In the first if statement,
we check if it was received on topics_models_in, which is from where we get
all the updates correlated to the connected devices. If the message concerns the
device of our type, we proceed to the file upload part. We try to load the file
in the try statement and abort the upload if it exists. If the file does not
already exist, we call UploadFile(deviceId) method.
The UploadFile method demonstrates receiving the file upload acknowledgement.
public string FileName(string deviceId)
{
    return deviceId + ".txt";
}

public string CreateSampleFile(string deviceId)
{
    var fileName = FileName(deviceId);
    System.IO.File.WriteAllText("files/" + fileName, "Sample content for device with id: " + deviceId);
    return fileName;
}

public string LoadFile(string deviceId)
{
    var fileName = FileName(deviceId);
    return System.IO.File.ReadAllText("files/" + fileName);
}

public void UploadFile(string deviceId)
{
    var fileName = CreateSampleFile(deviceId);

    var filesOutTopic = $"{this.Configuration.FilesOutTopic}";
    var sendFileMessage = new SendFileMessage(deviceId, "abb.ability.device", fileName, fileName, false, _filesUploaded.ToString());
    var sendFileJsonString = JsonConvert.SerializeObject(sendFileMessage);
    _mqttClient.PublishAsync(filesOutTopic, sendFileJsonString).ContinueWith((e) => Console.WriteLine($"Published message to topic '{filesOutTopic}': {sendFileJsonString}"));
    _filesUploaded++;
}
The actual file upload message is sent in the UploadFile(deviceId) method. We
first create the message in the sendFileJsonString variable and then we
publish it to the topics_files_out topic with the _mqttClient object.
After uploading the file, we can check whether it was properly digested by the
Platform by trying to access it through the Instance API. We can use a bash
program curl to download the uploaded file to our PC by typing the following
in the terminal window.
curl -X POST "https://abidasvcasctu1usedev.azurewebsites.net/api/v1/storage/object/files/download" -H "accept: text/plain" -H "Content-Type: application/json" -d "{ \"objectId\": \"ccf1aa10-4401-4ce7-b5b1-71e181dc8354\", \"model\": \"abb.ability.device\", \"path\": \"abb.ability.device/ccf1aa10-4401-4ce7-b5b1-71e181dc8354.txt\"}"
This program is made for data transfer between the server and a client and it supports a variety of protocols. In our example we use it to send a HTTP POST request. Please mind that the above example has to be customized with your:
- Instance API host
- object id
- The correct file name
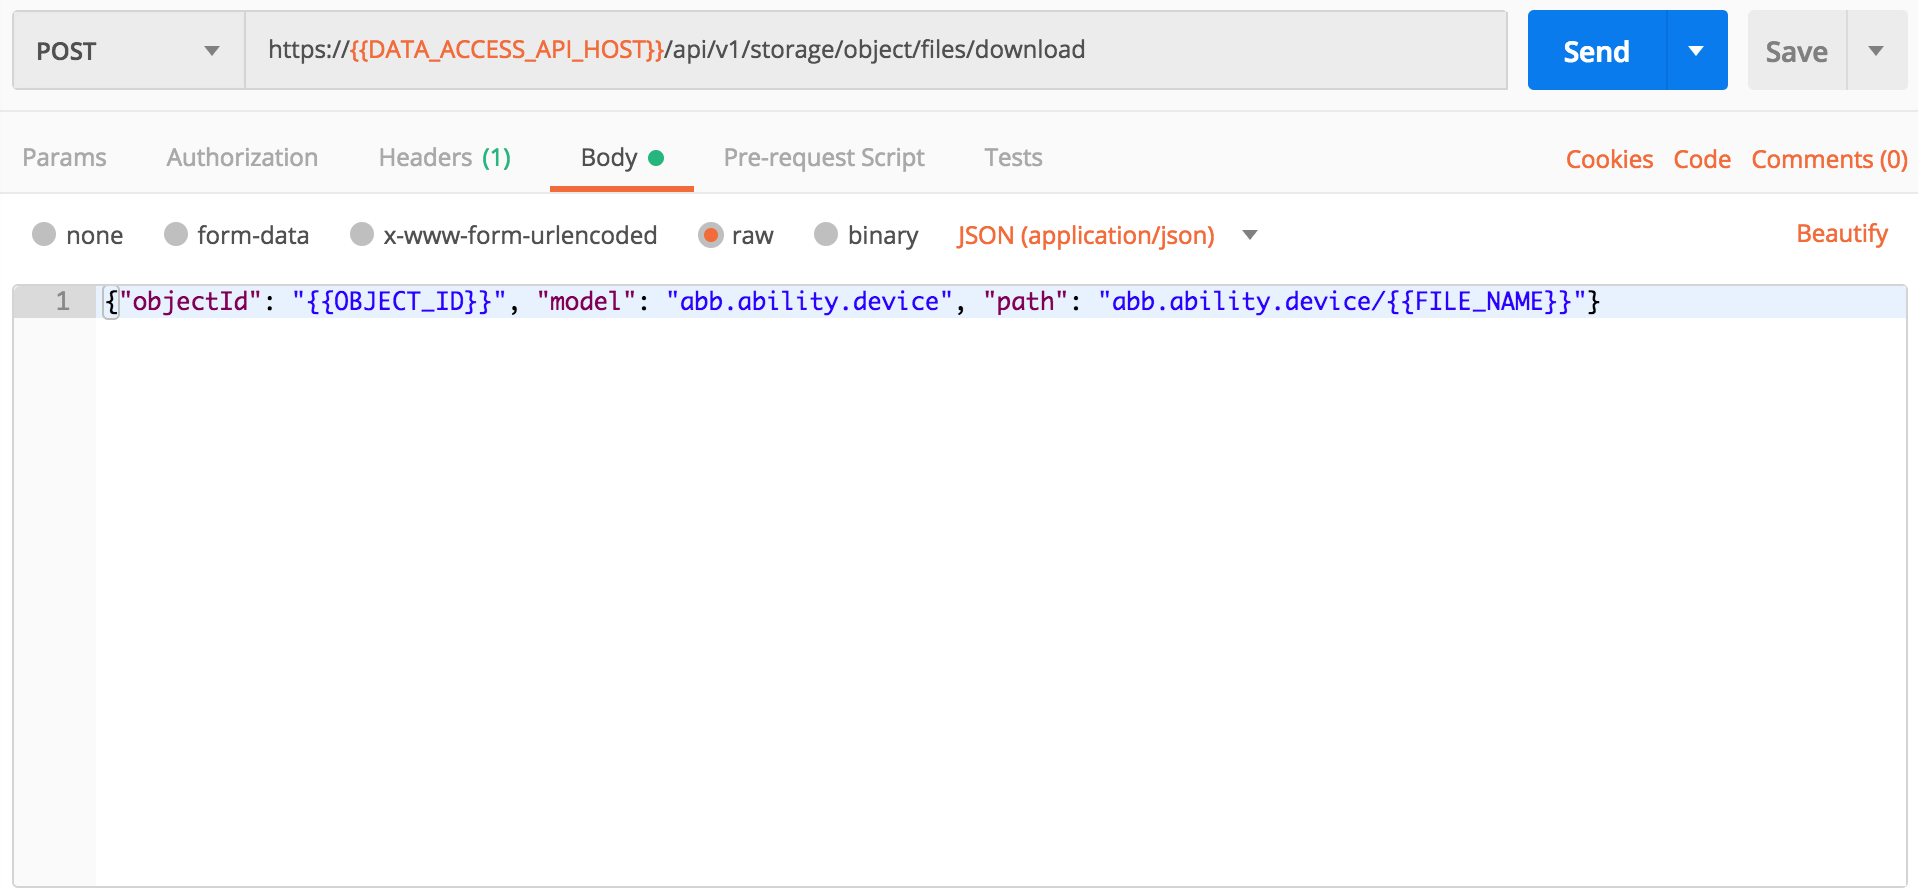
If you feel more comfortable with the GUI tools, you can achieve the same with Postman. I have exported the request along with the environment variables from Postman so you can import these to your project and change the environment variables for your custom settings.
Here is analogical request made with postman:
And don't forget about the headers:

Finally, our goal is achieved:
