# Edge Module Development
We are at the stage where we are ready to move on to a little bit different topic. We will come back to our web application soon, there is still much to add. However, for now let's focus on the device part of our project.
TIP
A small reminder - the whole solution (SPA + Edge Module) is available at Codebits.
Edge Module Tutorials
Note that we also have a series of tutorials that are focusing entirely on developing Ability Edge modules. If this is the main area of your interest, we suggest you to take the Edge Module Development Tutorials after you are finished with this tutorial series.
# Information Modeling Continued
First of all, let's briefly discuss what we are going to achieve by the end of this module of the tutorial. Our plan is to have an Ability Edge instance with one custom module running on top of it. For now, the module's functionality will be limited to:
- starting up (obviously)
- receiving its configuration (temperature interval property is there!)
- creating a child device (the temperature sensor)
In later tutorial articles, we will expand the module by adding telemetry sending functionality (which will be done with the configured interval).
As we said previously, the actual device that we want to run - a temperature sensor - will be simulated. It will be completely virtual and the edge module will "pretend" that it is collecting data from it. In reality, the data will be just randomized. For now, however, we're not dealing with any data. Our goal is just to create an information model object for the temperature sensor from the edge module.
Let's stop for a moment in the information modeling. Last time we covered type definitions. You created five of them for the needs of this tutorial. As was mentioned, type definitions can be seen as classes in object oriented programming. They are like blueprints that define how the actual instances should look like. I.e., we have defined a very simple type definition for our temperature sensor:
{
  "typeId": "temperatureSensor.device",
  "model": "abb.ability.device",
  "name": "Simulated temperature sensor",
  "version": "1.0.0",
  "variables": {
    "temperature": {
      "dataType": "number"
    }
  }
}
This definition informs us that every instance of temperatureSensor.device will have a variable
called temperature. The key point is that there is one type definition called
temperatureSensor.device, but there might be multiple objects based on it. Actually, you could
even create one right now using an API endpoint that is suitable for that operation. We will not do
that, however. Instead, we will create an object for the temperature sensor from within the edge
module. It has a dedicated Module API, which works on top of the MQTT protocol.
In the previous paragraph we only mentioned an object for the temperatureSensor.device. What about
objects for the Ability Edge itself or the module? You also created type definitions for those, so
there should be objects created, right? Yes, however, this is handled by the Ability Edge framework,
which creates them for you. The part that you need to take care of is everything below the module.
In our case, it is the temperatureSensor.device.
Before we do that, let's understand how Ability Edge framework works in a greater detail.
# Ability Edge Framework
We have already introduced some Ability Edge framework concepts. You should already know that Ability Edge is a set of software that runs on a computer designated to be an edge. This set of software allows you to run your custom modules that are able to do various things in communication with Ability Platform. Let's see how this actually works. The diagram below shows an architecture of Ability Edge:
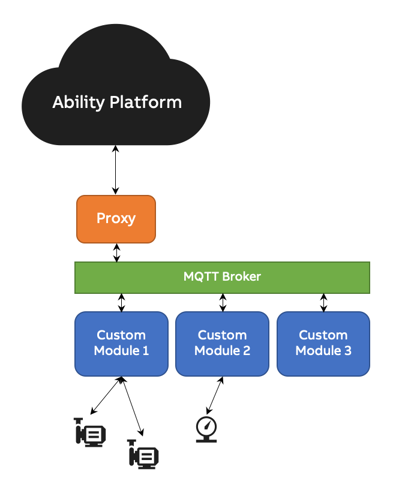
The diagram can be split into four parts:
- Ability Platform cloud
- Ability Edge system modules (Proxy and MQTT Broker)
- Custom modules
- Devices
Every Ability Edge has two system modules that have the following responsibilities:
- Proxy is responsible for communication with Ability Platform. It is the only piece that communicates with the platform directly. All the other modules communicate with Ability Platform through the Proxy module. It is also responsible for orchestration of the custom modules and the MQTT broker.
- MQTT Broker is a message bus that allows for the communication between all the other modules.
Whenever some custom module wants to send some data to the cloud, it will send it to the Proxy via the MQTT Broker. The Proxy will then forward the message to the cloud. The other way round, when the message comes from the cloud to the module (or one of devices behind the module), the Proxy receives it first and sends it via MQTT Broker to the appropriate module.
In our case, there will be just one custom module and one device that is connected to it.
TIP
Note that Ability Edge framework is not the only choice. You could develop your devices to be Ability-native from scratch. However, in such case you have to take care of all the parts that Ability Edge handles for you in the background (i.e., certificate management, TPM handling, communication with Azure DPS, communication with IoT Hub using Ability Device API, handling transient failures, etc.). In this tutorial we will follow the path that is recommended in most cases - we will stick with Ability Edge.
# Startup
Let's also discuss a bit what happens when Ability Edge starts. Let's assume that it is a first startup and the Ability Edge software is already installed.
First of all, Edge will request a certificate for itself using SCEP protocol. It is necessary for its authentication when connecting to the cloud. When the certificate is delivered, Edge will communicate with Global ID Generator, which is another API offered by Ability Platform. Its role is to generate a unique objectID identifier for the devices. When the objectId is delivered, the user needs to register the device using Admin Portal. After that, the Proxy system module can be started. It will connect with Ability Platform using Device API and request the creation of the object model for it. After the object is created it will be delivered to the Proxy. The object will contain information about the modules that should be running on the Edge. Proxy, as an orchestrator, will start these modules and request object creation for them too. Every custom module will receive its object as soon as it gets created and delivered to the Proxy (which will forward them to the modules via the MQTT Broker).
As you can see, the process might seem a bit complicated. However, the Ability Edge framework handles most of the work for us, so that we can focus on the development of our modules for the most part. Other than that, we just need to configure the Edge properly before we start it.
In this article we will focus on developing our module.
# Module Application
Even though we changed the domains and moved from web app development to Edge module development, our technology stack will not change too much. Obviously we will not use Vue.js this time, however, we will stay in the JavaScript world and make use of Node.js. It will allow us to keep the code concise.
TIP
One thing that we really want to emphasize during this tutorial is that the choice of development technologies that we've made is not any recommendation for you. You are free to use any technology stack that you feel comfortable with in your business organization. Ability Platform does not constrain you in any way in that area.
WARNING
You are about to see a code that is far from production-grade quality. The module will be written procedurally in one file. Our goals were to keep it short and easy to explain. Forgive us the usage of so many global variables!
Let's start by creating a new directory for the module and initiating it with npm:
mkdir edge-module-getting-started
cd edge-module-getting-started
npm init -y
We will install some packages that will be useful for us:
npm install async-mqtt dotenv
async-mqtt will allow us to communicate with Proxy via
MQTT, while dotenv will allow us to store some configuration
values in a separate .env file, keeping these values out of code, which is a good practice.
Let's create a new file called index.js (this is the default name of the entry file, as you can
see in package.json). At the top, we will import some dependencies that we need:
require('dotenv').config();
const mqtt = require("async-mqtt");
const fs = require('fs');
const util = require('util');
const { EventEmitter } = require("events");
const readFile = util.promisify(fs.readFile);
Below, let's add a few "global" variables that we will be using:
// Initial configuration
const eventEmitter = new EventEmitter()
const initialConfigEvent = "initialConfiguration";
let receivedInitialConfig = false

// Shared objects
let mqttClient = null
let envConfiguration = null

// Telemetry
let telemetryInterval = null
let deviceObjectId = null
EventEmitter will be useful for signaling to our program that the module has received its object
model with configuration (an instance of module.configuration). EventEmitter will allow us to
turn this asynchronous operation into a synchronous flow thanks to Node.js's support of async/await
keywords. We will code it in a moment.
mqttClient is obviously a variable for an instance of AsyncMqttClient, which we will use for
handling MQTT messaging. envConfiguration will store some configuration values that every Ability
Edge module has setup for it by default. telemetryInterval is the value that the module can be configured
with via its module.confiuration object.
deviceObjectId will store the objectId of a temperature sensor device that we will simulate.
Since our program will use async/await keyword, we need to create an async function and call it:
main()

async function main() {
    try {
        console.log("ABB Ability Getting Started Module is starting!")

    }
    catch (e) {
        console.log("There was an error. The program will terminate.")
        console.log(e)
        console.log(e.stack)
        process.exit()
    }
}
A simple error-handling with try-catch has been added, as you can see above.
# Environment Configuration
Let's create a new function that will be responsible for reading environment configuration:
async function getEnvironmentConfiguration() {
    console.log("Reading configuration from environment variables")
    const mqttPassword = (await readFile(process.env.mqtt_password_file)).toString('utf8')
    return {
        mqttClientId: process.env.mqtt_client_id,
        mqttUrl: process.env.mqtt_url,
        mqttPassword,
        mqttModelInTopic: process.env.topics_model_in,
        mqttMessagesOutTopic: process.env.topics_messages_out,
        mqttMethodsInTopic: process.env.topics_methods_in,
        mqttMethodsOutTopic: process.env.topics_methods_out,
        moduleObjectId: process.env.object_id
    }
}
Every Ability Edge module is setup with a bunch of values that are required for it to operate. They are available as environment variables and this is the Proxy that sets them up for you. These values are:
- the objectId of the module
- the clientId for communicating via MQTT
- the path to the file that contains a password for communication via MQTT
- all the different topics that the module can use when communicating with the outside world (mostly Proxy)
TIP
In our function we are not reading all of the available values, because in the tutorial we will not be using all of the available functionality. You can see the list of all environment variables and their exemplary values here
The MQTT topics that we will be using in or modules are (listed are the environment variables that contain the actual topics):
topics_model_in- the module subscribe to that topic to receive object models from the cloudtopics_messages_out- module has to use this topic if it wants to send some data (like telemetry) to the cloudtopics_methods_in- if some predefined action is requested to be invoked, module will be informed about that on this topic. In our case, ourmodule.devicetype deifnes two methods:startTelemetryandstopTelemetry.topics_methods_out- topic used for responses for method invocations
Let's call the function in main and use some of the fetched values to establish MQTT connection:
async function main() {
    try {
        console.log("ABB Ability Getting Started Module is starting!")

        envConfiguration = await getEnvironmentConfiguration();
        console.log(`Module's objectId: ${envConfiguration.moduleObjectId}`)
        mqttClient = await mqtt.connectAsync(
            envConfiguration.mqttUrl,
            { username: envConfiguration.mqttClientId, password: envConfiguration.mqttPassword })
        console.log("Connected to the MQTT broker")
    }
    catch (e) {
        console.log("There was an error. The program will terminate.")
        console.log(e)
        console.log(e.stack)
        process.exit()
    }
}
# Receiving Configuration
Now, let's move on to the functionality that will allow us to get the configuration from the cloud.
Every module receives its object models on startup. In our case, there will be two of them - one
instance of module.device and one for module.configuration. We can ignore the first one, and
focus on the module.configuration, which will contain the telemetryInterval property. We want to
retrieve it, since we will need it soon.
Create a new function called receivedMessage. It will be a callback method invoked when any new
MQTT message comes in. Additionally, create a handleModelMessage function, which will handle
messages from topics_model_in topic specifically):
async function receivedMessage(topic, message) {
    console.log(`A new message was delivered on topic '${topic}':`)
    const messageJson = message.toString('utf8')
    console.log(messageJson)

    handleModelMessage(topic, JSON.parse(messageJson));
}

function handleModelMessage(topic, message) {
    if (topic.includes("abb.ability.configuration")) {
        console.log("Delivered message is a configuration object")
        const newInterval = message.properties.telemetryInterval.value
        console.log(`Setting telemetry interval to ${newInterval} [s]`)
        telemetryInterval = newInterval

        if (!receivedInitialConfig) {
            receivedInitialConfig = true
            eventEmitter.emit(initialConfigEvent)
        }
    }
    else if (!deviceObjectId && !topic.includes(envConfiguration.moduleObjectId)) {
        deviceObjectId = message.objectId
    }
}
For now, the receivedMessage function treats every new message as a model message. In the next
article we will extend it to also handle method invocations.
The handleModelMessage function reads the telemetryInterval property and stores it in our global
variable. After that we finally make use of our EventEmitter. We'll get back to handling it in a
minutes.
The last thing worth mentioning is this piece:
else if (!deviceObjectId && !topic.includes(envConfiguration.moduleObjectId)) {
    deviceObjectId = message.objectId
}
The name of the topic will also contain the objectId of an entity that the message is directed to.
In our case, it might be either our module or the temperature sensor. We didn't create the sensor
yet, however, the handling of its object delivery is already added here, so that we don't need to
come back to modify handleModelMessage in the future. Whta this fragment of code is doing is
basically reading objectId of the temperature sensor. We will need it to send telemetry in its name.
Let's add the last pieces to the main method:
async function main() {
    try {
        console.log("ABB Ability Getting Started Module is starting!")

        envConfiguration = await getEnvironmentConfiguration();
        console.log(`Module's objectId: ${envConfiguration.moduleObjectId}`)
        mqttClient = await mqtt.connectAsync(
            envConfiguration.mqttUrl,
            { username: envConfiguration.mqttClientId, password: envConfiguration.mqttPassword })
        console.log("Connected to the MQTT broker")

        const initialConfigDelivery = new Promise((resolve) => {
            eventEmitter.on(initialConfigEvent, resolve);
        });
        mqttClient.on("message", receivedMessage)
        await mqttClient.subscribe(`${envConfiguration.mqttModelInTopic}/#`)
        await mqttClient.subscribe(`${envConfiguration.mqttMethodsInTopic}/#`)
        console.log("Awaiting initial configuration to be delivered")
        await initialConfigDelivery
        await createChildDevice()
    }
    catch (e) {
        console.log("There was an error. The program will terminate.")
        console.log(e)
        console.log(e.stack)
        process.exit()
    }
}
We added a few new lines of code. Let's see what is actually happening there. First of all we setup
an initialConfigDelivery constant, which is a Promise. It will be resolved as soon as we receive
initial configuration from the cloud. Go back to the handleModelMessage function - this is where
we emit an event that resolves that promise. However, we're not awaiting it yet. It wouldn't make
sense, because first we have to subscribe to MQTT topics to receive any message at all! These lines
are responsible for just that:
mqttClient.on("message", receivedMessage)
await mqttClient.subscribe(`${envConfiguration.mqttModelInTopic}/#`)
await mqttClient.subscribe(`${envConfiguration.mqttMethodsInTopic}/#`)
Notice, that the topics that we subscribe to end with #. In MQTT # is a wild card character.
Anything that appears after envConfiguration.mqttModelInTopic part will be accepted by us. What
could be there? For example, an objectId of the entity that the message is directed to. Do you
remember how we were handling the delivery of our temperatures sensor's object? We were checking if
the topic does not contain the module's objectId (which is well known to us, since we got it in an
environment variable). In such case, we assume that it is directed for something else - in our case
it can only be the temperature sensor.
Hopefully, a few things became a bit more clear now.
Our main function is finished. However, there is one last piece that we are missing. Look at the
last function that is called form withing main. It's createChildDevice. We do not have it yet.
Let's create it:
async function createChildDevice() {
    console.log("Creating a child device")

    const message = {
        type: process.env.DEVICE_TYPE_DEFINITION,
        parent: {
            objectId: envConfiguration.moduleObjectId,
            reference: process.env.REFERENCE_NAME
        }
    }
    await mqttClient.publish(
        `${envConfiguration.mqttMessagesOutTopic}/type=deviceCreated`,
        JSON.stringify(message));
}
The procedure here is simple. We create a message and we send it via MQTT. You can see that the body
of the message needs to follow some contract. You need to specify the type of your device, the
objectId of the parent (our module) and the name of the reference that ties them together (the name
of this reference can be found in the module.device type definition).
TIP
Some of the values come from the .env file (the ones preceeded by process.env.). We will create
it in a moment.
Additionally, notice that we appended /type=deviceCreated to the end of the topic that we red from
environment variables. This informs the Proxy module about the kind of message that we are sending.
After such a message is sent to a Proxy, it prepares a proper message to Ability Platform. It will
then receive a response in the form of an object model of the new device. This object model will be
forwarded to us, and its receival is already handled by us in handleModelMessage.
The last thing to do for now is to create a .env file with the following contents:
DEVICE_TYPE_DEFINITION=temperatureSensor.device@1
DEVICE_VARIABLE_NAME=temperature
REFERENCE_NAME=devices
Remember to update the values according to your project, especially the name of temperature sensor's
type definition. Also, notice the @1 at the end of its name. It needs to be there and it specifies
the major version of the type definition that you want to use (have a look at the version in your
type definitions. It follows Semantic Versioning).
WARNING
Notice that our application has one flaw. Every time the module is restarted, a new child device will be created! It is not an issue for our learning purposes, however, in a "real" application you should check if there is a device created already before you create a new one. It could be done in two ways. First, if the module has some "children", it will receive them on startup from Proxy, together with its own objects. Secondly, a module is able to request all of its children via a specific topic. For simplicity, we skipped that in this tutorial.
# Summary
Let's stop for now. You have created a functional Ability Edge module, but it's not finished yet. We are lacking functionalities related to telemetry sending and methods invocation. The next article will pick up right where we left off.