# Type Definitions
We created the base of our web application. For now, it's very limited, it just retrieves an access token. In this article we will extend it with a first module that actually communicates with the Ability Instance API. What we will achieve by the end of that page is an ability to create type definitions. Why do we even need them?
Let's not forget that our real goal is to run a device connected to the Ability Cloud and to have an accompanying application being able to control the device or read its data. However, in order to reach that goal we need to make some smaller steps that will take us to it. We are already past one of these steps - we got the access token for our SPA. The next step is type definitions, or more generally, information model of Ability Platform.
# Information Modeling
Before you run any device or start sending any data, you need to model it so that:
- there is some "contract" that various client applications and users can align to
- the platform is able to validate if the data it receives meets the schema
In order to get a good understanding of these concepts, we recommend you to read this introduction article. The key points to take out of it are:
- model definition defines the capabilities that type definitions using it can have
- type definition is analogical to a class on object oriented programming
- information model object is a representation of your actual devices (or, more generally Things in the IoT nomenclature). Remember that one device might have multiple objects associated with it, each one being an instance of a different type definition. We will use that approach in this tutorial and you will get a better understanding of it.
# Defining our type definitions
Let's first think about the actual Things (Internet of Things) that we will have in our solution. Enumerating them will make it easier for us to identify what type definitions we need to create.
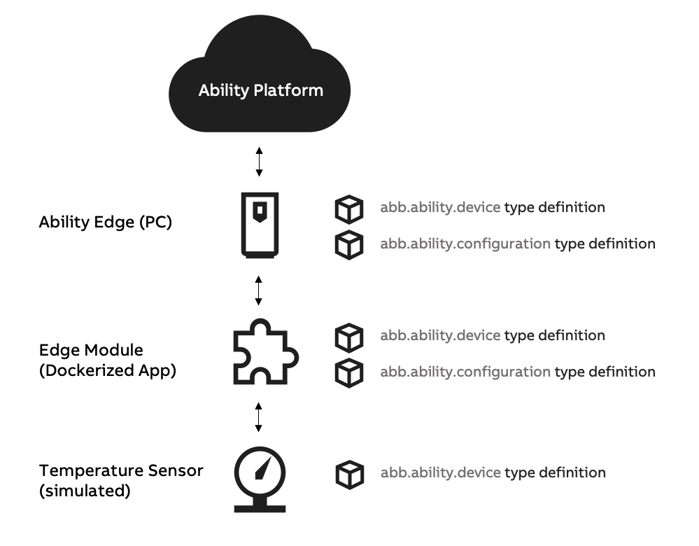
The information modeling is required on the devices-side of our project, so let's look at this side a bit. We are going to use Ability Edge framework, which provides a base on top of which we can build an Ability-connected device. Let's show graphically the relationship between various entities that we will have:
Even though we are not yet starting to create our device, it's worth to explain the concepts behind it a bit. It will make it easier for you to understand the diagram above.
Ability Edge is a set of software components that is meant to run on a Linux computer (with some restrictions on the hardware, which are not important at this point). The role of this software is to:
- communicate with Ability Platform
- orchestrate the modules that are running on the Ability Edge computer
The modules are custom applications that the users create and run on their edges. In the diagram above, a module is depicted as a piece of the puzzle meaning that there may be a few of them running, depending on user's needs. Each module should have some role that it does. Most often, such modules are protocol translators. The user might have some devices (i.e. robots, motors, etc.) that are not capable of communicating with Ability Platform. An Edge module would be created that is able to communicate with that device (using some protocol that the device supports). The module would then become a broker between the cloud and the actual device that we wanted to connect to the cloud.
The presented description is a big simplification of Edge computing. However, it is sufficient for our needs.
Looking back at the diagram, at the top there is Ability Platform. An Ability Edge computer communicates with it. A bit lower is the Edge module - a piece of software that communicates with our device (i.e. a temperature sensor) and with the Ability Edge's components exchanging information between them.
You could come to a conclusion that what we need in terms of type definitions is three of them: one for the Ability Edge computer, one for the module, and one for the temperature sensor. You would be partly correct. We are actually going to define five type definitions.
As we mentioned previously, one device might be represented by a few objects, each one being an instance of a different type definition. This multi-object representation of one Thing is quite a useful capability. Looking at the Ability Edge computer device and its characteristics, we could split its properties/variables into two categories:
- those that are reported by the device itself (i.e., CPU usage, memory usage, etc.).
- those that are configurable (i.e. the verbosity of logs being generated, the number of retries in case of transient network errors, etc.)
This is the main idea behind the multi-objects approach. It was created to split various device properties/variables into separate entities, when it makes sense. Ability Edge framework uses it by requiring two type definitions for the Edge computer, and two type definitions for each module that users create.
If you read the information model introduction, you probably know by now that there are two (available by default) model definitions that the type definitions may use:
abb.ability.device- used for properties/variables reported by the device itselfabb.ability.configuration- used for properties that should be configurable by the user
Knowing all that, let's list the type definitions that we will have to create:
temperatureSensor.devicemodule.configurationmodule.deviceedge.configurationedge.device
WARNING
In case of Ability Sandbox users, the names proposed above might be already taken. Ability Platform
shares type definitions between tenants, meaning that other users of the Ability Sandbox could
already use these names for their type definitions. Mind that ALL Sandbox environments are created
on one platform instance. Type definitions are shared on platform instance by design. It is
recommended to change the above names, i.e. by adding some unique string in front of each type's
name. In this tutorial we will refer to these types by the names listed above. Keep in mind that
when we mention these, i.e. module.configuration, you should actually look at your type, which
could be called johnsmith.module.configuration.
Each type definition contains a bunch of sections. You will find there: properties, variables, methods, attributes, references, relatedModels. Let's shortly define what these are:
- properties - they characterize the entity and it rarely changes (i.e. a serial number of a robot)
- variables - these are the values that a given device "produces" and sends to the cloud as timeseries telemetry. In our case the temperature sensor has "temperature" variable
- methods - define actions that the device is capable of doing (they are invokable)
- attributes - define some metadata that may be used in other parts of the type definition
- references - define connections between various objects (i.e. an edge has a module, and a module has a temperature sensor)
- relatedModels - used to connect various type definitions together so that one "thing" may be represented by multiple objects (i.e. one type based on abb.ability.device and another based on abb.ability.configuration)
The types are available in the Codebits Repository, right next to the Edge module's code, which we will be looking at some time later. However, you can already take a look at the type definitions themselves. Soon we will be uploading them to the platform using a new module of our SPA that we will develop.
# Extending SPA
After learning some theory, let's get back to the code. We will extend our application with the functionality of creating new type definitions (by the usage of Ability Instance API).
# Type Definition Service
Let's start by extending the .env file configuration. Add a new configuration key there:
VUE_APP_INSTANCE_API_URL. The value for that key can be found in the mail with your Ability
Instance's details. Make sure to paste in the Instance API URL here, after the "=" character.
Additionally, make sure that the URL has a slash ("/") at the end.
Sandbox Users
Sandbox users can find this URL under the "Instance API URL" parameter. The
configuration will look similar to this one:
VUE_APP_INSTANCE_API_URL=https://ability-sandbox-proxy.azurewebsites.net/sandbox/
(your address might differ a bit from the example, it is to be expected).
Non-Sandbox Users
The API address, that you have, probably contains "v1" as a part of its path. In such a case,
VUE_APP_INSTANCE_API_URL should contain only the part that comes before "v1". An example:
VUE_APP_INSTANCE_API_URL=https://api-abc12.dev.abilityplatform.abb/. The "v1" will be
added dynamically in the code, as you will see in a moment.
After the changes, the .env file should look like
below (the values should be real, instead of placeholders):
VUE_APP_AUTH_CLIENTID=clientId of a native app registered in the Admin Portal
VUE_APP_AUTH_AUTHORITY=URL of your B2C authority
VUE_APP_AUTH_B2C_DOMAIN=domain address of the B2C tenant of your platform
VUE_APP_AUTH_SCOPE=your specific scope
VUE_APP_AUTH_REDIRECT_URI=redirect URI as set up in the Admin Portal
VUE_APP_INSTANCE_API_URL=URL of the Instance API (with a slash at the end)
Now, let's install axios that we will use whenever we make an HTTP request:
npm install axios
If your local Vue.js server is not running, start it with npm run serve. If it is running already,
restart it (since we changed the .env file). This way, you will be able to see changes to our app
live as we add code.
Let's add a new file src/typeDefinitions/typeDefinitionService.js (you need to create a new
directory typeDefinitions):
import axios from 'axios';

async function createTypeDefinition(accessToken, typeDefinitionJson, modelDefinition) {
    const url = new URL(
        `v1/modelDefinitions/${modelDefinition}/types`,
        process.env.VUE_APP_INSTANCE_API_URL
    );

    const response = await axios({
        method: "post",
        url: url.toString(),
        responseType: "json",
        headers: { Authorization: `Bearer ${accessToken}`, "Content-Type": "application/json" },
        data: typeDefinitionJson
    })
    return response
}

export { createTypeDefinition as default }
Our typeDefinitionService.js consists of just one function - createTypeDefinition. It expects
three arguments:
- an
accessToken- we will retrieve using the previously createdAuthService - a
typeDefinitionsJson- an actual type definition that we want to create. If you look into the Codebits Repository with the types for this tutorial, you will see that they are JSON structures. - a
modelDefinition- even thoughtypeDefinitionJsonalready contains a modelId (a synonym for model definition), API requires to pass in the model definition explicitly in the path of the URL, for performance reasons.
The body of the function is rather straightforward:
- We build the URL by concatenating the base URL from the
.envconfiguration and the path of the type definitions endpoint - We send the HTTP POST request using the axios library that we installed a minute ago.
- We return the response of the server
You might think about error handling - we will handle that in the Vue.js component that we're about to build now.
# Vue.js Component
Let's add a new file src/typeDefinitions/TypeDefinition.vue, with the following contents:
<template>
  <div class="card" style="height: 100%">
    <div class="card-body">
      <h5 class="card-title">2. Type Definition Creation</h5>
      <h6 class="card-subtitle text-muted mb-4">You can create your Ability Edge types</h6>
      <div class="container">
        <div class="row">
          <div class="col">
            <form @submit.prevent>
              <div class="form-group">
                <label for="modelDefinitionInput">Model Definition</label>
                <input
                  v-model="modelDefinition"
                  type="text"
                  class="form-control"
                  id="modelDefinitionInput"
                />
                <small class="form-text text-muted">The model definition of the new type.</small>
              </div>

              <div class="form-group">
                <label for="typeDefinitionTextArea">Type Definition</label>
                <textarea
                  v-model="typeDefinition"
                  class="form-control"
                  id="typeDefinitionTextArea"
                  rows="12"
                />
                <small class="form-text text-muted">The type definition to be created.</small>
              </div>

              <button
                type="button"
                @click="createType"
                class="btn btn-primary mb-3"
                :disabled="!modelDefinition || !typeDefinition"
              >POST</button>
            </form>

            <section
              class="alert"
              v-if="isSuccess !== null"
              v-bind:class="{ 'alert-success': isSuccess, 'alert-danger': isSuccess === false }"
            >{{ alertText }}</section>
          </div>
        </div>
      </div>
    </div>
  </div>
</template>

<script>
import AuthService from "../auth/AuthService";
import createTypeDefinition from "./typeDefinitionService";

export default {
  name: "TypeDefinition",
  data: function () {
    return {
      authService: null,
      modelDefinition: "abb.ability.device",
      typeDefinition: null,
      isSuccess: null,
      alertText: null,
    };
  },
  methods: {
    async createType() {
      try {
        this.isSuccess = null
        this.alertText = null

        if (!this.authService.isAuthenticated()) {
          await this.authService.signIn()
        }
        const { accessToken } = await this.authService.getToken()

        const response = await createTypeDefinition(
          accessToken,
          this.typeDefinition,
          this.modelDefinition
        )
        this.alertText = "Type definition created."
        this.isSuccess = true;
      } catch (error) {
        console.log(error)
        this.alertText = "There was some problem with your request. Check console for details."
        this.isSuccess = false
      }
    },
  },
  created: function () {
    this.authService = AuthService.getInstance()
  },
};
</script>
Most of the content is taken by the HTML template, due to the fact that we need to display a form
accepting various inputs. The script makes use of the AuthService to obtain the token and
createTypeDefinition function, that we just created in the typeDefinitionService.js file, to
send the type to Ability Platform.
Looking at the data of our Vue.js component we see:
modelDefinitionandtypeDefinition, which are bound to the HTML markup for us to be able to retrieve the user's inputisSuccessandalertTextthat are used for success/error reporting
# Extending App.vue
The last thing to do is to actually display our new component. Modify the src/App.vue file, which
is the root component of our application and modify it so that its contents are like this:
<template>
  <div class="app">
    <header class="mb-4">
      <nav class="navbar navbar-light bg-white border-bottom">
        <div class="container">
          <span class="navbar-brand mb-0 h1 text-wrap">
          Getting Started with <span class="abb font-weight-bold">ABB Ability™ Platform
          </span></span>
        </div>
      </nav>
    </header>

    <main class="container">
      <div class="row">
        <div class="col-12 mb-4"><AccessToken /></div>
        <div class="col-lg-6 mb-4"><TypeDefinition /></div>
      </div>
    </main>

    <footer class="footer mt-4 p-3 bg-white border-top">
      <div class="container">
        <span class="text-muted">This application is part of the Ability Getting Started
        tutorial series that can be found on
        the <a target="_blank" href="https://clientsuccess.ability.abb">
        Ability Developer Portal</a>.</span>
      </div>
    </footer>
  </div>
</template>

<script>
import AccessToken from './auth/AccessToken';
import TypeDefinition from './typeDefinitions/TypeDefinition';

export default {
  name: 'App',
  components: {
    AccessToken,
    TypeDefinition
  }
}
</script>
As you can see above, you need to add our new component in three (highlighted) places of the
src/App.vue.
Look at the browser. Here's the result that you should be seeing:
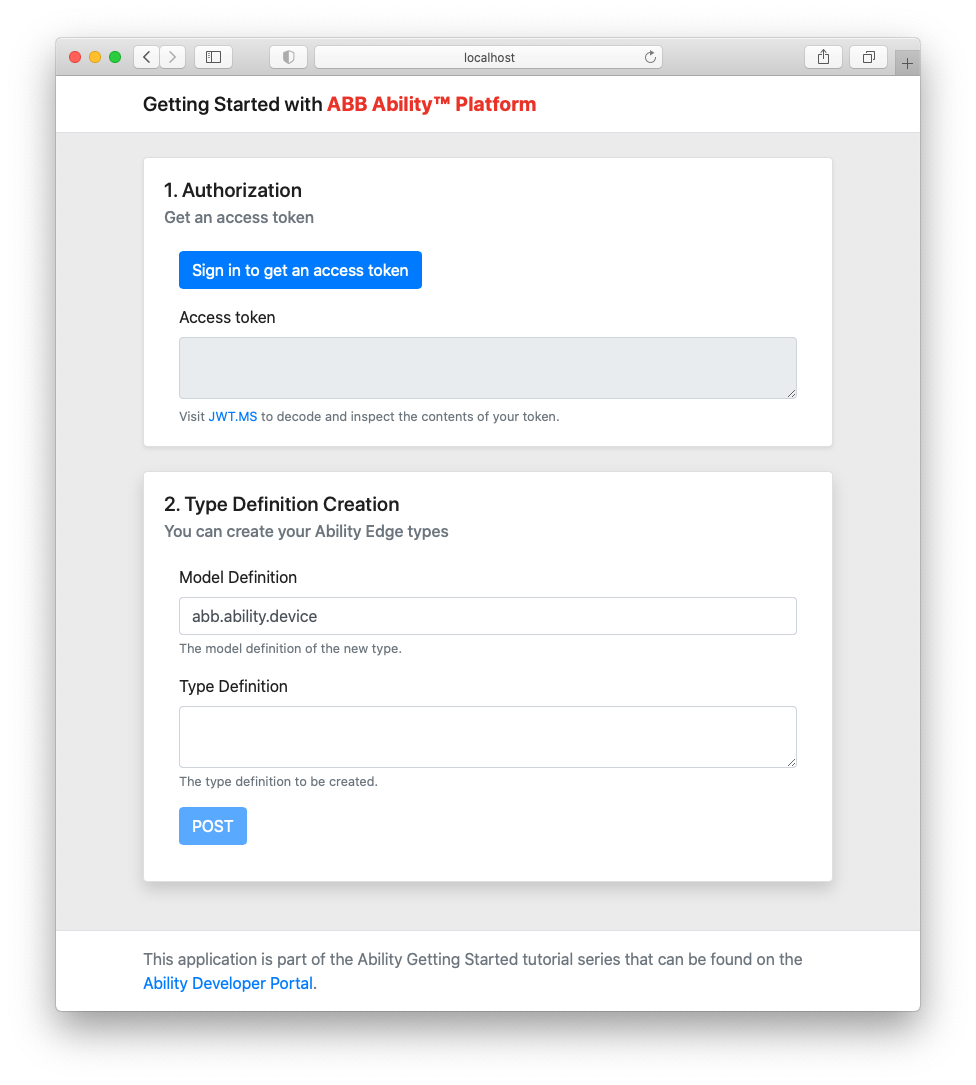
WARNING
The page is responsive, so it might look a bit different if the width is bigger
# Creating Type Definitions
Since the application is ready, let's use it in practice. Download the type definitions from
Codebits and optionally modify them by changing their names, as was already
mentioned above (especially in the case of Sandbox users). Note that you will not only need to
modify the typeId of each JSON, but also various references to them. I.e., the edge.device type
mentions edge.configuration in its relatedModels section. make sure that you change ALL
occurrences of the type names that you're changing. Use the search functionality of your code editor
to do that.
TIP
To learn more about specific parts of type definitions, you can read about it here
When you update the JSONs as necessary, you can start to create the types. Make sure that you do that in the following order (the types will be called differently after your changes):
temperatureSensor.devicemodule.configurationmodule.deviceedge.configurationedge.device
The reason for the ordering is the fact that you cannot create a type that references another one
that doesn't exist. If you'd try to create edge.device, before defining edge.configuration,
you'd get an error. You will be forced to create the types in the correct order.
Make sure to fill in the Model Definition input correctly each time, according to the type that
you are going to create (use abb.ability.configuration or abb.ability.device).
Hopefully, the creation went smoothly and you were able to create all of your types. If you made some mistake and the type you created is not what you wanted to have, we suggest you to rename all of your types again and start over.
# Summary
By following the above article, you have extended the SPA with type definition creation capability. You created type definitions for your device and you are ready to start working on the device itself. Let's continue!
Accessing Ability APIs
In this tutorial we are accessing Ability Platform APIs directly from our single page app. It is not a recommended approach - there should be a "proxy" in between your client app and the Ability Platform APIs. In this case, we're taking a bit of a shortcut, since we really wanted to get you started with using the Platform as quickly as possible.
In case of Ability Sandbox users, there is a small correction about the above statement. You're not actually connecting to the Platform directly. Instead, the Instance API URL that you have is a proxy that we've set up for your convenience. Nevertheless, in a real application, you'd probably have your own "proxy" API that exposes the data using an abstraction level appropriate to the solution you're building.
With that in mind, we can truly continue 😉.