# Timeseries Telemetry
Our device is already running, but for now it's rather quiet. All it does is it creates a child and that's it. No further communication with the cloud is made. In this last part of the tutorial we will make use of the timeseries telemetry sending functionality that is already embedded into our module. We just need some way to enable it.
In this article we will do the following:
- add a new component to the SPA that will allow us to start/stop telemetry sending on the device
- add a new component to the SPA that displays timeseries data (stored in the cloud, originated from our device)
In the process you will learn how to use two other endpoint of the Instance API.
# Invoking Methods
A small reminder:
- our
module.devicetype definition defines two methods: "startTelemetry" and "stopTelemetry" - our Edge module has capabilities to generate and send variable telemetry to the cloud (for
"temperature" variable, as defined in
temperatureSensor.device)
These facts mean that our solution enables us to make use of methods - actions that can be invoked on devices. In our case the methods will be of the simplest possible types - there are no inputs, nor outputs. Adding these would require modification of type definition and of course our device would need to be able to support it. In this tutorial we'll not cover that.
# Method invocation Component in SPA
# Method Service
We will start by creatng a new JS file with a function that sends method invocation requests. The
file will be src/methods/methodsService.js :
import axios from 'axios';

async function invokeMethod(accessToken, objectId, modelId, methodName, methodPayload) {
  const url = new URL(
    `v1/objects/${objectId}/models/${modelId}/methods/${methodName}`,
    process.env.VUE_APP_INSTANCE_API_URL
  )

  try {
    const response = await axios({
      method: "post",
      url: url.toString(),
      responseType: "json",
      headers: { Authorization: `Bearer ${accessToken}`, "Content-Type": "application/json" },
      data: methodPayload
    })
    return response
  }
  catch (error) {
    console.log(error.response)
    throw (error)
  }
}

export { invokeMethod as default }
The call is a simple HTTP POST request. You can see that a few parameters are needed:
objectId,- model definition (
modelId), methodName(in this tutorial it can be either "startTelemetry" or "stopTelemetry").
# Vue.js Component
We'll move to to a new Vue.js component creation. Create a new file src/methods/MethodInvocation.vue:
<template>
<div class="card" style="height: 100%">
<div class="card-body">
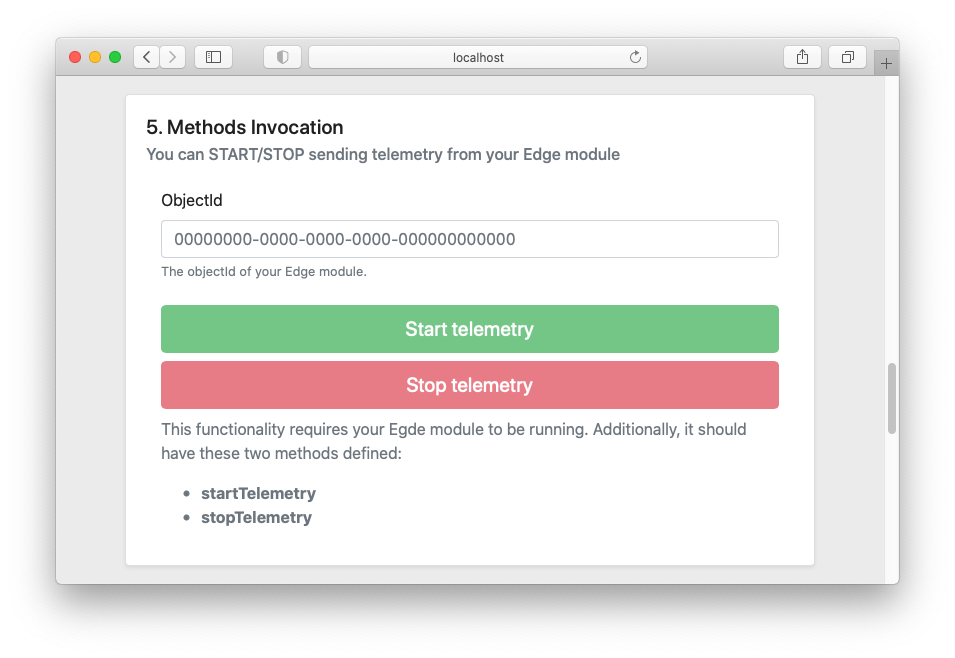
<h5 class="card-title">5. Methods Invocation</h5>
<h6 class="card-subtitle mb-4 text-muted">You can START/STOP sending telemetry from your Edge module</h6>
<div class="container">
<div class="row">
<div class="col-12">
<form @submit.prevent>
<div class="form-group mb-4">
<label for="objectIdInput3">ObjectId</label>
<input
v-model="objectId"
type="text"
class="form-control"
id="objectIdInput3"
placeholder="00000000-0000-0000-0000-000000000000"
/>
<small class="form-text text-muted">The objectId of your Edge module.</small>
</div>
<button
type="button"
@click="invokeStartTelemetry"
class="btn btn-success btn-lg btn-block"
:disabled="!objectId || startLoading || stopLoading"
><span v-if="startLoading" class="spinner-border spinner-border-sm"></span>
Start telemetry</button>
<button
type="button"
@click="invokeStopTelemetry"
class="btn btn-danger btn-lg btn-block"
:disabled="!objectId || startLoading || stopLoading"
><span v-if="stopLoading" class="spinner-border spinner-border-sm"></span>
Stop telemetry</button>
<section
class="alert mt-4 col-12"
v-if="isSuccess !== null"
v-bind:class="{ 'alert-success': isSuccess, 'alert-danger': isSuccess === false }"
>{{ alertText }}</section>
</form>
<section class="mt-2 text-muted">
<p>This functionality requires your Edge module to be running.
Additionally, it should have these two methods defined:</p>
<ul>
<li class="font-weight-bold">{{this.startMethodName}}</li>
<li class="font-weight-bold">{{this.stopMethodName}}</li>
</ul>
</section>
</div>
</div>
</div>
</div>
</div>
</template>
<script>
import AuthService from "../auth/AuthService";
import invokeMethod from "./methodsService";
export default {
name: "MethodInvocation",
data: function () {
return {
authService: null,
objectId: null,
isSuccess: null,
alertText: null,
startMethodName: process.env.VUE_APP_START_TELEMETRY_METHOD,
stopMethodName: process.env.VUE_APP_STOP_TELEMETRY_METHOD,
startLoading: false,
stopLoading: false
};
},
methods: {
async invokeStartTelemetry() {
this.startLoading = true
await this.invokeMethod(this.startMethodName)
this.startLoading = false
},
async invokeStopTelemetry() {
this.stopLoading = true
await this.invokeMethod(this.stopMethodName)
this.stopLoading = false
},
async invokeMethod(methodName) {
try {
this.isSuccess = null
this.alertText = null
const accessToken = await this.getAccessToken();
const data = await invokeMethod(
accessToken,
this.objectId,
"abb.ability.device",
methodName,
"{}"
);
this.alertText = "Method invoked."
this.isSuccess = true
}
catch (error) {
console.log(error);
this.alertText = "There was some problem with your request. Check console for details."
this.isSuccess = false
}
},
async getAccessToken() {
if (!this.authService.isAuthenticated()) {
await this.authService.signIn();
}
return (await this.authService.getToken()).accessToken;
},
},
created: function () {
this.authService = AuthService.getInstance();
},
};
</script>
The component contains two buttons. One of them commands the device to start sending telemetry, the
other one does the opposite. The names of the methods that are requested are configured in .env
file and we need to add this information there. Other than that you can see that the payload that we
are passing into invokeMethod function is {}. This is due to the fact that our method does not
define any inputs. If it did, we'd pass them here.
Let's add the following two lines into .env file:
VUE_APP_START_TELEMETRY_METHOD=startTelemetry
VUE_APP_STOP_TELEMETRY_METHOD=stopTelemetry
In total, you should now have eight values stored in .env.
The last step, as previously, is to update src/App.vue:
<template>
  <div class="app">
    <header class="mb-4">
      <nav class="navbar navbar-light bg-white border-bottom">
        <div class="container">
            <span class="navbar-brand mb-0 h1 text-wrap">
            Getting Started with <span class="abb font-weight-bold">ABB Ability™ Platform
            </span></span>
        </div>
      </nav>
    </header>

    <main class="container">
      <div class="row">
        <div class="col-12 mb-4"><AccessToken /></div>
        <div class="col-lg-6 mb-4"><TypeDefinition /></div>
        <div class="col-lg-6 mb-4"><ObjectModelGet /></div>
        <div class="col-lg-6 mb-4"><ObjectModelPatch /></div>
        <div class="col-lg-6 mb-4"><MethodInvocation /></div>
      </div>
    </main>

    <footer class="footer mt-4 p-3 bg-white border-top">
      <div class="container">
        <span class="text-muted">This application is part of the Ability Getting Started
        tutorial series that can be found on
        the <a target="_blank" href="https://clientsuccess.ability.abb">
        Ability Developer Portal</a>.</span>
      </div>
    </footer>
  </div>
</template>

<script>
import AccessToken from './auth/AccessToken';
import TypeDefinition from './typeDefinitions/TypeDefinition';
import ObjectModelGet from './objectModels/ObjectModelGet';
import ObjectModelPatch from './objectModels/ObjectModelPatch';
import MethodInvocation from './methods/MethodInvocation';

export default {
  name: 'App',
  components: {
    AccessToken,
    TypeDefinition,
    ObjectModelGet,
    ObjectModelPatch,
    MethodInvocation
  }
}
</script>
WARNING
If your Vue.js server is running, you need to restart it after updating the .env file. Otherwise,
the added configuration will not be read.
Let's try to use this functionality, provided your Edge module is still running. Provide the objectId of your module (you can find it in the logs of the module) and click "Start telemetry".
If everything is configured properly, the module should start producing the following logs:

First, you will see "Telemetry START" message, which is shown when the method invocation comes in.
Then, every telemetryInterval seconds a message with a random value will be sent (in the
presented example, every 3 seconds, because that is the value that we updated our module's
configuration with).
TIP
You can modify the telemetryInterval now, during the telemetry is being sent. Edge will adjust to
the new incoming configuration anytime you change it
You can also stop the telemetry sending anytime with "Stop telemetry" button.
Producing all this data is nice, but in the end we need some way to access it. Let's see an example of how we can do that. We will extend our SPA with a new (and last in this tutorial) component.
# Telemetry
Ability Platform allows you to produce/read three kinds of telemetrical data:
- variables
- alarms
- events
In this tutorial we will be dealing with variables only, however, the rest of them are handled in a similar way.
# Telemetry Service
Let's continue our SPA development. Create a new file src/telemetry/telemetryService.js:
import axios from 'axios';

async function getTelemetry(accessToken, objectId, variable, startTime) {

  const url = new URL(`v1/data/variables`, process.env.VUE_APP_INSTANCE_API_URL)

  const response = await axios({
    method: 'post',
    url: url.toString(),
    responseType: 'json',
    headers: { "Authorization": `Bearer ${accessToken}` },
    data: {
      date: {
        from: startTime
      },
      filter: `objectId='${objectId}' AND variable='${variable}'`
    }
  })

  return response.data
}

export { getTelemetry as default }
We've got one simple function that sends a POST request with some payload. In this case we want to
get data of some specified variable coming form a specified objectId and of a specified time
period (from startTime until now).
TIP
You can look here to see what other options you have when requesting telemetrical data.
Let's create a component that will use this function.
# Telemetry Component
We need to create a new file src/telemetry/Telemetry.vue:
<template>
  <div class="card" style="height: 100%">
    <div class="card-body">
      <h5 class="card-title">6. Warm Path</h5>
      <h6 class="card-subtitle text-muted mb-4">Fetch telemetry with selected filtering</h6>
      <div class="container">
        <div class="row">
          <div class="col-lg-6">
            <form @submit.prevent>
              <div class="form-group">
                <label for="objectIdTelemetryInput">ObjectId</label>
                <input
                  v-model="objectId"
                  type="text"
                  class="form-control"
                  id="objectIdTelemetryInput"
                  placeholder="00000000-0000-0000-0000-000000000000" />
                <small class="form-text text-muted">The objectId of the object that has some telemetry.</small>
              </div>

              <div class="form-group">
                <label for="variableInput">Variable Name</label>
                <input
                  v-model="variableName"
                  type="text"
                  class="form-control"
                  id="variableInput"
                />
                <small class="form-text text-muted">Some variable of your object.</small>
              </div>

              <div class="form-group">
                <label for="hoursInput">Time Interval (h)</label>
                <input
                  v-model="hoursInterval"
                  type="number"
                  class="form-control"
                  id="hoursInput"
                />
                <small class="form-text text-muted">How many hours back from now do you want to fetch the telemetry for.</small>
              </div>

              <button
                type="button"
                @click="getTelemetry"
                class="btn btn-primary mb-3"
                :disabled="!objectId || !variableName || !hoursInterval"
              >POST</button>
            </form>
          </div>

          <div class="col-lg-6">
            <label for="telemetryTextArea">Raw Data</label>
            <textarea id="telemetryTextArea" readonly v-model="textAreaData" class="form-control" rows="14"></textarea>
          </div>
        </div>
      </div>
    </div>
  </div>
</template>

<script>
import AuthService from "../auth/AuthService";
import getTelemetry from './telemetryService'

export default {
  name: "Telemetry",
  data: function () {
    return {
      authService: null,
      objectId: null,
      variableName: "temperature",
      hoursInterval: 1,
      textAreaData: null
    }
  },
  methods: {
    async getTelemetry() {
      try {
        this.textAreaData = null

        if (!this.authService.isAuthenticated()) {
          await this.authService.signIn();
        }
        const { accessToken } = await this.authService.getToken()

        const rawData = await getTelemetry(
          accessToken,
          this.objectId,
          this.variableName,
          this.getStartTimeISO())

        this.textAreaData = JSON.stringify(rawData, null, 2)
      }
      catch (error) {
        console.log(error)
        this.textAreaData = error;
      }
    },
    getStartTimeISO() {
      let date = new Date()
      date.setHours(date.getHours() - this.hoursInterval)
      return date.toISOString();
    }
  },
  created: function () {
    this.authService = AuthService.getInstance()
  }
};
</script>
If you've been following this tutorial until now, there are no surprises for you. A single thing to
note here is that the instance API expects timestamps to be UTC ISO8061 formatted strings. That's
why we have the getStartTimeISO function here.
As you probably could guess, we need to update src/App.vue once more:
<template>
  <div class="app">
    <header class="mb-4">
      <nav class="navbar navbar-light bg-white border-bottom">
        <div class="container">
            <span class="navbar-brand mb-0 h1 text-wrap">
            Getting Started with <span class="abb font-weight-bold">ABB Ability™ Platform
            </span></span>
        </div>
      </nav>
    </header>

    <main class="container">
      <div class="row">
        <div class="col-12 mb-4"><AccessToken /></div>
        <div class="col-lg-6 mb-4"><TypeDefinition /></div>
        <div class="col-lg-6 mb-4"><ObjectModelGet /></div>
        <div class="col-lg-6 mb-4"><ObjectModelPatch /></div>
        <div class="col-lg-6 mb-4"><MethodInvocation /></div>
        <div class="col-12 mb-4"><Telemetry /></div>
      </div>
    </main>

    <footer class="footer mt-4 p-3 bg-white border-top">
      <div class="container">
        <span class="text-muted">This application is part of the Ability Getting Started
        tutorial series that can be found on
        the <a target="_blank" href="https://clientsuccess.ability.abb">
        Ability Developer Portal</a>.</span>
      </div>
    </footer>
  </div>
</template>

<script>
import AccessToken from './auth/AccessToken';
import TypeDefinition from './typeDefinitions/TypeDefinition';
import ObjectModelGet from './objectModels/ObjectModelGet';
import ObjectModelPatch from './objectModels/ObjectModelPatch';
import MethodInvocation from './methods/MethodInvocation';
import Telemetry from './telemetry/Telemetry';

export default {
  name: 'App',
  components: {
    AccessToken,
    TypeDefinition,
    ObjectModelGet,
    ObjectModelPatch,
    MethodInvocation,
    Telemetry
  }
}
</script>
Let's have a look at our new component:
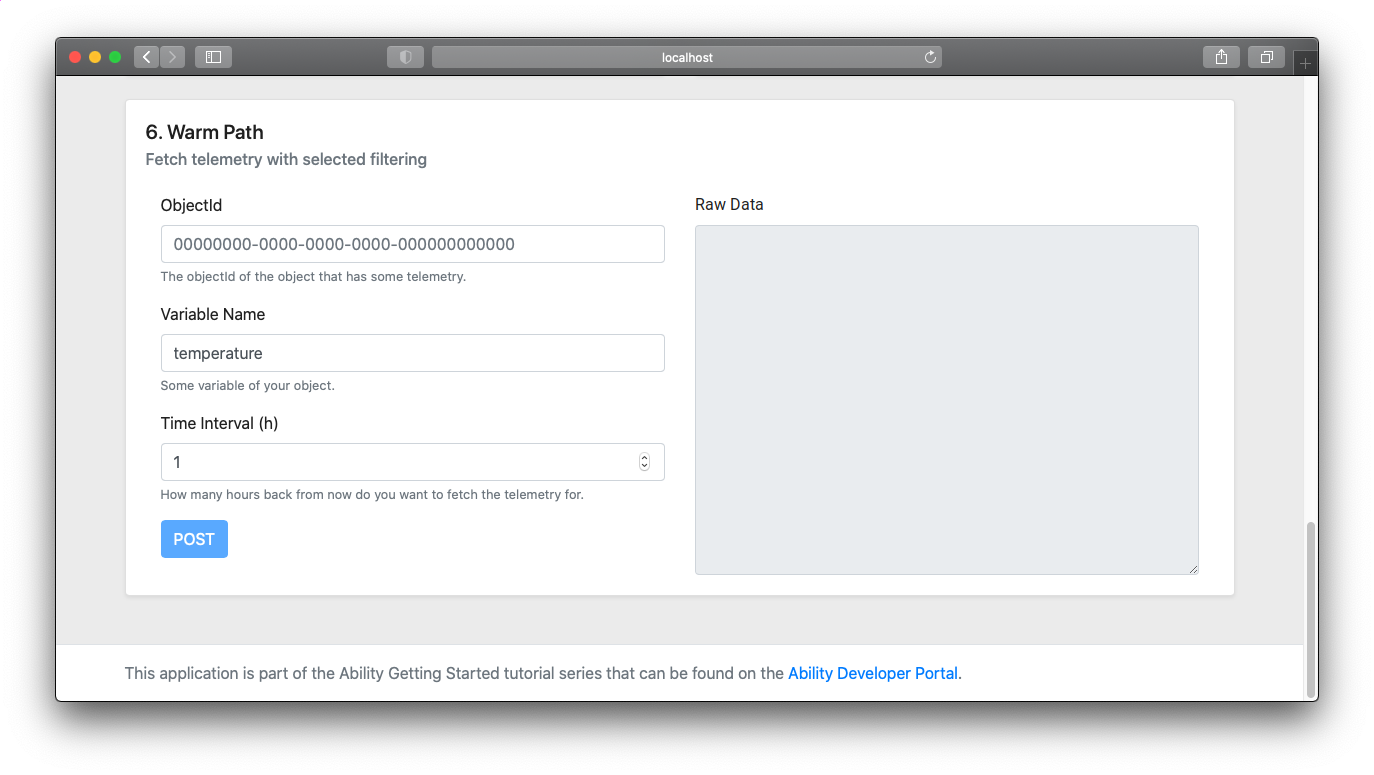
Let's try to use it. Hopefully your module has managed to produce a good amount of data that you will be able to see in the SPA.
WARNING
The data that you are retrieving in the SPA module is coming to you from the cloud where it is stored. It is not sent to you directly from the device. You could say that the Ability Platform is a proxy between you and the temperature sensor that you want to get the data from.
TIP
The way of retrieving telemetry that we used is not the only one. You can also create a "hot path" subscription where the data wil be coming to you every time a new data point comes into the cloud. In our approach you'd have to send a separate request every time you want to get fresh data. You can read more about hot path subscription here.
# Visualizing Data
You should have already managed to get the timeseries data and display it in the app, but it's a bit dull, don't you think? We're basically displaying the JSON that the API delivers to us:
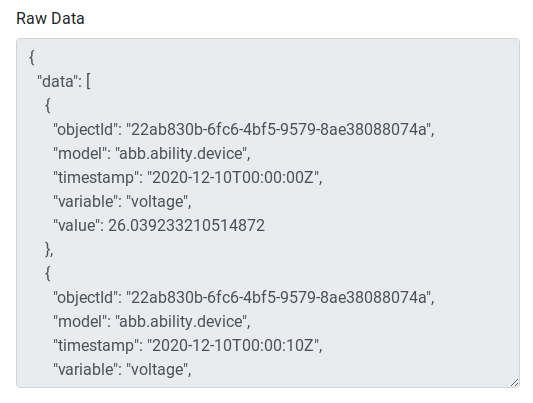
Let's try to make our application a little bit more attractive by turning this data into a line chart.
TIP
Treat this section as an optional one. It will not teach you anything strictly Ability Platform related. Instead, we will build on top of what we already have, trying to make the data presentation a bit more pleasant. It should help to make your app look more interesting if you were to show what you have built to your colleagues - I mean, who wants to look at raw JSON!
First of all, let's install a package that will make things very easy for us - vue-chartjs. It is basically a wrapper around the popular Chart.js library, ready to use with Vue.js-based projects (like ours).
npm install vue-chartjs@3.5.1 chart.js@2.9.4 --save
# Chart component
With the package installed, we will continue by creating a new component - Chart.vue.
We need to create a new file src/telemetry/Chart.vue:
<script>
import { Scatter } from "vue-chartjs";

export default {
  name: "Chart",
  extends: Scatter,
  props: {
    chartdata: {
      type: Object,
      default: null,
    },
    height: {
      type: String,
      default: "200px",
    },
  },
  mounted() {
    this.renderChart(this.chartdata, {
      scales: {
        xAxes: [
          {
            type: "time",
            time: {
              displayFormats: {
                quarter: "MMM YYYY",
              },
            },
          },
        ],
      },
    });
  },
};
</script>
This simple component will allow us to display a chart in our application. It was created based on examples in the documentation of vue-chartjs.
# Extending Telemetry component
Since we already have a "box" that displays timeseries data, let's extend it
with the addition of the Chart component.
First, let's import the new component into the Telemetry.vue one:
import AuthService from "../auth/AuthService";
import getTelemetry from "./telemetryService";
import Chart from "./Chart";
Additionally, we need to add the components array into our Telemetry
component declaration:
export default {
  name: "Telemetry",
  components: {
    Chart
  },
...
Next, we will extend the data part of our component with chartData:
data: function () {
  return {
    authService: null,
    objectId: null,
    variableName: "temperature",
    hoursInterval: 1,
    textAreaData: null,
    chartData: null
  };
},
We will later bind the Chart to this variable as a source of its data.
The last thing to do in the "script" area of the component is to extend the
getTelemetry method:
async getTelemetry() {
  try {
    this.textAreaData = null
    this.chartData = null

    if (!this.authService.isAuthenticated()) {
      await this.authService.signIn()
    }
    const { accessToken } = await this.authService.getToken()

    const rawData = await getTelemetry(
      accessToken,
      this.objectId,
      this.variableName,
      this.getStartTimeISO()
    )

    this.textAreaData = JSON.stringify(rawData, null, 2)

    if (rawData?.data?.length > 0) {
      this.chartData = {
        datasets: [
          {
            label: `${this.variableName} (${this.objectId})`,
            borderColor: "#E64997",
            fill: false,
            lineTension: 0,
            showLine: true,
            pointRadius: 0,
            data: rawData.data.map(n => ({ x: new Date(n.timestamp), y: n.value }))
          },
        ],
      }
    }

  } catch (error) {
    console.error(error)
    this.textAreaData = error
  }
}
Now, we can extend the template with the following:
<div class="col-lg-6">
<label for="telemetryTextArea">Raw Data</label>
<textarea
id="telemetryTextArea"
readonly
v-model="textAreaData"
class="form-control"
rows="14"
></textarea>
</div>
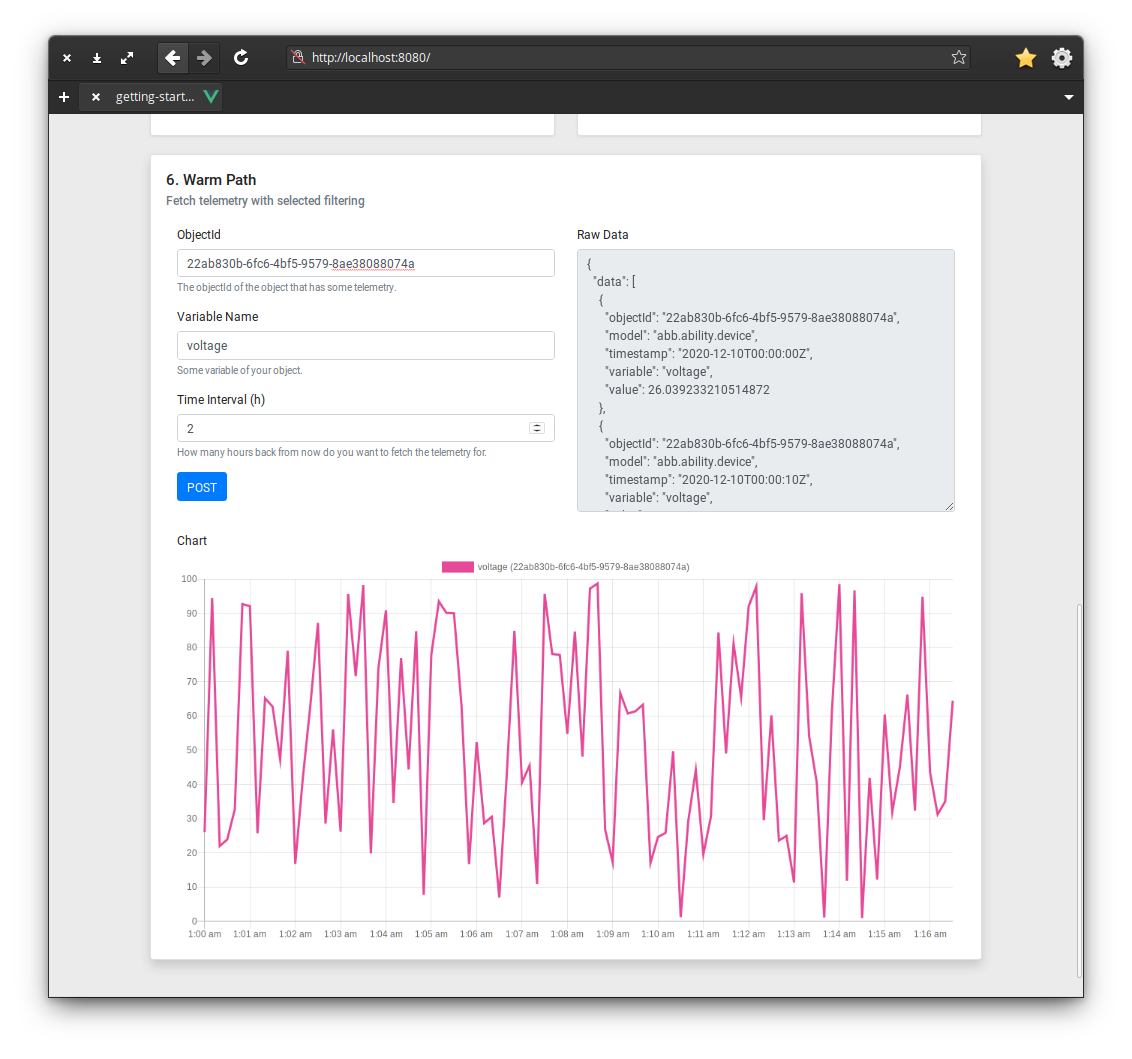
<div v-if="chartData !== null" class="col-12 mt-4">
<label>Chart</label>
<Chart :chartdata="chartData"></Chart>
</div>
We've placed the Chart just below the text area that we had
previously. It will show up only if the chartData contains anything other than null.
This is basically it. Start the application, query for the timeseries data, and you should see something like this:
# Summary
Wow, did you really get through the whole tutorial? If so, congratulations. Hopefully you learned something during the way and are already finding ways to use that knowledge. Feel free to navigate this portal to learn more. In case of any questions, we're waiting for your queries.