# SPA Authorization
In this article we will finally start to code the solution. Our environment was set up and we are ready to use the created entities (application, grant) to our advantage.
Before we jump to the code editor, let's look at the end result that we are aiming for:
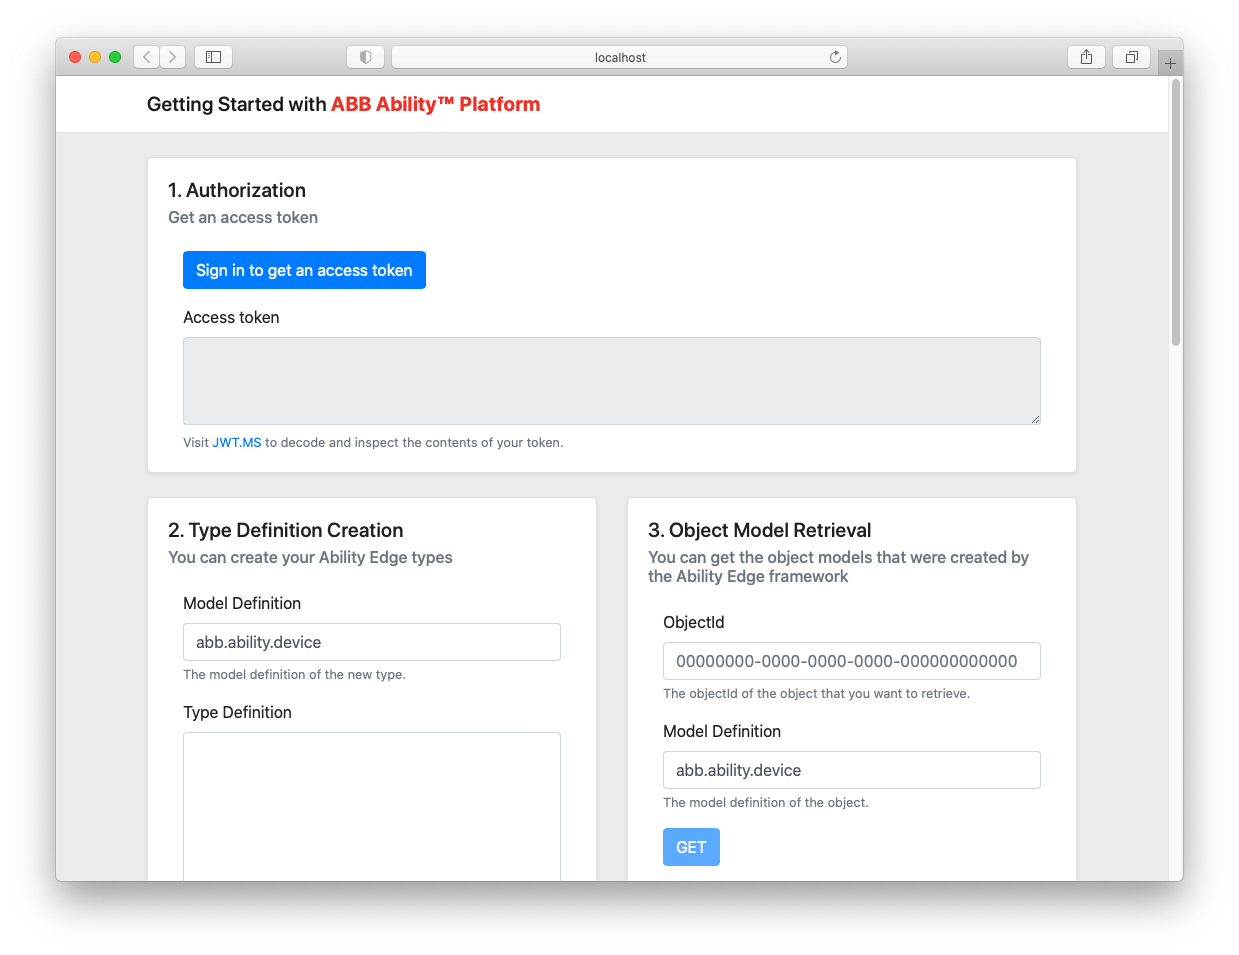
The application will consist of six modules/boxes that we will be creating in this tutorial series. Each module will be crated to teach you some new concept in the process. In this article, we will focus on the first one, which you can see above - Authorization. Its role is to log the user in and display an access token for further inspection.
WARNING
In a real application it is not recommended to allow the users to view the access tokens. However, for our tutorial needs, it was desired.
# Architecture
Let's look briefly at a schema of the app that we will build to understand what are its building blocks:
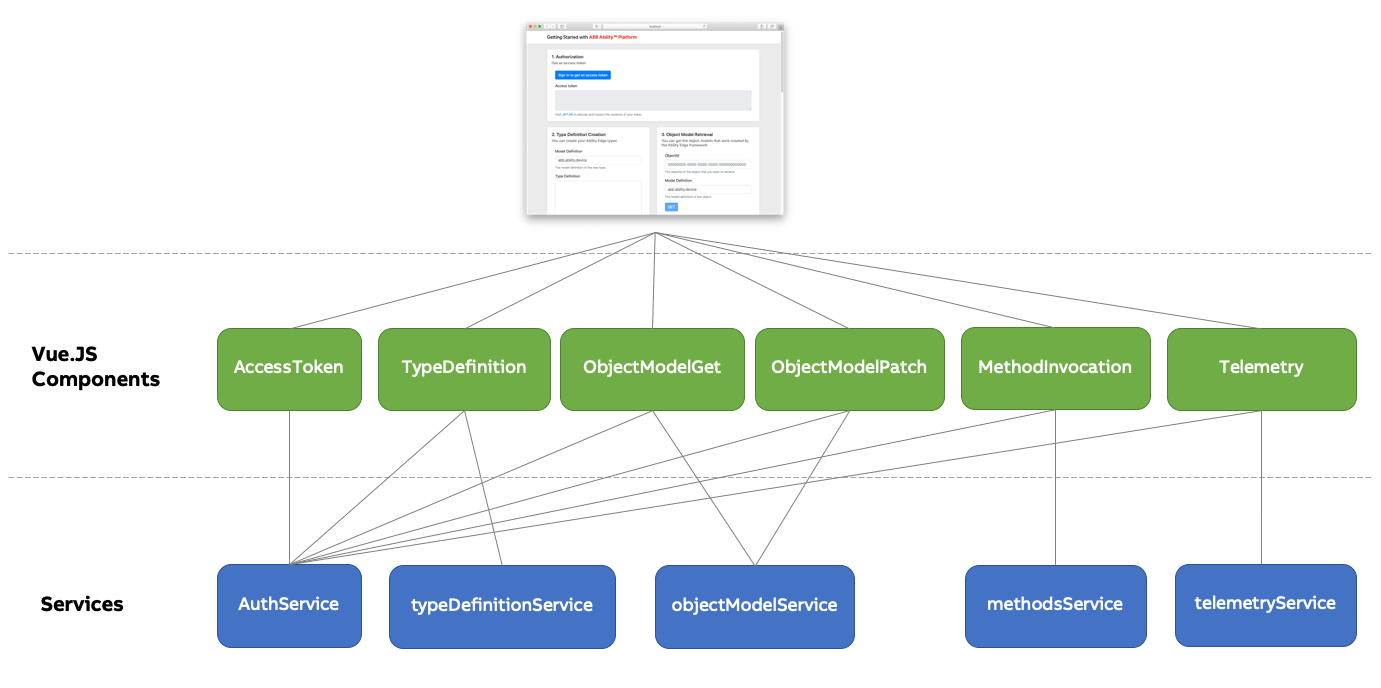
There seems to be a lot going on, however, the overall project is rather simple. Each "module" on th
page is one component (there is 6 of them). Each component uses some services. All of them rely on
the AuthService in order to retrieve an access token for communication with the API. The other
services expose selected Ability API functionalities.
App component
The diagram skips the App component, which is at the root of the application.
In this article we will create AccessToken component and the AuthService class.
# Authorization Method
Ability Platform protects its APIs using the industry standard OAuth2 suite of protocols. The main idea behind it is that accessing API endpoints requires possession of an access token. Access token is basically an encoded string that allows the server to understand if you are authorized to do the operation that you requested (like getting some data, or updating it, etc.). OAuth2 defines a few authorization flows, each one targeting specific case. I.e., a Client Credentials flow is ideal for cases where the application should access some protected server without any user context. It could be some kind of web job running on schedule every hour, generating some reports based on data that it fetches from the server.
In this tutorial series we are building a SPA (Single Page App). These are web applications meant to be used in a browser with users logged in. Client Credentials flow would be a very bad choice here. Instead, we need to use some authorization flow which is suited for web apps that are accessed by users. We are going to go with Authorization Code with Proof Key for Code Exchange (PKCE) flow. It is currently the recommended flow to be used in the cases as ours. Additionally, using it will make you prepared for the upcoming OAuth2.1 update of the protocol, which is going to promote PKCE and drop support for some other flows, like implicit grant, which is considered legacy.
# App Initialization
As mentioned in the prerequisites, we will be using Vue.js framework to speed up the development of the app and skip the hassle of dealing with the HTML DOM elements. If you're familiar with any SPA component-based JS framework (i.e. Angular, React), you should be rather familiar with what we'll be doing.
TIP
One thing that needs to be made clear: the technologies that we're using during this tutorial (Node.js, Vue.js, etc.) were chosen due to their simplicity and clarity (in our humble opinion). We do not make any recommendations in this area - you are free to use any software development stack that your project requires and that your business department allows you to use.
# Vue CLI
Let's start off with installation of the Vue CLI, which will allow us to manage our app's dependencies through NPM. Additionally it will let us do things like:
- defining and loading environment variables
- running development server that reloads our app every time we change some code
Open your terminal and run the command:
npm install -g @vue/cli
This will install Vue CLI. You can verify that the installation was successful by running:
vue --version
If it returns a version, installation was successful. Navigate to the directory where you want the code files to be stored and run:
vue create ability-getting-started-spa
Obviously, you can call your app any way you like.
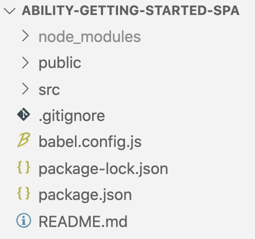
Select the "Default (Vue 3)" preset and continue (we will be using Vue 3). The whole process is described in detail here.
After these steps you should end up with a project structure as below:
# Test run
Let's try to run the app as it is now. Run the following command in the terminal:
npm run serve
You should get a result similar to this one:
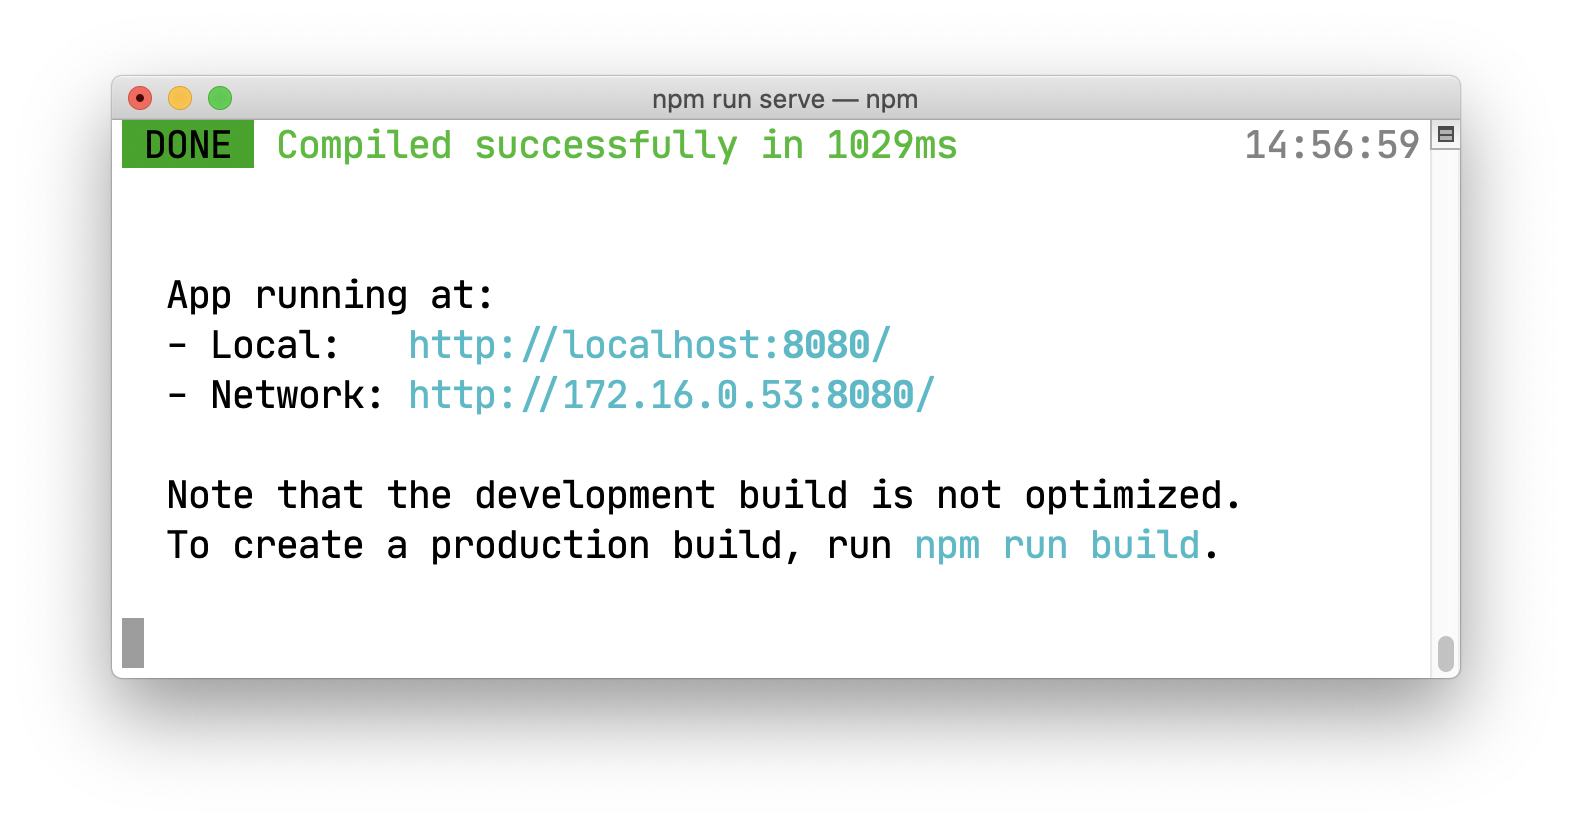
When you follow the link http://localhost:8080 in your browser, you should see:
If that works, you are on the right way. The command that you just run is very useful during development since it will automatically reload your app when you make changes to the source code.
# Packages
Let's install some packages that will be useful:
npm install @azure/msal-browser bootstrap
We'll be using msal-browser for authorization purposes. Bootstrap will allow us to not focus too much on CSS styling.
# Eslint Rule
Vue-CLI installed eslint package into your application (you can see that in
package.json file). It is a JavaScript linter that statically analyzes your
code and informs you if it finds any issues. By default, it is rather strict,
i.e. it will throw an error (and disallow the application to run) if it finds
some unused variables defined in your code. It might become problematic during
the tutorial, and you might want to relax that rule. Here's an example of
eslintConfig that we used in package.json:
"eslintConfig": {
  "root": true,
  "env": {
    "node": true
  },
  "extends": [
    "plugin:vue/essential",
    "eslint:recommended"
  ],
  "parserOptions": {
    "parser": "babel-eslint"
  },
  "rules": {
    "no-unused-vars": "off"
  }
}
It differs from the default configuration in a rule that we've added. Update
your package.json with that small change and save the file. If your app is
running, you might need to restart it for the new config to be applied (press
Ctrl+C in your terminal window and rerun npm run serve).
You will not see any difference in runtime, however, it might save you from
some annoying errors while you're coding later on.
# Environment Variables
Our application will use a few values that are configuration kind of data. Instead of putting them all over our source code, let's keep them in one file, for easier access.
Create a file called .env (in the root directory of your project, the same one where the src
folder lives).
TIP
We assume that you have bash shell installed, and the touch command is
available. However, you can create the file in any other way you like.
touch .env
Inside of this file, add the following contents:
VUE_APP_AUTH_CLIENTID=
VUE_APP_AUTH_AUTHORITY=
VUE_APP_AUTH_B2C_DOMAIN=
VUE_APP_AUTH_SCOPE=
VUE_APP_AUTH_REDIRECT_URI=
All of the values above will be needed for the authorization process. For now, there are no values, we need to fill them in. Let's discuss each one of them.
Authorization Parameters
You can find a dedicated page on ADP that discusses OAuth 2.0 authorization parameters here.
# Client Id
The first parameter is VUE_APP_AUTH_CLIENTID. it is the ID of the application that you created in
the Admin Portal, not so long ago. Go back to the Portal, navigate to your application and copy its
Id:
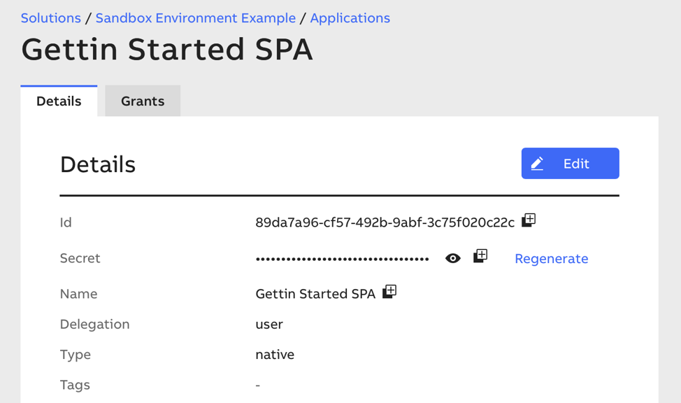
In the example above, the clientId is 89da7a96-cf57-492b-9abf-3c75f020c22c. Yours will be
different.
# Authority
The VUE_APP_AUTH_AUTHORITY parameter is the URL of the authority endpoint for your tenant and
solution. It has the following format:
https://<B2C_TENANT_NAME>.b2clogin.com/<B2C_TENANT_NAME>.onmicrosoft.com/B2C_1A_<TENANT_NAME>_RP
The B2C_TENANT_NAME is the name of the B2C tenant that is associated with your Ability Platform
instance. You can find it in a table of platform parameters that you received when you got access to
your platform instance.
Sandbox Users
Sandbox users can find the full B2C domain under "B2C Tenant Domain" parameter.
The <TENANT_NAME> is under Tenant Name (if it has any spaces, replace them with dashes ("-")).
TIP
Azure Active Directory B2C is an identity management service that is used by Ability Platform. You can read more about B2C parameters here.
The TENANT_NAME is the name of the tenant in the Admin Portal that you are logging with (with
spaces replaced with dashes). For most users it would be abb-ability. If you're a Sandbox user, go
to the "Tenants" tab of the Admin Portal and copy the Name of your tenant (again, replace spaces
with dashes).
An example of VUE_APP_AUTH_AUTHORITY could be:
https://Abilityrst15EunOps.b2clogin.com/Abilityrst15EunOps.onmicrosoft.com/B2C_1A_us-john-smith-tenant_RP
TIP
The above authority string will not work, you need to provide your own.
# B2C Domain
The VUE_APP_AUTH_B2C_DOMAIN parameter has the following format:
<B2C_TENANT_NAME>.b2clogin.com
Since you already had to use the <B2C_TENANT_NAME> value in the VUE_APP_AUTH_B2C_DOMAIN
parameter, just reuse it here.
# Scope
Another string that you need to prepare is for the VUE_APP_AUTH_SCOPE parameter. Its format is:
https://<B2C_TENANT_NAME>.onmicrosoft.com/<SOLUTION_NAMESPACE>/instance
You should already know how to find the <B2C_TENANT_NAME>.
SOLUTION_NAMESPACE may be taken from the Admin Portal, in the "Details"
view of your solution:
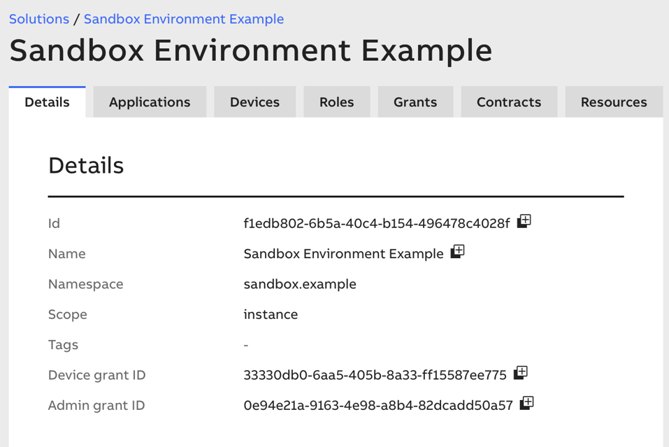
The value is titled Namespace.
# Redirect URI
This one is simple. The value for VUE_APP_AUTH_REDIRECT_URI is the Redirect URI that you had to
fill in while creating an application entity in the Admin Portal. It will be
http://localhost:8080, since this is the default URL used by Vue CLI when running an app.
When you collect all of the values fill them into the .env file.
TIP
.env file is being read by Vue CLI when building your app and the values are being used in the
appropriate places (which you will see in a moment). Make sure to restart the npm run serve
command anytime you modify the .env file. Otherwise, the changes will not be picked up.
# Styles and main.js
Before we move on, let's create a style.css file in the src/ directory with the following
contents:
body {
    background: #EBEBEB;
    color: #1F1F1F;
}
.app {
    display: flex;
    flex-direction: column;
    min-height: 100vh;
}
main {
    flex: 1;
}
.abb {
    color: rgb(234, 51, 40)
}
.card {
    box-shadow: 0 .125rem .25rem rgba(0,0,0,.075);
    transition: box-shadow 300ms;
}
.card:hover {
    box-shadow: 0 .5rem 1rem rgba(0,0,0,.15);
}
These styles will make our app look just a little bit better.
Additionally, modify the src/main.js file so that it looks like this:
import { createApp } from 'vue'
import App from './App.vue'
import 'bootstrap/dist/css/bootstrap.min.css';
import './style.css';

createApp(App).mount('#app')
Basically, we imported bootstrap together with our custom CSS file.
# AuthService Class
We'll start the actual coding from the AuthService class. This class will make use of the
msal-browser package that we installed. AuthService will also make use of authConfig.json that
we need to define.
TIP
Our AuthService is a simplified version of an example provided by Microsoft at
GitHub.
Create a new file src/auth/authConfig.js:
const msalConfig = {
  auth: {
    clientId: process.env.VUE_APP_AUTH_CLIENTID,
    authority: process.env.VUE_APP_AUTH_AUTHORITY,
    knownAuthorities: [process.env.VUE_APP_AUTH_B2C_DOMAIN]
  },
  cache: {
    cacheLocation: "sessionStorage", // This configures where your cache will be stored
    storeAuthStateInCookie: false, // Set this to "true" if you are having issues on IE11 or Edge
  }
}

const loginRequest = {
  scopes: [process.env.VUE_APP_AUTH_SCOPE, "openid"],
  redirectUrl: process.env.VUE_APP_AUTH_REDIRECT_URI
}

const tokenRequest = {
  scopes: [process.env.VUE_APP_AUTH_SCOPE],
  forceRefresh: false // Set this to "true" to skip a cached token and go to the server to get a new token
}

export { msalConfig, loginRequest, tokenRequest }
This file uses the values that were defined by us in the .env file. Each time process.env.* is
there, the environment variable is used.
Next, create the file src/auth/AuthService.js:
import * as msal from "@azure/msal-browser";
import { msalConfig, loginRequest, tokenRequest } from "./authConfig";

class AuthService {
  static instance

  constructor() {
    this.msalApp = new msal.PublicClientApplication(msalConfig)
  }

  static getInstance() {
    if (AuthService.instance) {
      return AuthService.instance
    }

    AuthService.instance = new AuthService()
    return AuthService.instance
  }

  async signIn() {
    return await this.msalApp.loginPopup(loginRequest).then((resp) => {
      if (resp !== null) {
        this.accountId = resp.account.homeAccountId
      } else {
        const currentAccounts = this.msalApp.getAllAccounts()
        if (!currentAccounts || currentAccounts.length < 1) {
          return
        } else {
          this.accountId = currentAccounts[0].homeAccountId
        }
      }
    })
  }

  isAuthenticated() {
    const accounts = this.msalApp.getAllAccounts()
    return (accounts && accounts.length > 0)
  }

  getAccount() {
    if (this.accountId) {
      return this.msalApp.getAccountByHomeId(this.accountId)
    } else if (this.msalApp.getAllAccounts() && this.msalApp.getAllAccounts().length !== 0) {
      return this.msalApp.getAllAccounts()[0]
    }
    return null
  }

  async getToken() {
    const request = {
      ...tokenRequest,
      account: this.getAccount()
    }

    return await this.msalApp.acquireTokenSilent(request).catch(async (error) => {
      console.log("silent token acquisition fails.")
      console.log("acquiring token using popup")
      return await this.msalApp.acquireTokenPopup(request)
    })
  }
}

export { AuthService as default }
As you can see, this class is a singleton. Just one instance of it will be created during the
runtime and it will be used by all of our components. As you can see, we are using popup as a method
to acquire a token. The usage of msal-browser makes this class rather consise considering that
this is a core service of our application.
Let's move on to create our first Vue.js component.
# AccessToken Vue.js Component
Create a new file src/auth/AccessToken.vue:
<template>
  <div class="card" style="height: 100%">
    <div class="card-body">
      <h5 class="card-title">1. Authorization</h5>
      <h6 class="card-subtitle text-muted mb-4">Get an access token</h6>
      <div class="row">
        <div class="container">
          <div class="col-12">
            <button
              type="button"
              class="btn btn-primary mb-3"
              @click="getAccessToken"
            >Sign in to get an access token</button>
          </div>
          <div class="col-12">
            <label for="accessTokenTextArea">Access token</label>
            <textarea id="accessTokenTextArea" readonly v-model="result" class="form-control mb-2" rows="5"></textarea>

            <small class="form-text text-muted">
              Visit
              <a target="_blank" href="https://jwt.ms">JWT.MS</a> to decode and inspect the contents of your token.
            </small>
          </div>

        </div>
      </div>
    </div>
  </div>
</template>

<script>
import AuthService from "./AuthService";

export default {
  name: "AccessToken",
  data: function () {
    return {
      authService: null,
      result: null,
    };
  },
  methods: {
    getAccessToken: async function () {
      try {
        this.result = null
        await this.authService.signIn();
        const { accessToken } = await this.authService.getToken();
        this.result = accessToken;
      } catch (error) {
        this.result = error;
      }
    },
  },
  created: function () {
    this.authService = AuthService.getInstance();
  },
};
</script>
If this is the first time you're seeing a Vue.js code, let's break it down a bit. We've got both the
HTML and the script that controls it in the same file. The whole file is like an HTML template file
that contains the various parts in separate "containers". template is used for HTML markup,
script contains JavaScript and, optionally, there could also be a style container for CSS.
Every Vue.js component needs to export an object that will contain the component's private data
and methods. In the case of AccessToken component we have two fields in the data object:
authService- a singleton instance of ourAuthServiceclassresult- a variable that will store the access token. It is used in the HTML markup to display its content in thetextarea(v-model="result").
We've got just a single method called getAccessToken. It is called when the user pressed a
button. It makes use of our AuthService instance to get the token.
The last piece in the created function. It is one of the Vue.js lifecycle hooks. It is run
automatically when our component's instance is created. We use it to obtain the singleton instance
of AuthService. It is done the same way in every component that we create in this tutorial
series.
# App Component
Now that we have the AccessToken component ready, let's try to put it on the screen. We need to
modify the src/App.vue file that was created automatically for us by the Vue CLI. If you look into
it you will see that it displays an HelloWorld component (another one that was created
automatically for us). You can delete the /src/components/HelloWorld.vue - we will not need it.
Now, let's update the contents of src/App.vue:
<template>
  <div class="app">
    <header class="mb-4">
      <nav class="navbar navbar-light bg-white border-bottom">
        <div class="container">
          <span class="navbar-brand mb-0 h1 text-wrap">
          Getting Started with <span class="abb font-weight-bold">ABB Ability™ Platform
          </span></span>
        </div>
      </nav>
    </header>

    <main class="container">
      <div class="row">
        <div class="col-12 mb-4"><AccessToken /></div>
      </div>
    </main>

    <footer class="footer mt-4 p-3 bg-white border-top">
      <div class="container">
        <span class="text-muted">This application is part of the Ability Getting Started
        tutorial series that can be found on
        the <a target="_blank" href="https://clientsuccess.ability.abb">
        Ability Developer Portal</a>.</span>
      </div>
    </footer>
  </div>
</template>

<script>
import AccessToken from './auth/AccessToken';

export default {
  name: 'App',
  components: {
    AccessToken
  }
}
</script>
Save the file and run the command:
npm run serve
Navigate to http://localhost:8080 in your browser. You should see the following result:
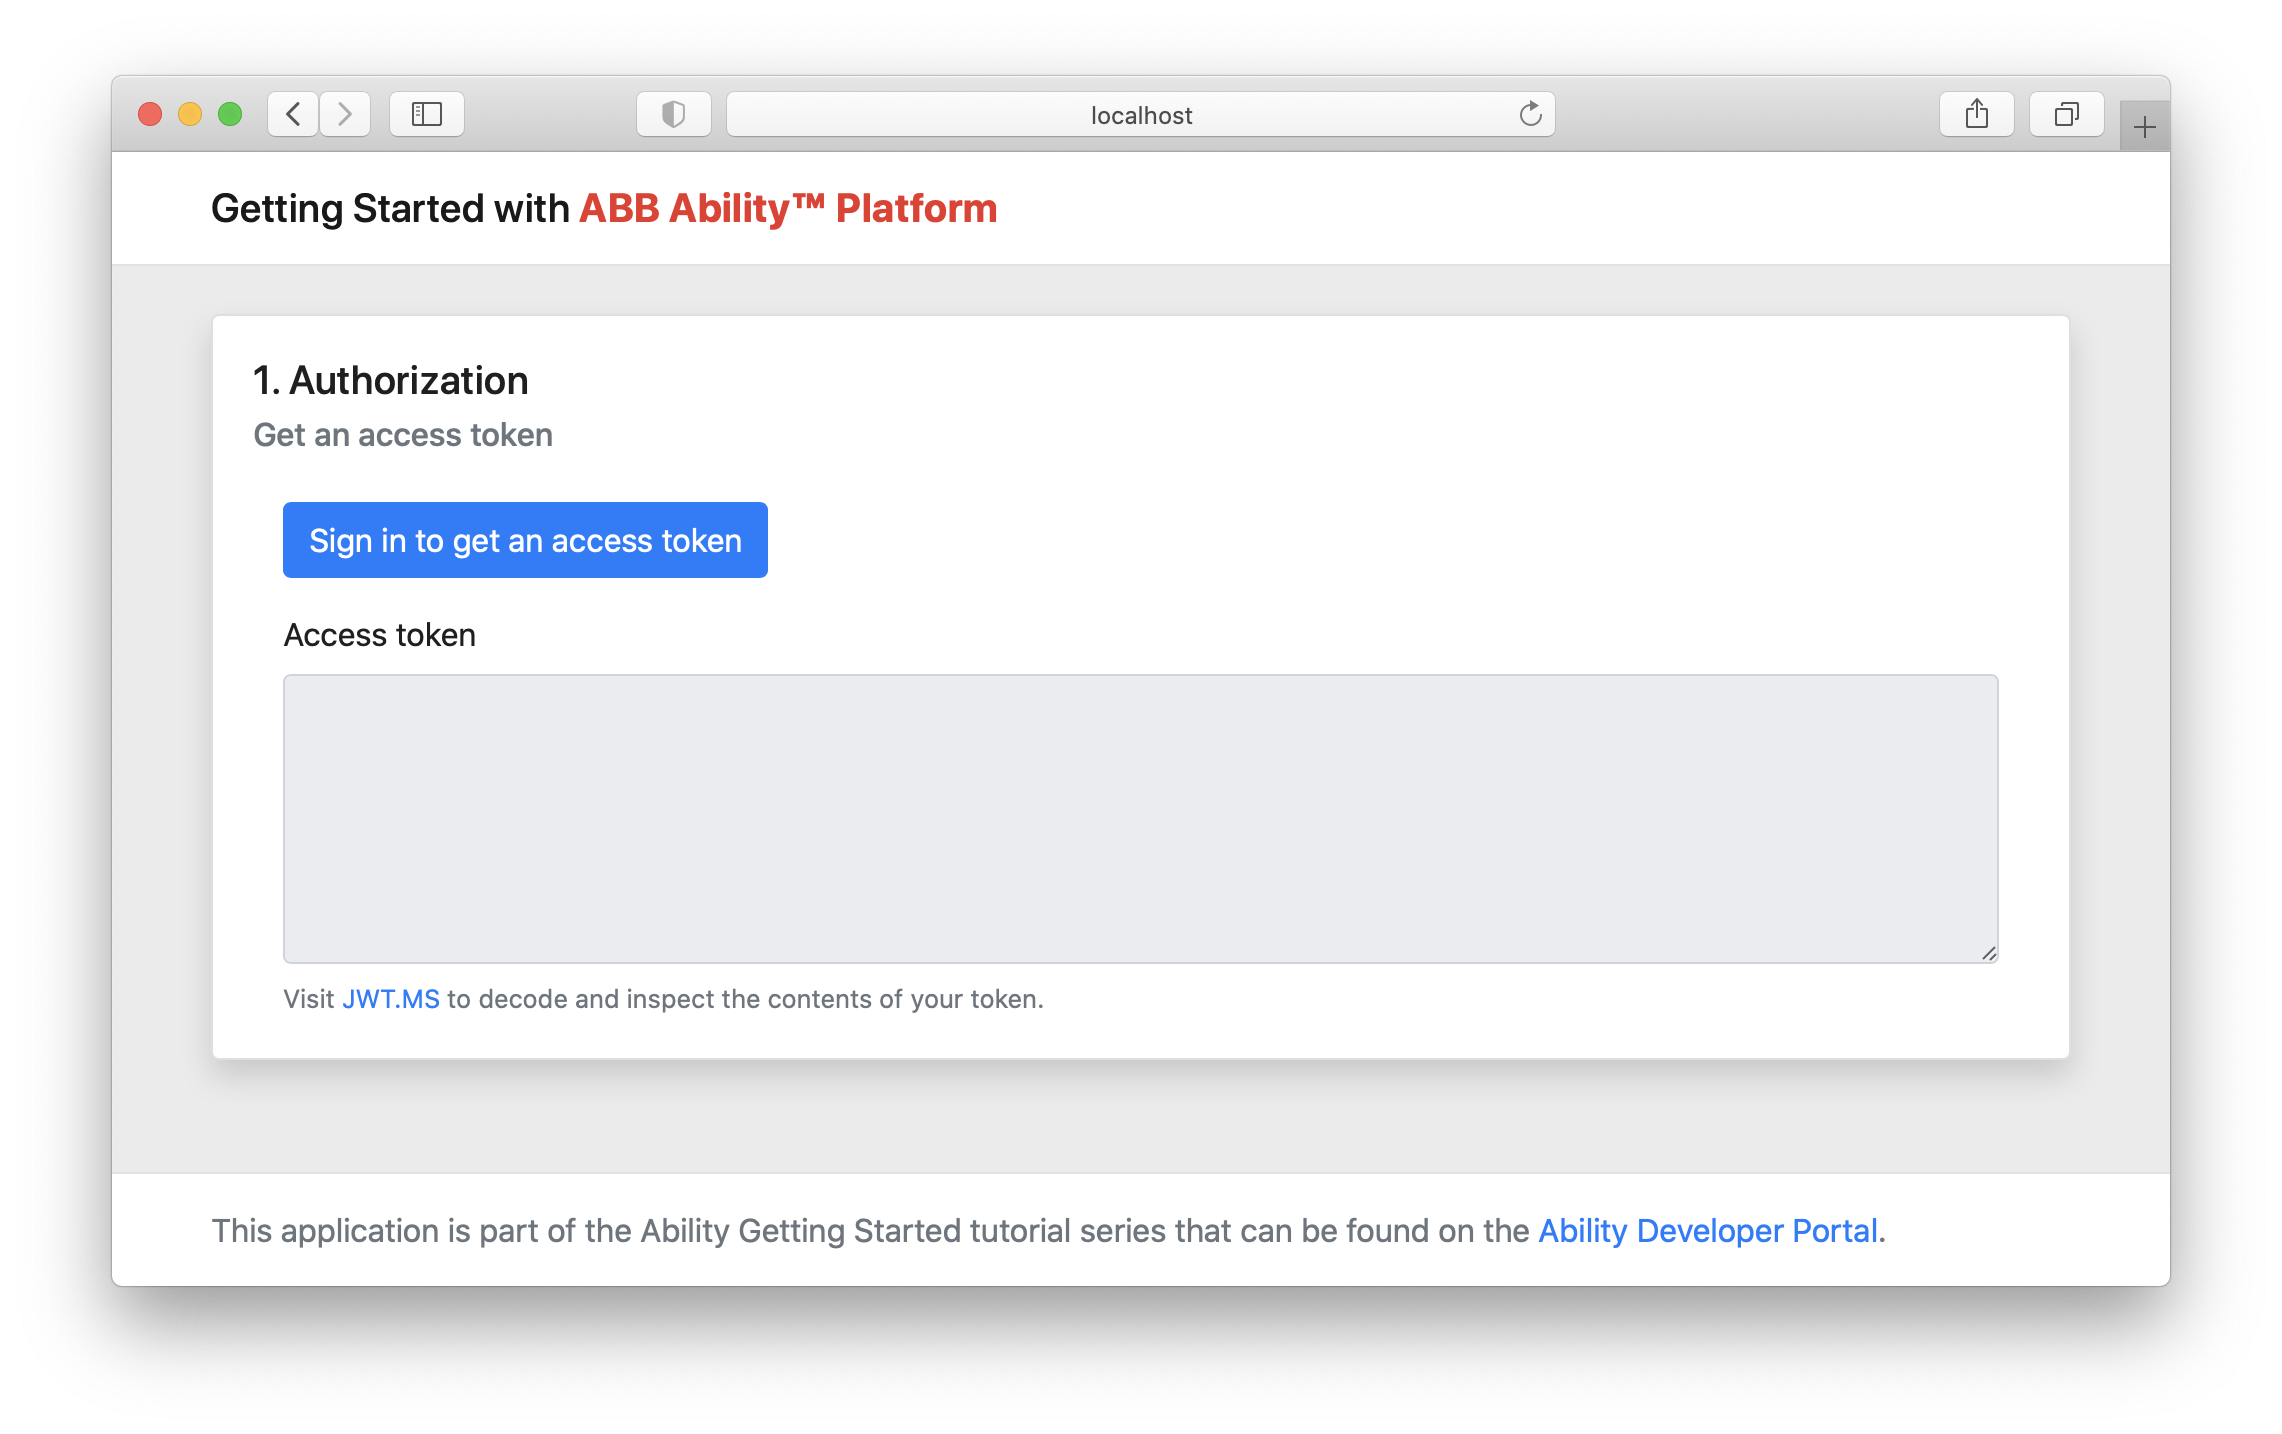
The final test is to press the "Sign in" button and see if you are able to get an access token. if something fails in this process, there are a few things that could go wrong. Make sure that you check well these items:
- correct configuration values in the
.envfile - correctly assigned grant to yourself and your application in the Admin Portal
TIP
If the app does not work as you'd expect, you will most likely find some errors in the console of
your browser. Possibly, you just need to restart the Vue.js server and run it again with npm run serve. If you cannot find any issue in your code, feel free to drop us an email. We'll have a look.
# Summary
In this module of the tutorial we were dealing with all things related to authorization of our application. Hopefully you were able to get an access token. Just below the token area there is a link to jwt.ms. Try to paste your token in there to see what is actually encoded in it. You should see the four permissions that you selected in the Admin Portal. This is how the API server knows what your app is allowed to do!
An access token by itself is not very exciting. We wanted to have a device and an SPA to interact with the APIs. Continue to the next article to get closer to that end goal.